Fun Friday – Exploring Bubbles!

Fun Friday – Exploring Bubbles!

WHAT IS A BUBBLE?

A bubble is a thin film of liquid filled with air or another gas. Most bubble are made up of soapy water and air.

LET’S LEARN MORE…

No matter what shape a bubble starts off as, it will always try to form a round shape (called a sphere). A sphere is the shape that allows the least amount of surface area – and therefore the least amount of energy is needed to maintain this shape.

If one or more bubbles touch they will loose their sphere shape – the walls of the touching bubbles will merge. If both bubbles are the same size the shared wall will be flat!

The walls of joined-up bubbles always meet at an angle of 120 degrees

photo credit: kaibara87 via photopin cc
photo credit: Jeff Kubina via photopin cc


WHAT COLOUR IS A BUBBLE?

Bubbles reflect colours from their surroundings so at first they may appear rainbow coloured.

As time goes on the colour of the bubble changes until finally the bubble appears colourless – and then it bursts


HOW DOES IT WORK?

The sphere of a bubble is made up of two layers – an inner wall and an outer wall. As light waves hit the bubble they are reflect off both walls. The walls of the bubble gradually weaken and the distance between the two walls reduces until the reflected light waves cancel each other out and the colour disappears.

 Did you know… The skin of a bubble is less than one thousandth of a millimetre thick!


EXPERIMENTS TO TRY AT HOME

Make your own bubble solution!

 Commercial bubble solutions are great but they can be expensive, so why not make your own? There are lots of good recipes that work really well but this is the one I usually use! 
You will need… a clean, dry empty plastic bottle (1 litre), 4 tblsp (60ml) washing-up liquid, 2 cups (480mls) clean water, 2 tblsp (30ml) glycerine
What to do: Before you start make sure the bottle, your hands and any measuring utensils are clean and dry. Carefully measure out each ingredient and add, one by one to the bottle, trying not to make the mixture get too bubbly. Once everything has been added stir slowly and carefully. Cap the bottle and leave it in a safe place overnight. The bubble solution is ready to use the next day.
Some tips: When making your bubble solution make sure you use “original” washing-up liquid and not any of the scented varieties! If possible, use bottled or filtered water rather than tap water.


So now what?… Now start making bubbles!! If you don‛t have any bubble wands you can make your own using some pipe cleaners. Try shaping the pipe cleaners into different shapes and see how the bubble will still always end up as a sphere shape.

 Did you know… The biggest free- floating soap bubble ever blown was 105.4 cubic feet. It could have held 788 gallons of water!


If you really want to scale it up make extra bubble solution and us a small paddling pool and a hoola hoop to make some mega bubbles!
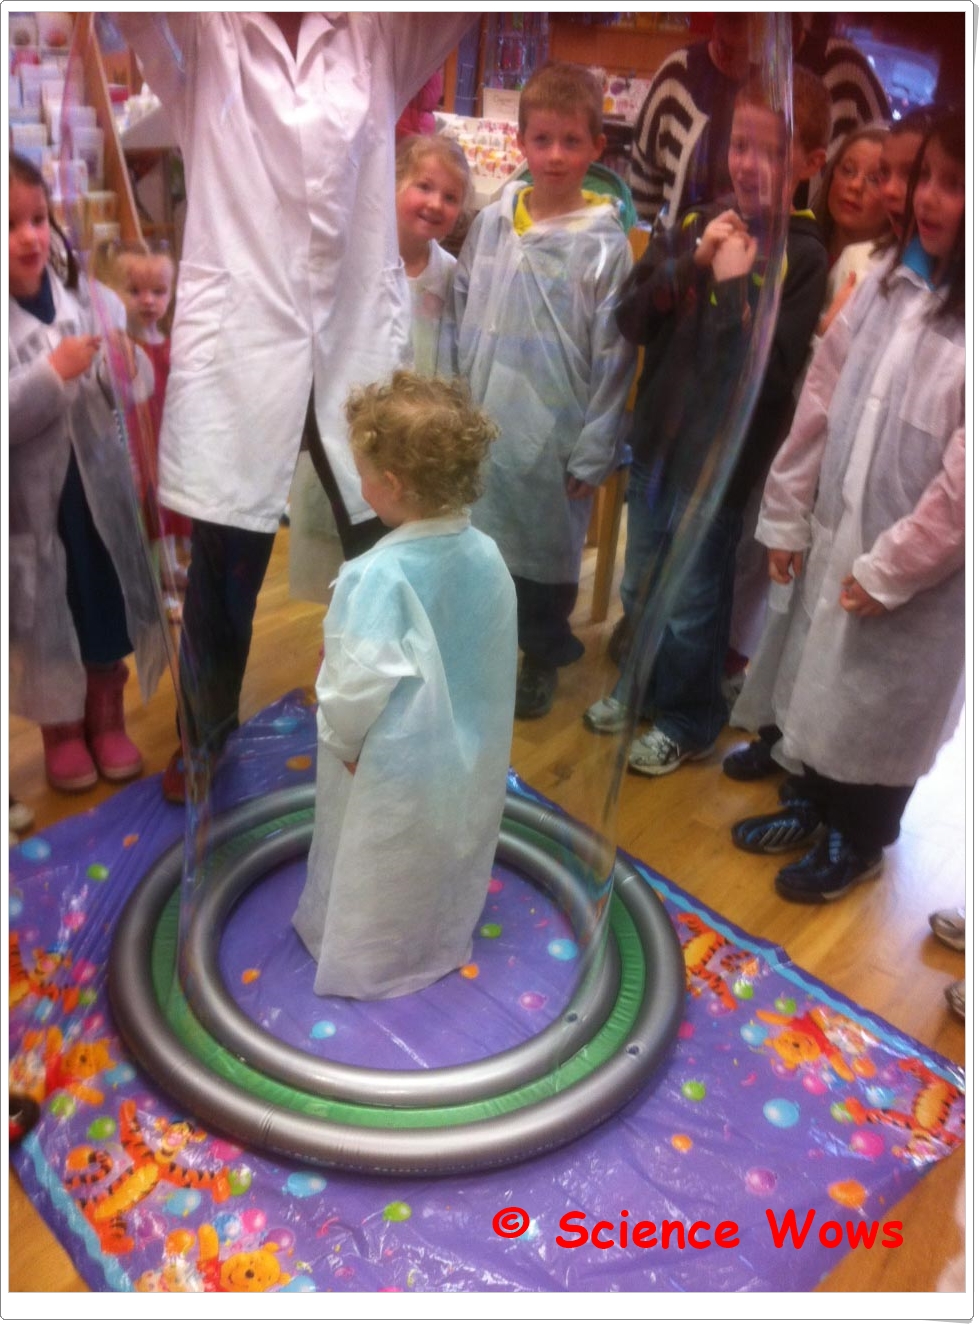
 

This is a photo of my son in a big bubble made using a commercial bubble ring


Did you know… The world record for the most people inside a bubble was set in 2006 by Sam Heath; His bubble contained 19 girls and boys over five feet tall!!


BUBBLE ART:

You will need.. bubble solution, food colouring, plastic cup, a straw, paper.


What to do: Pour bubble solution into the plastic cup until the cup is about one third full. Add two tablespoons of food colouring to the bubble solution and mix it well. Place the straw into the bubble solution and keep blowing until the bubbles are coming out of the pot.

Lower the piece of paper onto the bubbles to make an imprint (do not let the paper touch the plastic cup).  Lift off the paper and allow your bubble art to dry.

You can repeat the process using different colours of food colouring!


ENJOY!

Fun Friday – exploring Acids and Bases

Fun Friday – exploring Acids and Bases

I know, I know, I shouldn’t call in Fun Friday when I am posting it on a Saturday, but ignoring the fact that I am a day late with this regular blog post, I hope you enjoy!

Exploring Acids and Bases

What are Acids and Bases?

Acids and Bases are chemicals that occur naturally in lots of different substances.
Acids can be found in things like lemons and vinegar; Bases (also called Alkali) are found in toothpaste or many cleaning products. Bread soda is a base.

Lets learn more!

The Bronsted-Lowry Definition of an acid and a base is…
  • Acids are substances that gives up hydrogen ions (H+).
  • Bases are substances that accept hydrogen ions (H+).
  • These hydrogen (H+) ions can change things in many ways, including taste and colour!

Did you know… that the word acid comes from the Latin word acidus meaning sour!

Lemons contain an acid called
citric acid that gives them that
sour taste!

The pH Scale

The pH scale is a scale that measures how acidic or basic a substance is.
The pH scale goes from 0 to 14. The scale for acids goes from 0 to 7. A very strong acid has a pH of 0. The scale for bases goes from 7 to 14. A very strong base has a pH of 14.
Something with a pH of 7 is said to be neutral (neither an acid or a base). Pure water has a pH of 7.
photo credit: ViaMoi via photopin cc


“Did you know… that bee sting venom contains an acid called formic acid!”

Acids and bases in plants!

An indicator is something that can determine whether a substance is an acid or a base. Many indicators are natural chemicals.
A group of chemicals called anthocyanins are naturally present in a number of different plants such as apples, grapes, the leaves of many trees and flowers such as roses and poppies.
photo credit: Jason A. Samfield via photopin cc

The colour of anthocyanin changes depending upon the acid levels (pH) of the plant. The bright red and pink colours of Autumn are due to anthocyanin and acid levels in leaves (for more on this see my previous
post “Carrots, Cabbages and Cups of Tea“).

Anthocyanin changes colour from red to pink, to purple, to blue, to green as the pH changes from 0 to 14.
photo credit: Parvin via photopin cc

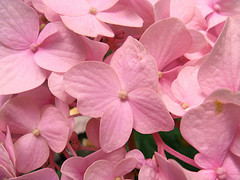
“Did you know… Hydrangea flowers can change colour depending on the pH of the soil. In acidic soils chemical reactions occur to make aluminium available to the plant, turning the flowers blue, in alkaline (basic) soil these chemical reactions cannot occur so the flowers remain pink.”


Experiments to try at home:

Make your own sherbet

You will need… icing sugar, citric acid, bread soda, flavoured jelly crystals, a teaspoon, a tablespoon and a mixing bowl.
What to do… add one teaspoon of citric acid and one teaspoon of bread soda to the bowl. Add three tablespoons of icing sugar and two tablespoons of flavoured jelly crystals. Mix all together then place a small amount on your tongue! The sherbet should bubble a little and you should feel a tingle on your tongue!
So what is happening?… you have just created an  acid-base reaction in your mouth! When the citric acid, bread soda and saliva in your mouth combine they react together to give off a gas, called carbon dioxide, that forms tiny bubbles that you feel fizzing on your tongue!

Cabbage juice experiment

You will need… a red (purple) cabbage, a knife, a saucepan, a sieve, an ice tray, clear vinegar, water and bread soda
What to do… cut up half the red cabbage and add it to a pan.  Ask and adult to cover with water and bring it to the boil then leave to cool.  Once cool pour the cabbage juice through a sieve, collecting the juice in a bowl.  Pour the juice into an ice tray and freeze until it hardens into ice-cubes.
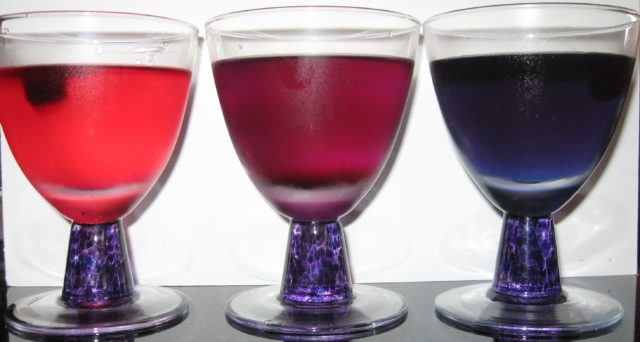
Half fill three glasses, one with water, one with clear vinegar and one with water mixed with half a teaspoon of bread soda. Now drop a cabbage juice ice-cube into each glass and see what happens.
Cabbage Juice ice cube experiment


So what is happening?… red cabbage contains anthocyanin. When the cabbage juice mixes with the acid (vinegar) it turns a red/pink colour; when it mixes with the bread soda solution (base) it turns a blue/green colour.  The water is neutral (pH 7) so it does not alter the purple colour of the cabbage juice.
#FunFriday – exploring Magnets

#FunFriday – exploring Magnets

What is a Magnet?


A magnet is an object that can produce a magnetic force around it called a “magnetic field”.  Magnets attract certain types of metals such as iron, nickel and cobalt.


Let’s learn more!


A magnetic field is not visible to the human eye, however iron filings can be used to show the pattern of a magnetic field. The magnetic field around all magnets is strongest at it‛s ends – these ends are called the Poles. One end is called the North Pole and the other is called the South Pole, just like the Earth.

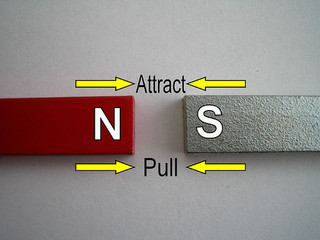
If you put the poles of two magnets together they will either pull together (attract) or push apart (repel); Different poles attract (North and South), similar poles repel!

photo credit: daynoir via photopin cc


Did you know… small iron rocks on the Earth‛s surface are often natural magnets and these are called Lodestones.

The Earth as a magnet


The Earth is one big magnet – it‛s magnetic field is created by the iron that is in the core of the Earth. The Earth‛s magnetic field is strongest at the North Pole and the South Pole.

photo credit: *~Dawn~* via photopin cc
Did you know… many objects is space are magnetic including the Sun!

photo credit: Najwa Marafie - Free Photographer via photopin cc
photo credit: Najwa Marafie – Free Photographer via photopin cc


Did you know… the Earth‛s magnetic field deflects charged particles that come from the sun (Solar Wind) and this creates the wonderful lights called AURORA that can sometimes be seen in the sky.

Magnetic compasses use the Earth‛s magnetic field to determine North, South East and West.


Electromagnets


An electromagnet is a magnet that is produced when an electric current is passed around a piece of iron.  Unlike true magnets, electromagnets are only magnetic while the electric current is switched on!

Did you know… the first person to notice that electric currents produce magnetism was a Danish scientist called Hans Christian Oersted, in 1820.
Some countries have started to use high speed trains called “MagLev” trains that are operated by powerful electromagnets.
photo credit: Erwyn van der Meer via photopin cc


These wheel less trains float on magnetic tracks and can reach speeds of more than 500 km/h.

Two experiments to try at home:

Make a compass:

You will need… a circle of paper, a needle, a magnet and a bowl of water.
What to do… thread the needle through the circle of paper so that nearly all the needle lies on one side of the paper (see below). Stroke the needle 30 times in one direction with one end of a strong magnet.  Lift the magnet between strokes. Float the circle of paper on top of the water in the bowl (needle side up).  The paper should spin around slowly for a few moments and then stop.  The needle should now be pointing North-South.  You can confirm this with a compass if you wish!
So what is happening? The needle contains little particles of iron that are all jumbled up.  When the needle is stroked with the magnet it makes all the iron particles align in the same direction (North-South); the needle is temporarily magnetised!

Make an electromagnet:

You will need.. 1 metre of thin insulated wire, a large iron nail, blue tac, a 1.5 volt battery, paper clips;
What to do… wind the insulated wire tightly around the nail at least 30 times then ask an adult to strip back the insulation from both ends of the wire, exposing about 2 cm of the wire beneath.  Using the blue tac stick one end of the wire to the + side of the battery and the other end to the – end.  Now see if your electromagnet can pick up some paperclips.  If you disconnect the batter the paperclips should fall!!
photo credit: Steve Wilhelm via photopin cc


So what is happening? When the wire is attached to the battery it creates an electric current that runs through the wire, temporarily magnetising the iron particles in the nail. When the battery is disconnected the nail no longer acts as a magnet!


Hope you have fun with these this weekend!  If you have a question or something to add please drop me a note in the comments below!

#FunFriday – Exploring Clouds

What are Clouds?

photo credit: Theophilos via photopin cc

Clouds are made up of tiny drops of water or ice crystals. They form when warm air picks up water vapour from the land or sea and carries it into the sky turning it into water droplets or ice crystals!

The study of clouds is called Nephology.

Let’s learn more!

There are lots of ways to describe clouds but they are usually named based on their height in the sky, their shape or the weather they can bring!


  • If a cloud name starts with “cirr-” then you know it must form very high in the sky (over 20,000 feet).
  • If a cloud name has “Alto”- in it then it is in the middle section of the sky (between 6,500 and 20,000 feet).
  • Clouds with “Strato-” in the name are found in the lowest part of the sky (below 6,500 feet).
The clouds that are really high in the sky are mainly made up of ice crystals as the air is so cold.
Clouds at ground level are called “fog”.


Did you know…all clouds are white but can appear grey or dark when seen from below? This may be due to the amount of water they contain and shadowing by clouds above them.

Clouds named according to their shape will contain one of these Latin words in their name…
  • Cumulus” – heap
  • Stratus” – layer
  • Cirrus” – curl of hair
Cumulus Clouds
photo credit: Nicolai Grut via photopin cc
Cirrus Clouds
photo credit: Gerry Dincher via photopin cc


Alrostratus Clouds
photo credit: Anita363 via photopin cc

Therefore a cloud named Altostratus would mean a cloud that forms in layers and sits between 6,500 and 20,000 feet above land.

Did you know... other planets contain clouds made up of chemicals other than water? Venus has clouds made up of sulphuric acid, chlorine and flouride. Neptune is covered by bright blue methane clouds!

The latin word “Nimbus” is used to name rain clouds!

Cumulonimbus Clouds
photo credit: izoo3y via photopin cc

Clouds called Cumulonimbus are often referred to as thunder clouds as they usually bring thunder storms!

Cumulonimbus clouds are the tallest of all the clouds.
Cumulonimbus looks a bit like a giant cauliflower in the sky!
Did you know… a sinlge cloud can hold billions of pounds of water?

Clouds are carried along by the wind and can often travel quite fast;

Thunder clouds (Cumulonimbus) usually travel about 64 kilometres per hour (kph). The highest clouds (above 20,000 feet) can reach speeds of  over 160 kph!

An experiment to try at home:


Make a cloud in a bottle!


You will need… an empty 2 Litre plastic bottle, warm water and a match.


What to do… Fill the plastic bottle one third full with warm water.  Put the cap back on and squeeze and then release the bottle.  Nothing happens. Ask an adult to light the match and put it into the bottle.  Replace the cap quickly.  Try squeezing and releasing the bottle again.  What happens this time?


So what is happening? Once the match has been added to the bottle a cloud forms when you squeeze and then release the bottle (if you squeeze again the cloud dissapears and reappears when you release).  To make a cloud you need water vapour, small particles (like the smoke) and a decrease in air pressure.


Fun Friday – Rockets!

Fun Friday – Rockets!

 What is a rocket?


A rocket can describe any object that is propelled by fast moving liquid or gas!


Most rockets have a nose or cone at the top, a body that houses the fuel and fins at the base.
Rockets are usually powered by a chemical reaction (explosion) within the rocket itself. This chemical reaction requires both fuel and oxygen, both of which must be carried within the rocket.
The fuel and oxygen are called the propellant. There are two types of propellant, liquid propellant and solid propellant.
A solid propellant rocket is easier, simpler and cheaper to make.  However, these rockets are harder to guide and control as once the chemical reaction is started it is hard to stop.
A liquid propellant rocket is more complex and expensive to make but the burning of the liquid fuel is allot easier to control.
 photo credit: Flying Jenny via photopin cc

photo credit: Flying Jenny via photopin cc

A bit of history


The Chinese were the first to invent rockets when they started filling bamboo tubes with gunpowder and lighting them.
Rocket science really began with an English man called Isaac Newton. He formulated three laws to explain the physics of motion. These laws explain how rockets work!

Newton‛s 3rd Law of Motion states that every action has an equal and opposite reaction!


To understand this law think of a balloon full of air.
Demonstrating Newton's Law of Motion
Demonstrating Newton’s 3rd Law of Motion
If the balloon is untied and the air suddenly let out, it will escape the balloon with such force that it will propel the balloon in the opposite direction.
The force of the air leaving the balloon is called the thrust! The thrust that powers the launch of a rocket comes from the force of the gas (generated by the burning fuel) being ejected from the rear of the rocket!

The first liquid propellant rocket was launched in 1926 by an American called Robert Goddard.  He is considered the father of modern rocket science!

Rocket to the Moon


Neil Armstrong... photo credit: NASA's Marshall Space Flight Center via photopin cc
Neil Armstrong…
photo credit: NASA’s Marshall Space Flight Center
via photopin cc

In 1969 Neil Armstrong and Edwin Aldrin became the first men on the moon.

Armstrong and Aldrin traveled to the Moon in a rocket called Saturn V. It was 100 metres tall and weighed more than 3,000 tonnes! It was the largest rocket ever launched!

An Experiment to try at home


Make a stomp rocket!


You will need… an empty 2L plastic bottle, paper, insulation tape, a 1/2 inch PVC pipe, a length of rubber tubing;

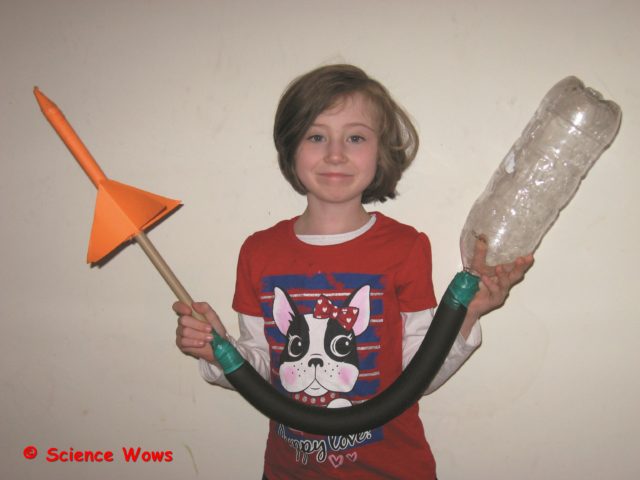
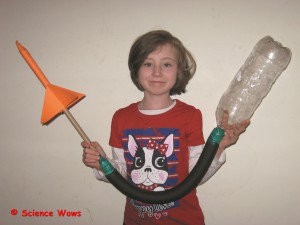
What to do… tape one end of the rubber tubing to the neck of the bottle and tape the other end to one end of the PVC pipe. Next make the body of the rocket by wrapping a piece of paper around the PVC pipe and secure it with tape at the overlap. Remove the rocket from the pipe. Cut four triangles of paper and attach to the body of  the rocket near one end; these are the rocket fins. Make a nose (cone shape) for the other end of the rocket and attach it with tape.  You are now ready to launch your rocket. (Best to do this outside!).
Sit your paper rocket over the PVC pipe and place the 2L bottle on the ground on its side. Stomp on the bottle and watch your rocket shoot off!
This is what your stomp rocket should look like

So what is happening?
… when you stomp on the bottle the air inside it shoots out through the tubing and the pipe, forcing the rocket off the end of the pipe! Just blow into the pipe to re-inflate to bottle to start again!

An Experiment to try at home


Make a teabag rocket

I have shared this one with you before, but for those of you who have not seen it I thought it would be a nice addition here…. a double for the Bank Holiday Weekend ;0)


If you try any of the experiments or have any comments or questions, please let me know in the comments below!


#FunFriday – learning about pressure!

I am pleased to be part of a Science and Nature theme at www.mykidstime.ie this week.  If you check out the links you can find some fun and fact filled articles on Sound, Light and Pressure along with some suggested experiments on each topic.

For today’s #FunFriday post I have shared one of the experiments on Pressure….hope you like it!


Have a great weekend and remember to drop me a comment if you try it or have any suggestions or questions!  I always love to hear from you!

#FunFriday – experiment with sound

This weeks #FunFriday experiment is a simple and easy way to teach children how sound moves in air.

What you will need:

  • An empty plastic bottle
  • Scissors
  • A piece of plastic (cut from a plastic bag or equivalent)
  • An elastic band or tape
  • Small candles
  • Matches

(Adult assistance required!)

Just follow the steps in the video… and the “big kids” among you might like the second half of the video… where I scale things up a little!

So what is happening?

When you tap the plastic it acts like a drum.  The sound waves it creates make the air molecules vibrate.  These vibrating molecules then make the molecules beside them vibrate.  The vibrations travel through the air in the bottle and blow out the flame.

Hope you enjoy this one… if you like it please share it and if you have any comments or questions I’d love to hear from you!
Fun Friday – Rainbow Explosions

Fun Friday – Rainbow Explosions

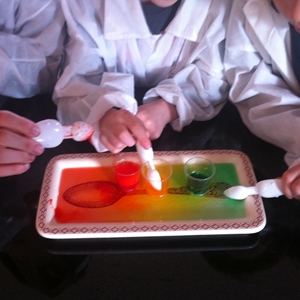
Wow, its Friday again, so that must mean another Fun Friday post.  This week’s experiment is quick and simple… and lots of FUN….rainbow explosions –  a BIG hit with all three of my children.

You probably have everything you need already in your kitchen!


RainbowExplosionIngredients1


You will need:

Vinegar
Bread Soda
Some different colours of food colouring
Some small spoons
Some small plastic cups (or similar)
A plate to contain it all


What you do:


Hope this is as much fun in your house as it was in ours;  Let me know how you get on!


They liked it so much they had to have a rerun….love the colours, don’t you?

RainbowExplosion

Fun Friday – make a periscope

Fun Friday – make a periscope

We had fun making this one… a bit fiddly at parts but worth it, the boys love their new periscope! You will need…. 2 clean empty juice/milk cartons (1 Litre) Some duct tape Scissors Pen Ruler 2 small mirrors (I got a little double mirror in a make-up set in The Two Euro Shop (for €1.50) )

What you need

What to do: First, cut the tops off the two cartons and tape them one on top of the other (taping them at the open ends)

Cut tops off
Tape together

Next mark off a square on the top side of one of the cartons with your marker (I made the square 5cm X 5cm);  Cut out the square. Repeat this step on the opposite end and side of the other carton… so if the first square is on the bottom right side of your periscope cut the second square out of the top left of the periscope.

Cut a square

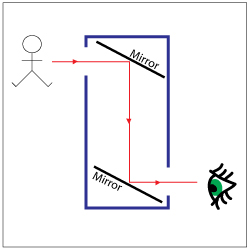
Now you want to fit a mirror into each end of the carton so that the reflective side of the mirror is facing you as you look in the hole and each mirror is tilted at an angle of approximately 45 degrees.  The bottom mirror is tilted up at an angle of 45 degrees and the top mirror is tilted down at an angle of 45 degrees. I was lucky, my mirrors fitted the exact width of my milk cartons so I was able to place them inside, tilt them as required and then tape them in place.  If your mirrors are wider than your carton then mark a line at the side of your carton, cut a slit and slide in your mirror.  Repeat for the other mirror then tape into place.

You should be able to look into the bottom hole and see what is reflected through the top hole….

Now all that remains is to decorate your periscope and have some fun…. you can use it to look around things or over things, great for playing spies, which is a very popular game in this house.

Enjoy!

How does it work? The object we see is reflecting light, this light is bounced off the top mirror onto the bottom mirror which bounces the light right onto our eyes!

How it works
How it works

FEEDBACK: I love hearing from people who have tried some of these experiment so please let me know if you try this one, or even send me some photos of your finished periscope;  If you have any questions just ask!

Fun Friday – make a balloon hovercraft

Here is a simple and fun experiment to try at home – how to make a balloon hovercraft.  I was temporarily abandoned by my junior scientists so had to step in front of the camera for a change….. so everybody…. meet Dr. How ;0)

Hope you have fun with this experiment and do please drop me a line or a little comment to tell me what you think or how you got on!

…and if you like it, please spread the word!