We have been experimenting with blackboard slime recently. We first spotted it here. I thought this slime would be great as a Halloween activity, covering both science and craft in one go and how right I was. Check out these cool ideas we came up with, my favourite is definitely the ‘day-of-the-dead’ decorating. Read more →
I have been asked a lot lately about slime recipes that do not require borax powder (as it is difficult to source in Ireland at the moment); We have tried and tested some alternatives (it’s a tough job but someone has to do it 😉 ) and here are our favourite slime recipes. Read more →
People are always asking me for a slime recipe that doesn’t require borax powder. This is one option, making silly putty. We love this recipe, using just cornflour and washing up liquid (or you can use liquid soap instead); just be careful that you use products that you know won’t irritate your child’s skin.
We thought we’d share this one, in honour of St. Patrick’s Day…. with all the shamrocks and the leprechauns and the rainbows 😉
You will need:
Cornflour
Liquid soap or washing up liquid
A bowl
A spoon
Food colouring
What to do:
Just click the arrow button on the right of the image below to find out how to make this brilliant rainbow silly putty; it is so easy and my kids loved it!
A post shared by Naomi Seely Lavelle (@naomiseelylavelle) on
The results:
We mixed all our silly putty together for the rainbow effect but you can keep the colours separate if you prefer. This silly putty is great to play with, mold it in your hand, stretch it, fold it… it makes a great stress busting tool too! It will last for a week or more if you put it in an airtight container or plastic bag but we usually just make a new batch each time.
Let me know if you try this yourself! We have had lots of fun working on other slime recipes and will be sharing them soon so remember to check back or follow the blog to make sure you don’t miss any posts!
I must admit that I am not a big fan of the commercial side of Valentine’s day but I have no problem with the idea of telling someone you love just how much they mean to you. When I get to couple the sentiment with some science experimenting then my heart really does skip a beat. Check out these cool valentine science experiments that would make some pretty unique (and educational) gifts for the someone special in your life.
Say it with flowers
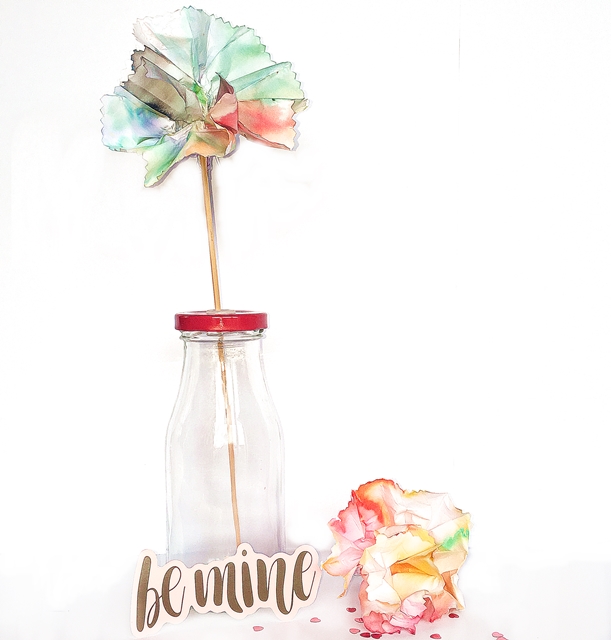
Who doesn’t love flowers on Valentine’s Day? With a little bit of science you can add an extra twist to this staple gift. Try these CHROMATOGRAPHY flowers…
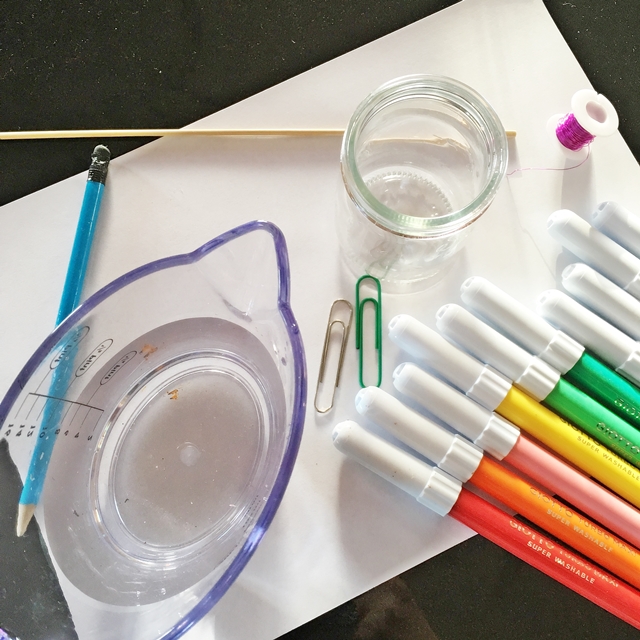
Here’s what you’ll need:
Some paper (we used regular white A4 paper here)
A selection of water soluble coloured markers
A pencil
A ruler
A paperclip
A glass or beaker
A jug of water
Some wire or pipe cleaners
What to do:
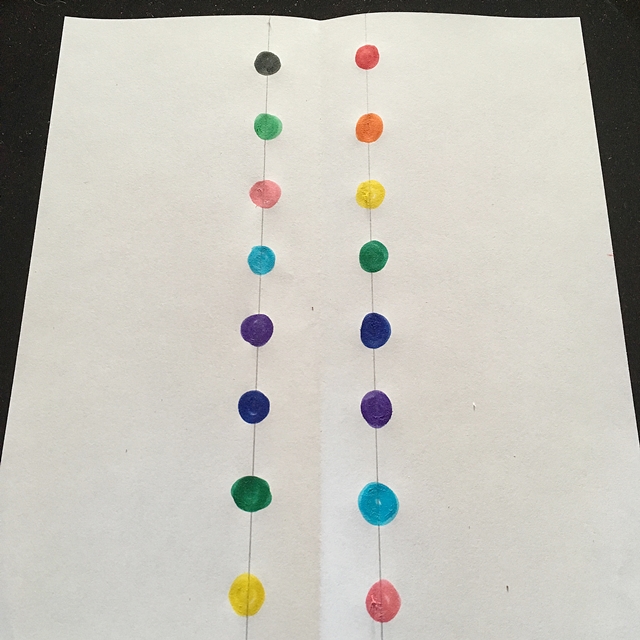
Fold your paper in half down the long side and then open it out again.
Using your ruler and a pencil, draw a line either side of the crease, the line should be about 2 cm from the crease on each side.
Choose the colours you would like to use and place large dots of each colour along these lines, leaving about 1 – 2 cm between each dot. Alternate the colours in whatever way you wish.
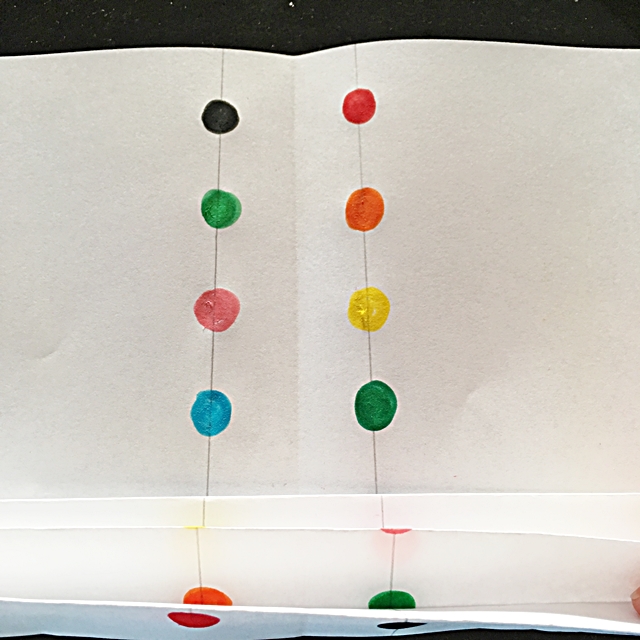
Once you have that done it is time to fold your paper. You need to fold along the shorter side, start at one end and fold the edge of the paper in about 2 cm. Turn over the paper and fold back another 2 cm. Turn over the paper and keep going like this until you reach the other side of the paper.
Keeping the paper folded, fold it in half and secure with a paperclip.
Trim the tops of the folded paper on each side. I used a serrated scissors but you could just cut into a pointy shape or round off the ends, whatever you prefer.
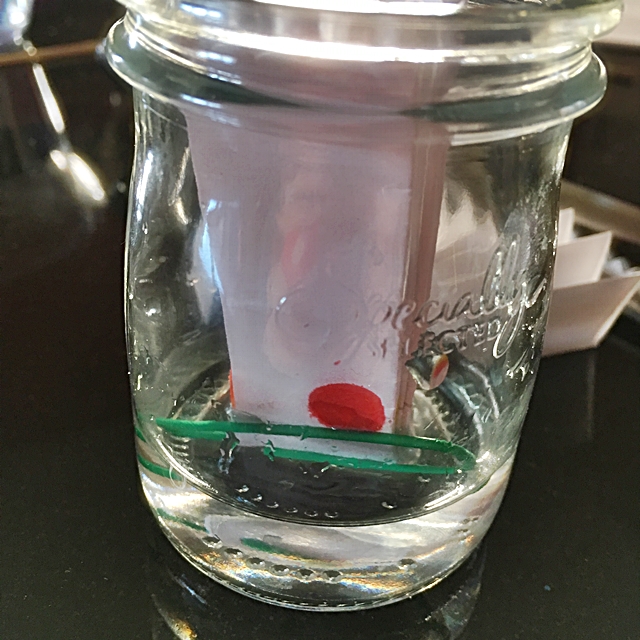
Pour about 1 cm of water into your glass (or beaker) and place the folded paper into the glass, as in the photo below. You want the end of the paper to sit into the water below the dots of markers, you don’t want the water level to reach the dots though.
Now you just need to wait a while. You should see the water creeping up the paper, spreading out the marker ink as it moves upwards. Once the water reaches the top of the paper you can remove it from the beaker and place it somewhere warm to dry.
Replace the paper clip with a strip of wire or a pipe cleaner, and twist it to close. This will be the stem of the flower.
Once dry it is time to open out the paper, into a flower shape, and see what a colourful CHROMATOGRAPHY flower you have made. You can try different types of paper, blotting paper works really well.
The science bit:
This experiment used a scientific technique called CHROMATOGRAPHY to separating different chemicals; in this case the chemicals are the inks in coloured markers. As the water creeps up the paper (by a process called CAPILLARY ACTION) it dissolves the different inks that make up the colour. These inks separate out as the water moves upwards and you get lovely streaks of colours through the paper.
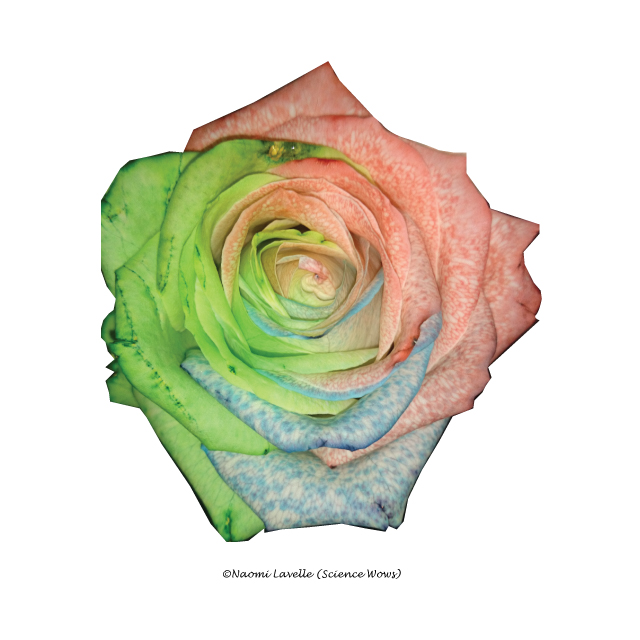
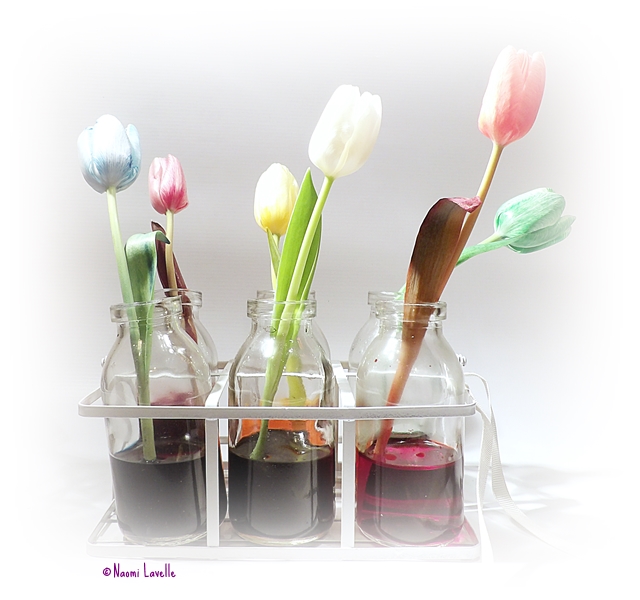
If you prefer real flowers to artificial ones you can still use a bit of science to add some extra colour; Here are two of our favourites (click the images below to find out how to make these beautiful coloured flowers while learning all about TRANSPIRATION!).
Make a multicoloured Rose (click the image to find out more).
Or try making a rainbow bunch of flowers, click the image above to go to the blog post.
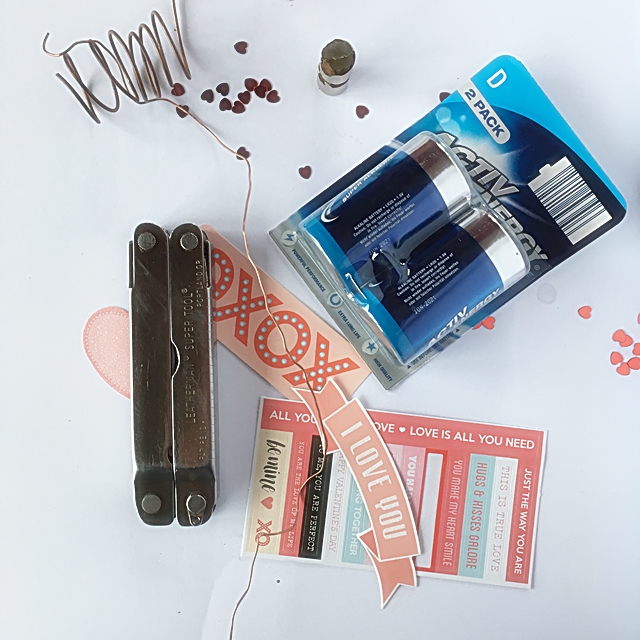
2. You make my heart spin
I’ll admit these do take an extra bit of time and effort but they are really worth it and give a nice WOW factor. Your Valentine will be amazed with a gift like this… left wondering just how you did it. This experiment requires ADULT SUPERVISION!
Here is what you’ll need:
Some copper wire
a pliers
a strong scissors or wire cutter
A battery (AA work just fine), I used a D battery here
A neodymium magnet (these are strong, rare earth magnets, often found in electrical appliances but can be purchased in many specialised shops)
Some items to decorate (optional)
And this is what you do:
You can start by decorating your battery with love hearts or similar stationary if you wish.
Place the neodymium magnet on the base (minus side) of the battery, it will ‘stick’ to the metal.
Now for the tricky bit, you need to make a connection from the positive end of the battery, to the other side (the magnets in this case) to complete an electrical circuit. You can see from the photo and video below that I shaped one end of the copper wire into a heart shape with a little ‘stalk’ to sit on the top of the battery. I then wrapped the remaining wire around the battery and finally, I wrapped the end of the wire around the neodymium magnet (in this case I used two small neodymium magnets, one on top of the other). You will know if the circuit is complete as the battery and copper wire will heat slightly. However in order to get the wire to start to move you need to ensure that the wire is balanced correctly and is not wrapped too tightly around the battery or magnet. It will take a bit of patience and ‘tweaking’ to get this right, but, hopefully you will be rewarded by a lovely spinning heart 🙂
Want to know how it works?
Congratulations, you have just created a HOMOPOLAR MOTOR and, by combining an elctrical current and a magnetic field, working in specific directions, you have generated a force called LORENTZ force, that makes the copper wire move.
To put it as simply as possible, the copper wire connect to the positive and negative ends of the battery, completing a circuit and creating an electrical current that runs through the wire. The neodymium magnet generated a permanent magnetic field. In this set up the electrical current is perpendicular to the magnetic field and this generated teh Lorentz Force which acts on the copper wire, making it move!
NOTE: This experiment requires adult supervision! An electrical current can generate heat and you need to be careful that nothing gets too hot.
3. Gooey with love
Slime may not be the first thing that comes to mind when thinking of a Valentine’s day gift but this one is the prettiest slime I’ve ever made, and it has love hearts and sparkles in it, so what’s not to love. Plus… a few minutes playing with this stuff is time well spent, it is actually a great stress busting exercise, try it and see!
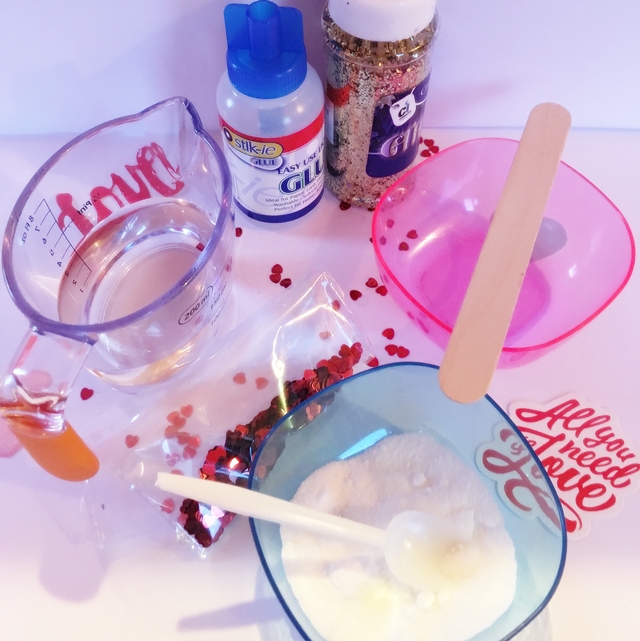
What you will need:
A bottle of clear glue
A jug of water
Bowl and something to stir with
A cup or small plastic cup or a second bowl
Borax powder
glitter and mini hearts (or any decoration of your choice)
Here is what you do:
Pour a small amount of clear glue into your bowl (we used a 10 ml at a guess). Add the little of the love hearts and glitter, just a small sprinkle of each is fine.
Give all that a good mix and then leave to the side while you make up the borax solution
In the cup (or jug) make up your borax solution; you want to dissolve 1/2 teaspoon of borax powder in a cup measure of warm water (about 240 ml); Stir until fully dissolved.
Still the glue constantly and add a very small amount of borax solution. Keep stirring all the time. As soon as the glue is no longer sticky you can pick it up in your hands and start kneading and molding it, for a few minutes.
I will admit that I had a lot of trouble coming up with a good recipe here. I am used to working with white glue (PVA) which makes great slime. The clear glue can get very rubbery slime which breaks easily. So the trick is to use small amounts and add as little borax solution as possible. Also, once the slime forms at all, take it into your hands and knead it.
You can even roll it into a ball and see how bouncy it is…
I know that borax is not easy to buy in Ireland at the moment so I will test out some alternatives and hopefully have a post next week with some borax-powder-free slime recipes!
The science bit:
Congratulation… you have just made a polymer!! In simple terms a polymer is a substance made up of lots of molecules arranged in long chains. If you imagine that the glue is like cooked spaghetti, it slides and slips around the place quite easily. When we add the borax to the glue it causes some of the molecules in the glue to stick together making the glue more rubbery and less liquid! Imagine if you took those strands of spaghetti and tied them together in places, the strands would not be able to slip and slide around nearly as much! The borax and glue mixture is just like your knotted spaghetti!
(Antacid tablets, such as Alkaseltzer – and adult supervision!)
What you do:
First add a few drop of red food colouring to the water until you are happy with the colour.
Add about half a teaspoon of glitter and half a teaspoon of miniature hearts to the water and mix well.
Using the funnel, pour the coloured water into the bottle, filling it to about a third full.
Fill the rest of the bottle with oil (using the funnel again) and replace the lid. You will notice that the oil and water remain as two separate layers.
Hold the bottle on its side and tilt it slowly back and forwards, you will see the water moves like a coloured wave, it gives a lovely effect.
If you want to turn this into a Valentine’s lava lamp just stand the bottle back up again, open the lid and pop in half an antacid tablet (like Alkaseltzer) NOTE: these tablets are not for eating and this part must be supervised by an adult.
Pop the lid back on (don’t seal it fully though as gas will build up in the bottle) and watch your lovely lava lamp.
When it stops you can pop in another piece of Alkaseltzer and watch all over again.
The science bit:
This is a good experiment to explain density. The oil is less dense than the water so it will sit on top of the water, creating two separate layers. The layer of oil keeps the water contained within the bottom half of the water and makes the movement of the water look like waves where the two liquids meet.
When we add the Alkaseltzer tablets to the bottle we get a chemical reaction. The tablets contain an acid and a base (or alkali) in powder form. When the tablet sinks down to the water layer the tablet dissolves and the acid and base get to mix together, forming carbon dioxide gas. The gas forms bubbles, and is lighter than the water and oil so the bubbles float to the top of the bottle where they burst, leaving just a drop of water, which is more dense than the oil so it falls back down. This cycle gives a lovely lava lamp effect of bubbles and blobs rising and falling through the oil layer. We are loving this one in our house at the moment. The glitter and love hearts add a really lovely touch to the whole thing.
So there you have it… five of our favourite Valentine experiments, I’m sure you’ll agree, as well as being educational, these would make great gifts for someone you love! We hope you get as much fun out of making these as we did and remember to let us know how you get on!
HAPPY VALENTINE’S DAY!!!
*****
If you’d like to know a little about the Science of Love, check out this post!
Can water go uphill? The answer is… yes it can! In some ways anyway; water can travel upwards by a process called capillary action.
Capillary action can be described as water climbing upwards due to weak forces created between the water molecules and the material the water moves up along, or through. In the experiment below the water travels up the paper towel, forming these forces with the paper towel as it creeps upwards.
For this experiment you will need…
six clear cups or bottles
six pieces of paper towel, folded length-ways into long strips
A jug of water
Food colouring… red, yellow and blue
What you do…
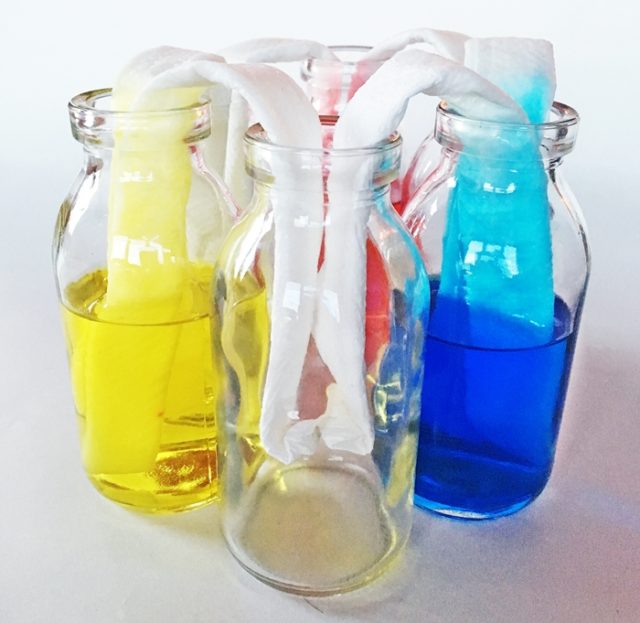
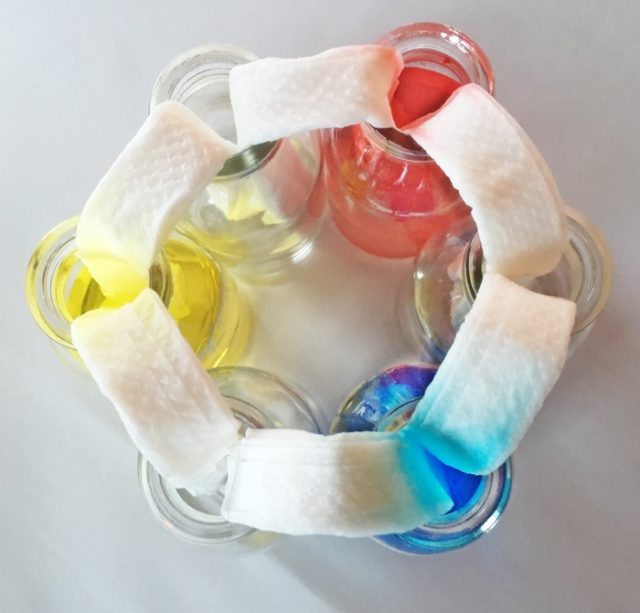
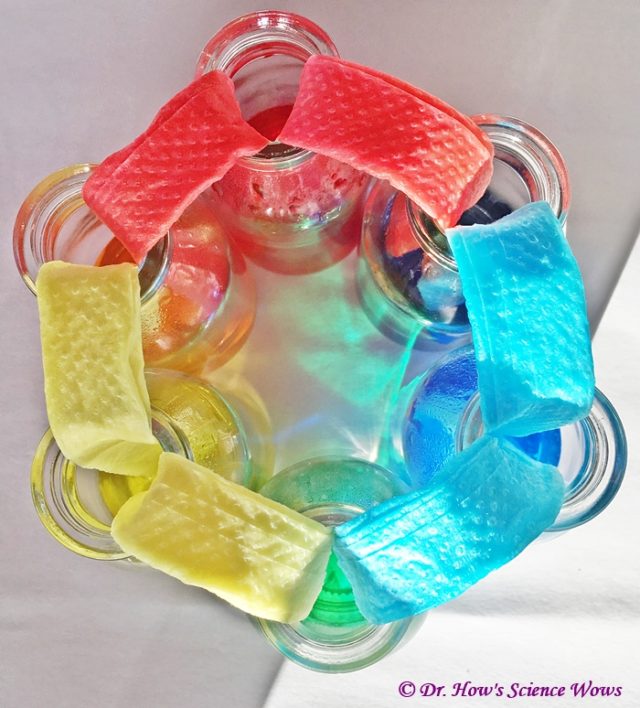
We arranged our six bottles in a circle (but you could do this in a straight line too, if you want to create the same colours as us, you will need seven bottles in a straight line, with one colour repeated… think about it 😉 )
Half fill every second bottle with water, leave the other bottles in between empty.
Add a few drops of food colouring to each bottle containing water, red in one, yellow in the next and blue in the next.
Now take a piece of the folded paper towel and place one end into the bottle containing red-coloured water, and the other end into the empty bottle beside it; make sure the paper towel sits into the coloured water.
Take another paper towel and place one end in the empty bottle (that is now connected to the red-coloured water bottle) and the other end into the bottle containing yellow-coloured water.
Repeat this all around the circle so that the paper towel ‘wick’ goes from the yellow-coloured water bottle to an empty bottle and another from that empty bottle to the blue-coloured water bottle; finally place a paper towel ‘wick’ from the blue-coloured water bottle to an empty bottle and another from that empty bottle to the red-coloured water bottle.
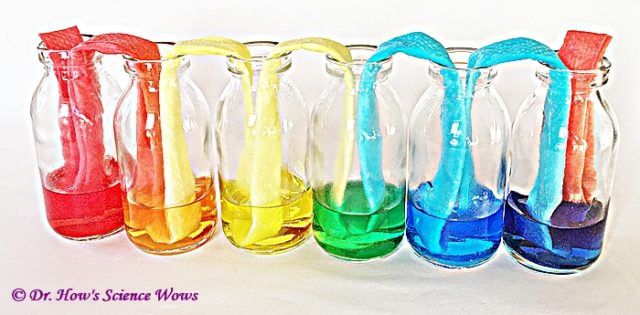
When all set up it will look like this…
Then all you have to do is wait! You should see the water starting to climb up the paper towel ‘wicks’ within a few minutes. Leave the experiment for a few hours or overnight to get the final result.
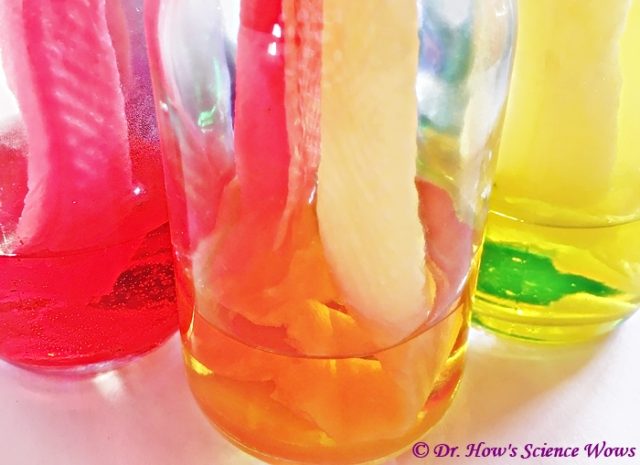
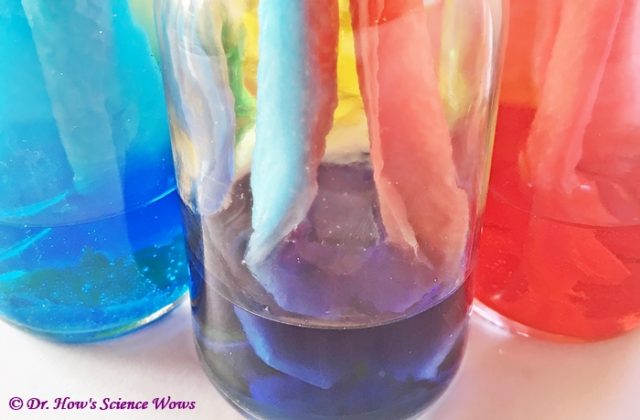
Results:
Eventually the water will travel up one side of the paper towel and down the other side, starting to fill the empty bottle. As water comes into the empty bottle from each side, the two colours of water will mix.
The red and yellow-coloured waters will mix in the bottle between them, creating orange-coloured water.
The yellow and blue-coloured waters will mix in the bottle between them, creating green-coloured water.
The blue and red-coloured waters will mix in the bottle between them, creating indigo-coloured water.
You will notice that all the bottles have now got about the same amount of water in them. Once this happens no more water will transfer between bottles.
What is happening?
As mentioned above, the water is able to climb up the paper towel due to these forces, called adhesive forces, that form between the water molecules and the paper towel. This process is called capillary action.
********
On the subject of water, if you ever wondered why our fingers wrinkle in the bath check out my recent Appliance of Science column in the Irish Examiner.
We are back with more bottle science experiments! How did you get on with the first five we shared last week? We have had plenty of feedback from people who tried them out and really enjoyed them so here are five more bottle science experiments to try!
You can find experiments 1 to 5 in this post!
REMEMBER: YOU NEED ADULT SUPERVISION FOR ALL THESE EXPERIMENTS
6. Using Friction to defy gravity
7. The Hovercraft Experiment
8. The Cloud in a Bottle Experiment
9. Bottle Rocket Experiment No. 1
This video doesn’t include the science of how it happens, so here it is! As you know from previous experiments… when we mix the vinegar and the bread soda the react rapidly making a salt, water and Carbon Dioxide gas. Gases usually take up more space than liquids or solids so the sudden production of Carbon Dioxide gas causes a rapid increase in pressure inside the bottle. The gas wants to break out of the confined space within the bottle but the cork is in the way. With enough pressure the cork is forced off and the gas escapes.
Newton’s Thirds Law of motion states that…
Every action has an equal and opposite reaction!
This law is what makes the rocket shoot into the air. The first ‘action’ is the cork shooting off the bottom of the bottle; this produces the ‘equal and opposite’ reaction of the bottle rocket shooting off in the opposite direction! It all follows the laws of physics!
10. Bottle Rocket Experiment No. 2
This rockets follows the exact same law as the previous experiment, except this time the pressure is built up by the air we pump into the bottle. This pressure eventually builds up forcing the cork, and the water, out of the bottle and the rocket is then propelled off in the opposite direction, shooting up into the sky.
And there you have it! Ten fantastic experiments to do with a plastic bottle. If you missed the first five you can find them here! Please let us know what you thought of this series and how you got on. If you like these video experiments and would like some more just let us know in the comments below and we will get working on a new series straight away!
Do you love science and want to try out some experiments yourself? Do you worry that you’ll need special equipment and expensive kits? FEAR NOT! There are so many science experiments you can do with things you have around your home RIGHT NOW! Just remember to always ask an adult’s permission. Finish drinking your water and save that bottle because we are going to share TEN amazing experiments with you… you’ll never look at a plastic bottle in the same way again!
A few months ago I promised to share ten experiments you can do with a simple plastic bottle. If you have been following me on Face Book you will have noticed that I have shared one every week and we reached ten no problem; I’ve compiled all the instruction videos here so that you can pick and choose which ones you want to do (or, even better, try all ten).
The reason I started this was because I was sick of seeing science experiment kits full of rubbish (I am not saying all science kits are rubbish, but I have seen my fair share lately). I wanted to show you that you can do plenty of science experiments from things you have around your own home. And what better example to use than a simple, humble, plastic bottle. A great example of reusing and recycling.
PLEASE NOTE: ALL THESE EXPERIMENTS REQUIRE ADULT SUPERVISION!
Without further ado… here are first five Science Experiments you can do with a plastic bottle:
make a fire extinguisher
2. Inflate a balloon
3. The Sneezing Alien Experiment
4. and 5. Ocean in a bottle experiment and Lava Lamp experiment
Those are the first five experiments. Have lots of fun with them, check back next week for the next five experiments. Remember to keep those bottles!
As always, we love to get comments and feedback so do let us know if you try some of these experiments; we’d love to know how you get on, did you make some of your own modifications and improvements to the experiments? Would you like us to share more video experiments?
What would happen if the Earth’s gravity suddenly disappeared?
This was a recent question from my 10-year-old son… it certainly got some interesting discussions going around the kitchen table. When I opened up the question on my Facebook page I got more input from Cathal (5) and Ciarán (7) (from the Bumbles of Rice blog); they reckon that if you were indoors you would float upwards, or feel like you were being pulled up… and bump your head! A very good point boys; In fact, the bump on the head would be the least of your worries!
Before I go any further though, it is important to say that this cannot actually happen, we can’t just turn off gravity, so when we discuss what would happen if we did, we are talking more science fiction than science; it is good to keep that in mind!
SO WHAT WOULD HAPPEN TO YOU?
As Cathal and Ciarán said, you would no longer have a force keeping you on the ground . The Earth would keep spinning, as it does, but you would no longer move with it, you would move in a straight line, upwards. In fact, rather than feeling like you are floating away from the Earth, you would probably feel like the Earth is dropping away from you!
WHAT WOULD HAPPEN TO THINGS AROUND YOU?
Anything not stuck down in some way would move in the same direction you would. Anything inside a building would get stopped by the ceiling, anything outside would float off into space, pretty quickly.
WHAT WOULD HAPPEN TO THE AIR?
Not only would solid objects float off into space but our air, our atmosphere would too; which means that unless you had an oxygen tank to hand you’d have no air to breathe.
WHAT WOULD HAPPEN TO THE LAKES, RIVERS AND SEA?
Liquids would leave the Earth’s surface too, so all the water on our planet, in lakes, rivers and seas would start to float off. A first, water would probably start floating off in large blobs, but as the atmosphere of the Earth disappears then the heat of the sun would penetrate to the Earth’s surface even more than it does now and water would probably start to boil off, into steam that would float off into space.
WHAT WOULD HAPPEN TO THE BUILDINGS?
So initially we said that if you were inside a building you would find yourself up at the ceiling; If you had an oxygen tank then you might be OK for a while. But you would start to feel those temperatures rise pretty quickly. The Earth would start to feel an incredible pressure which would ultimately mean that the buildings attached to its surface would start to break up and float away. Then rocks and clumps of earth would break off and float up too.
WHAT WOULD HAPPEN TO THE WHOLE EARTH?
Eventually, the whole Earth would break apart and float away into space, but we would be long gone by then.
So while the notion of floating around in zero gravity might, at first, seems appealing, when we look at the idea a little more closely we realise it is not a very nice concept at all. Fear not, as I said at the beginning… this cannot happen, it is just an imagining of what would happen if it did.
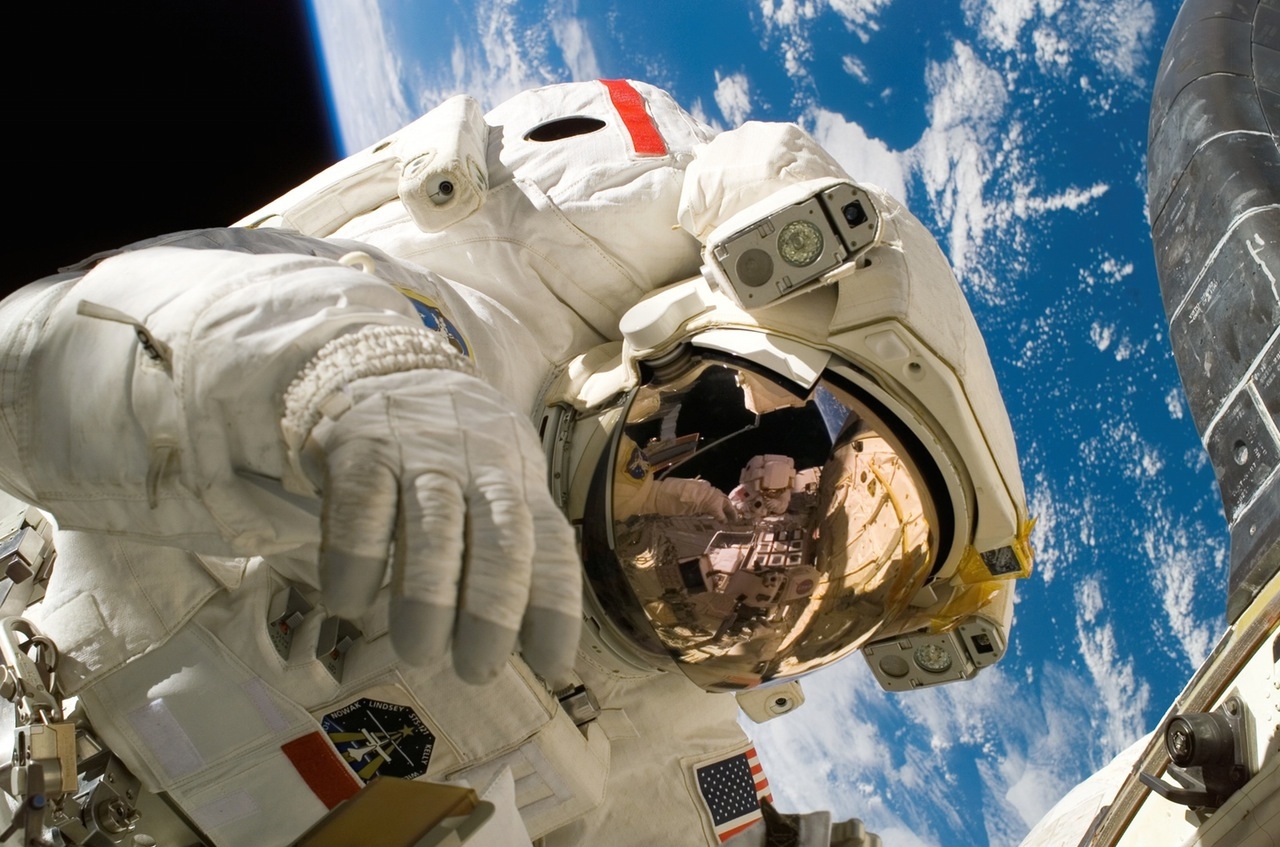
While scientists cannot really predict what would happen if we suddenly lost gravity on Earth, they can tell us the short term effect that lack of gravity (or weightlessness) has on our bodies… by observing what happens to astronauts while in space.
Image source: pixabay.com
Initially astronauts lose their sense of orientation, they find it hard to tell up from down. This disorientation can also make them feel sick for a while.
Another issue they report is feeling like their arms and legs are disconnected from their body!
The change in pressure can affect their vision a little, this may be due to the altered pressure on the eye ball, brain and spinal fluid (some astronauts report more long term problems when they return to Earth; recent studies have found a genetic link to this problem, but the exact mechanism is still unclear).
They usually get used to these issues pretty quickly but there are greater health effects the longer they stay in space.
Due to the lack of weight on their bodies, their muscles and bones begin to weaken; this is why astronauts spend so much time in space exercising!
An astronaut will actually get taller in space; without the pressure of gravity on their bodies, they can stretch about an inch or more. Of course, once they return to Earth they soon return to their usual height.
Astronauts immune systems can become weak in space too (the number of white blood cells that help to fight infection can reduce) and healing can be slowed down.
Now that we have learned a little about gravity and the lack of it, here is a fun experiment; try out this gravity defying trick with a glass of water and amaze your friends and family!
GRAVITY DEFYING EXPERIMENT
YOU WILL NEED:
A glass
A small piece of stiff paper or cardboard (large enough to cover the mouth of the glass)
A basin
Some water
(Adult supervision)
WHAT TO DO:
Fill the glass to the very top with water.
Place the piece of paper over the mouth of the glass, making sure there are no air bubbles underneath.
While holding the glass in one hand, and keeping the paper in place with the other, quickly turn the glass upside-down, over the basin (or ask an adult to do this for you).
Once the glass is inverted remove your the hand that is holding the paper in place.
The paper should stay in place and the water should stay in the glass.
Watch all the amazed faces of your family and friends as they observe your gravity defying feat!
THE SCIENCE BIT:
While this appears to be an experiment about defying gravity, it is actually all down to air pressure. The lack of air in the glass produces a difference in air pressure on either side of the paper. The air pressure on the underside of the paper is greater than the pressure on the water side, pushing the air up and keeping the paper in place.
I hope this experiment works for you without anyone getting wet feet! Be sure to let me know if you try it!
We have had a lot of fun with this little Christmas science experiment. It is so simple, it is definitely worth a try if you have a few minutes to spare and want to give the kids a good laugh.
Here is what you will need:
A small jar, or similar, decorated as a snowman. We covered ours in modeling clay and painted it but you could get the kids to paint a jar or decorate it as they wish. (The jar I used here is 100ml volume but you can alter the size.)
Some water (I used 40mls)
Washing up liquid (I added about a tablespoon)
Baking soda (also know as bread soda or sodium bicarbonate, but NOT baking powder… they are quite different)
A teaspoon.
Something to stir with
White malt vinegar (I used 40mls)
Here is what you do:
First add the water and then the washing up liquid.
Next add a heaped teaspoon of baking soda.
Give it a good stir.
Add all the vinegar, quickly, stand back and watch’s the poor snowman’s brains explode… that’s got to hurt!
And once your poor snowman has recovered, you can give him a quick rinse and do it all over again!
The Science bit:
It is all down to the vinegar and baking soda, when the two are added, they react rapidly together and one of the products of the reaction is carbon dioxide gas (CO2). This gas mixes with the diluted washing up liquid forming a white bubbly foam that erupts out the top of the snowman.
Simple! Seasonal! Science!
Happy Christmas.
*****
Looking for some more #science and #craft ideas for the Christmas Season? I have two guest posts on the lovely Where Wishes Comes From blog; Click the links below to pop over and have a look. There is lots more to see over there as Sadhbh is running a Craft Advent special, a different activity every day!
Who doesn’t love the volcano experiment? We will get to that in a minute, but before you go running for the vinegar and bread soda do you want to learn a little about them?
Firstly, what is a Volcano?
It is basically just a hole in the Earth’s crust. The word Volcano comes from Vulcan, the Roman God of Fire. Most volcanoes occur at weak spots in the Earth’s crust.
Scientists that study volcanoes are called Vulcanologists!
Scientists use a scale to measure the strength of volcanic eruption – it is called the Volcanic Explosive Index (VEI).
The VEI scale ranges from 0 to 8; volcanic eruptions of 8 are called super volcanoes.
Mount Vesuvius in Pompeii, Italy erupted in 79 AD killing all the inhabitants of the city. Everything was covered in a thick layer of ash preserving the scene as a snapshot in time.
The last super volcano to erupt was Toba on Summatra in Indonesia, 74,000 years ago. It spewed so much volcanic ash into the air that it blotted out the Sun, causing a volcanic winter that lasted nearly six years.
Krakatoa in Indonesia erupted in 1883 spewing hot ash more than 50km into the air. The force of the explosion was heard as far away as Australia and caused a tsunami.
Ever wonder what comes out of an erupting volcano?
When a volcano erupts it spews out hot liquid rock, dust, ash, rocks and poisonous gases. Magma is hot liquid rock contained under the Earth’s surface. When magma escapes from a volcano it is called lava.
Volcanic bombs are hot lumps of molten rock shot out of a volcano when it erupts. As they shoot into the air they
cool and fall to Earth as solid rock.
Did you know… the largest volcanic bombs recorded were from the eruption of Mount Asama in Japan and were
up to six metres in diameter?
How are volcanoes classifying?
Volcanoes can be classed as…
active (erupt regularly)
dormant (have erupted within recorded history but not of late)
extinct (have not erupted within recorded history)
They can also be defined by their shape:
shield volcanoes are dome shaped
cinder cone volcanoes have erupted from one single vent
strato or compsite volcanoes are tall with layers of magma and rock
What is Pumice?
Pumice is a type of volcanic rock, formed when frothy lava cools quickly? It is a very light rock that can float on water!
The largest volcano on Earth is thought to be Tamu Massiff off the coast of Japan, and is completely contained under the Pacific Ocean.
The largest volcano in our solar system is Olympus Mons on Mars. It is slightly narrower than Tamu Massiff but has a larger overall mass.
Olympus Mons – image source NASA
Finally to the experiment – how to make your own volcano:
You willneed: an empty jar, vinegar, bread soda, water, washing up liquid, food colouring and modelling clay
What to do:
You will use the jar as the volcano. If you want to make it look more realistic you can cover it in modelling clay, shaping it like a volcano and let this dry overnight.
To make the volcano erupt, first add some water into the jar (about one third full). Add a big squirt of washing up liquid and a few drops of red food colouring.
Add one large tablespoon of bread soda and stir well. Place the volcano in a clear plastic basin or deep tray.
Finally add vinegar, filling to near the top of the jar. Stand back and watch the fun!
To get the volcano going again just add more vinegar and bread soda!
What is happening?
The vinegar and bread soda react to form carbon dioxide gas. This gas gets trapped in bubbles formed by the washing up liquid making the lava appear thick and foamy.