We have been experimenting with blackboard slime recently. We first spotted it here. I thought this slime would be great as a Halloween activity, covering both science and craft in one go and how right I was. Check out these cool ideas we came up with, my favourite is definitely the ‘day-of-the-dead’ decorating. Read more →
I have been asked a lot lately about slime recipes that do not require borax powder (as it is difficult to source in Ireland at the moment); We have tried and tested some alternatives (it’s a tough job but someone has to do it 😉 ) and here are our favourite slime recipes. Read more →
People are always asking me for a slime recipe that doesn’t require borax powder. This is one option, making silly putty. We love this recipe, using just cornflour and washing up liquid (or you can use liquid soap instead); just be careful that you use products that you know won’t irritate your child’s skin.
We thought we’d share this one, in honour of St. Patrick’s Day…. with all the shamrocks and the leprechauns and the rainbows 😉
You will need:
Cornflour
Liquid soap or washing up liquid
A bowl
A spoon
Food colouring
What to do:
Just click the arrow button on the right of the image below to find out how to make this brilliant rainbow silly putty; it is so easy and my kids loved it!
A post shared by Naomi Seely Lavelle (@naomiseelylavelle) on
The results:
We mixed all our silly putty together for the rainbow effect but you can keep the colours separate if you prefer. This silly putty is great to play with, mold it in your hand, stretch it, fold it… it makes a great stress busting tool too! It will last for a week or more if you put it in an airtight container or plastic bag but we usually just make a new batch each time.
Let me know if you try this yourself! We have had lots of fun working on other slime recipes and will be sharing them soon so remember to check back or follow the blog to make sure you don’t miss any posts!
It is all about snails here this week; snail questions, bad weather and midterm break. I was planning a written blog in response to all his questions, but, spirits were high this morning (in the kids, not me!) so writing time was limited. Instead we went for something a little different and if you like it, I think it could become a regular feature.
We made a little video, the snail questioning one and I. So go get a cuppa and settle down for five minutes with us… it’s time to TAKE FIVE!
So what do you think? We hope you liked it, let us know what you think in the comments below and, if you have a question you’d like covered in a TAKE FIVE video, let us know!
I must admit that I am not a big fan of the commercial side of Valentine’s day but I have no problem with the idea of telling someone you love just how much they mean to you. When I get to couple the sentiment with some science experimenting then my heart really does skip a beat. Check out these cool valentine science experiments that would make some pretty unique (and educational) gifts for the someone special in your life.
Say it with flowers
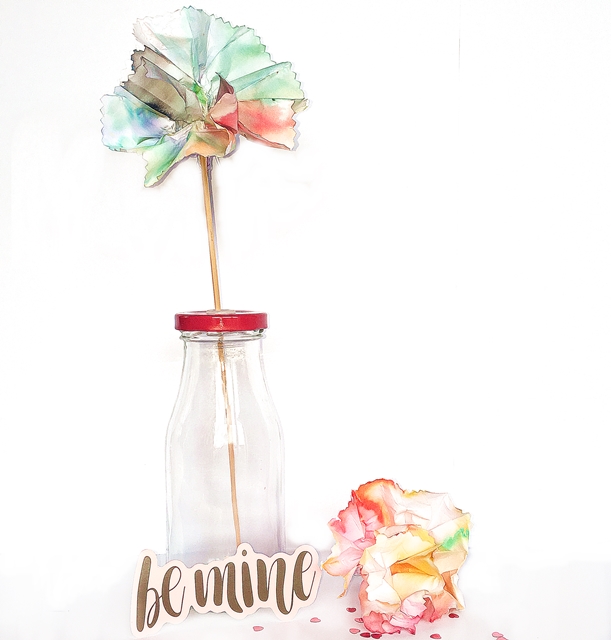
Who doesn’t love flowers on Valentine’s Day? With a little bit of science you can add an extra twist to this staple gift. Try these CHROMATOGRAPHY flowers…
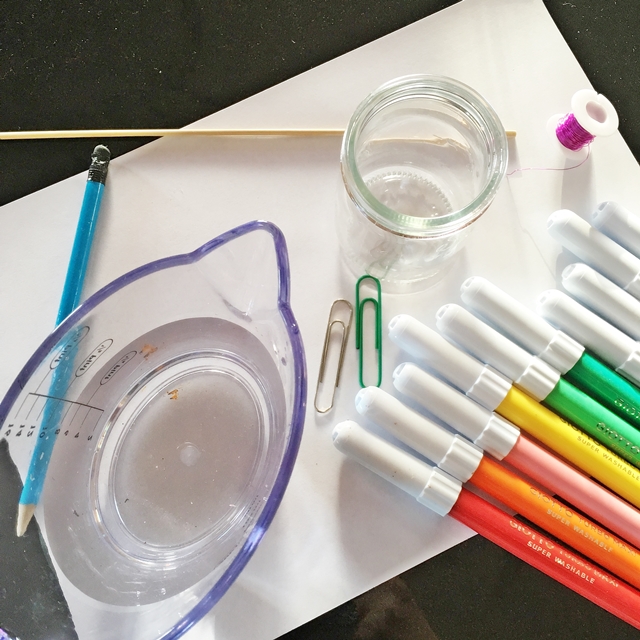
Here’s what you’ll need:
Some paper (we used regular white A4 paper here)
A selection of water soluble coloured markers
A pencil
A ruler
A paperclip
A glass or beaker
A jug of water
Some wire or pipe cleaners
What to do:
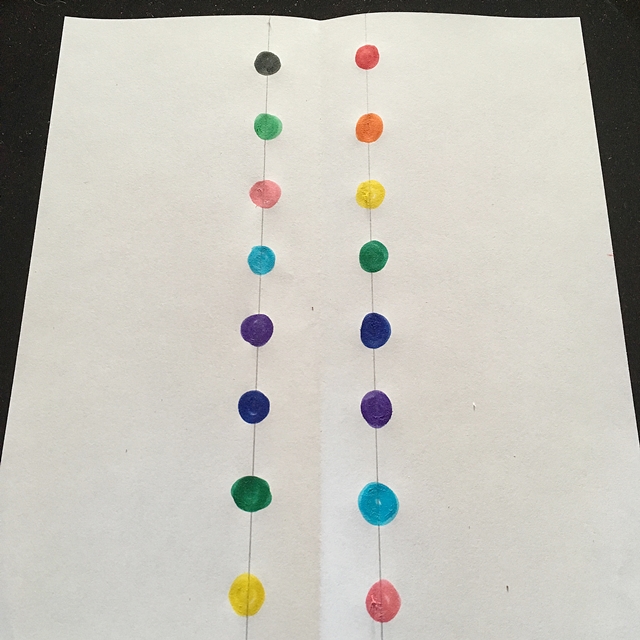
Fold your paper in half down the long side and then open it out again.
Using your ruler and a pencil, draw a line either side of the crease, the line should be about 2 cm from the crease on each side.
Choose the colours you would like to use and place large dots of each colour along these lines, leaving about 1 – 2 cm between each dot. Alternate the colours in whatever way you wish.
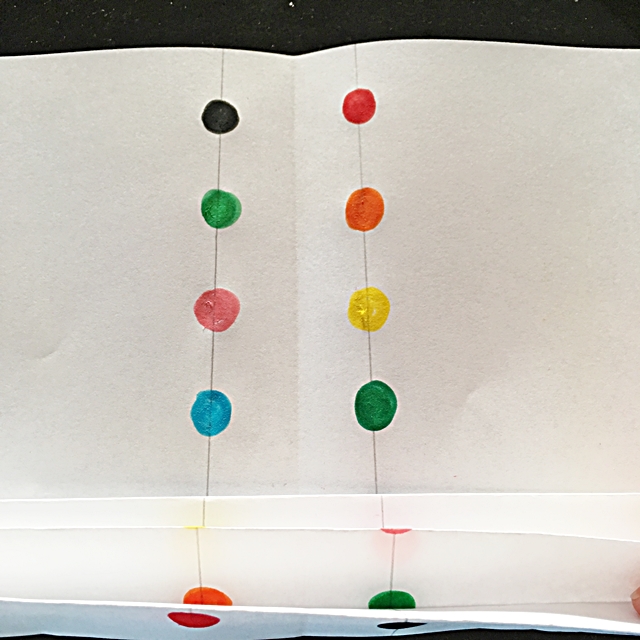
Once you have that done it is time to fold your paper. You need to fold along the shorter side, start at one end and fold the edge of the paper in about 2 cm. Turn over the paper and fold back another 2 cm. Turn over the paper and keep going like this until you reach the other side of the paper.
Keeping the paper folded, fold it in half and secure with a paperclip.
Trim the tops of the folded paper on each side. I used a serrated scissors but you could just cut into a pointy shape or round off the ends, whatever you prefer.
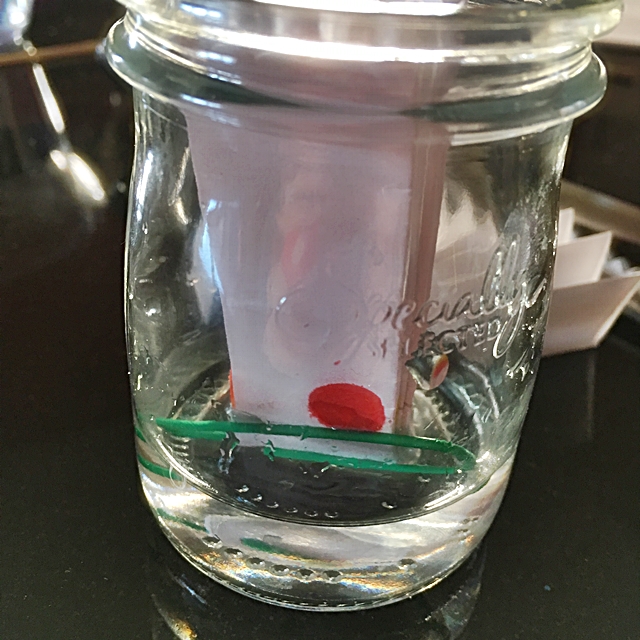
Pour about 1 cm of water into your glass (or beaker) and place the folded paper into the glass, as in the photo below. You want the end of the paper to sit into the water below the dots of markers, you don’t want the water level to reach the dots though.
Now you just need to wait a while. You should see the water creeping up the paper, spreading out the marker ink as it moves upwards. Once the water reaches the top of the paper you can remove it from the beaker and place it somewhere warm to dry.
Replace the paper clip with a strip of wire or a pipe cleaner, and twist it to close. This will be the stem of the flower.
Once dry it is time to open out the paper, into a flower shape, and see what a colourful CHROMATOGRAPHY flower you have made. You can try different types of paper, blotting paper works really well.
The science bit:
This experiment used a scientific technique called CHROMATOGRAPHY to separating different chemicals; in this case the chemicals are the inks in coloured markers. As the water creeps up the paper (by a process called CAPILLARY ACTION) it dissolves the different inks that make up the colour. These inks separate out as the water moves upwards and you get lovely streaks of colours through the paper.
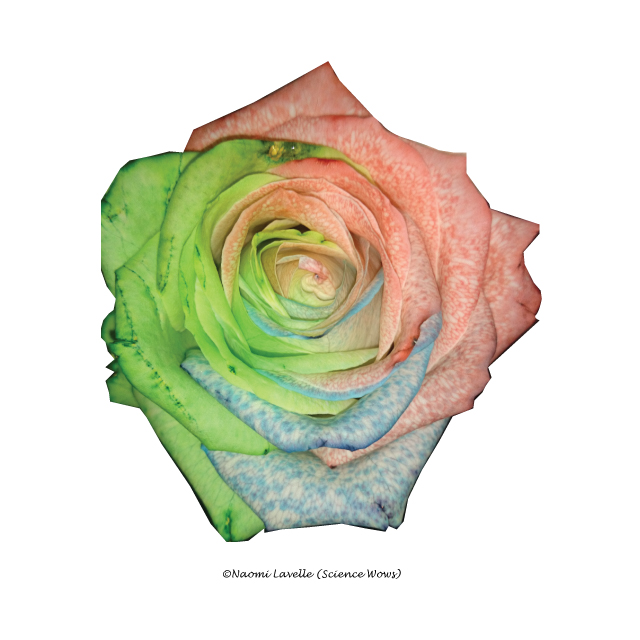
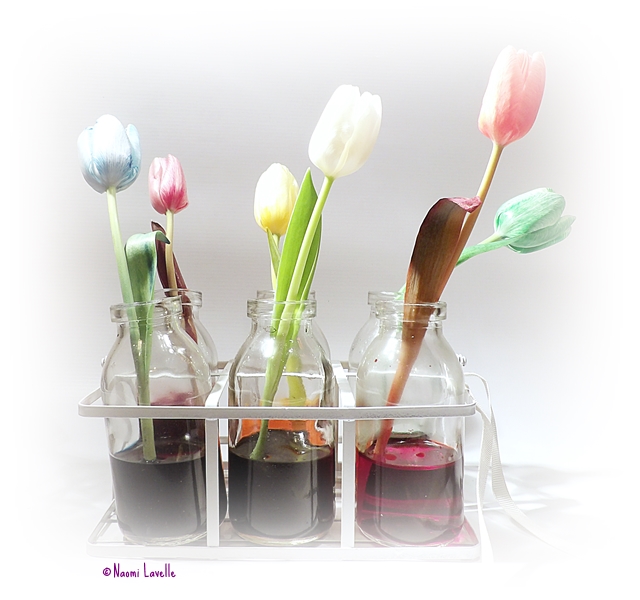
If you prefer real flowers to artificial ones you can still use a bit of science to add some extra colour; Here are two of our favourites (click the images below to find out how to make these beautiful coloured flowers while learning all about TRANSPIRATION!).
Make a multicoloured Rose (click the image to find out more).
Or try making a rainbow bunch of flowers, click the image above to go to the blog post.
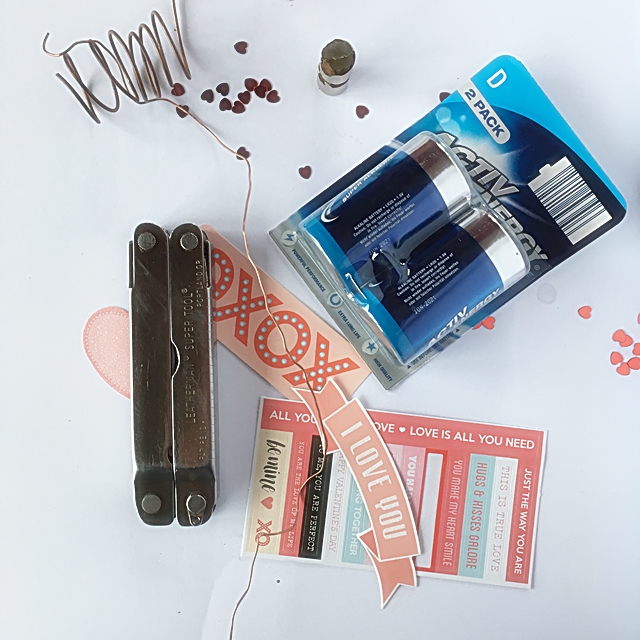
2. You make my heart spin
I’ll admit these do take an extra bit of time and effort but they are really worth it and give a nice WOW factor. Your Valentine will be amazed with a gift like this… left wondering just how you did it. This experiment requires ADULT SUPERVISION!
Here is what you’ll need:
Some copper wire
a pliers
a strong scissors or wire cutter
A battery (AA work just fine), I used a D battery here
A neodymium magnet (these are strong, rare earth magnets, often found in electrical appliances but can be purchased in many specialised shops)
Some items to decorate (optional)
And this is what you do:
You can start by decorating your battery with love hearts or similar stationary if you wish.
Place the neodymium magnet on the base (minus side) of the battery, it will ‘stick’ to the metal.
Now for the tricky bit, you need to make a connection from the positive end of the battery, to the other side (the magnets in this case) to complete an electrical circuit. You can see from the photo and video below that I shaped one end of the copper wire into a heart shape with a little ‘stalk’ to sit on the top of the battery. I then wrapped the remaining wire around the battery and finally, I wrapped the end of the wire around the neodymium magnet (in this case I used two small neodymium magnets, one on top of the other). You will know if the circuit is complete as the battery and copper wire will heat slightly. However in order to get the wire to start to move you need to ensure that the wire is balanced correctly and is not wrapped too tightly around the battery or magnet. It will take a bit of patience and ‘tweaking’ to get this right, but, hopefully you will be rewarded by a lovely spinning heart 🙂
Want to know how it works?
Congratulations, you have just created a HOMOPOLAR MOTOR and, by combining an elctrical current and a magnetic field, working in specific directions, you have generated a force called LORENTZ force, that makes the copper wire move.
To put it as simply as possible, the copper wire connect to the positive and negative ends of the battery, completing a circuit and creating an electrical current that runs through the wire. The neodymium magnet generated a permanent magnetic field. In this set up the electrical current is perpendicular to the magnetic field and this generated teh Lorentz Force which acts on the copper wire, making it move!
NOTE: This experiment requires adult supervision! An electrical current can generate heat and you need to be careful that nothing gets too hot.
3. Gooey with love
Slime may not be the first thing that comes to mind when thinking of a Valentine’s day gift but this one is the prettiest slime I’ve ever made, and it has love hearts and sparkles in it, so what’s not to love. Plus… a few minutes playing with this stuff is time well spent, it is actually a great stress busting exercise, try it and see!
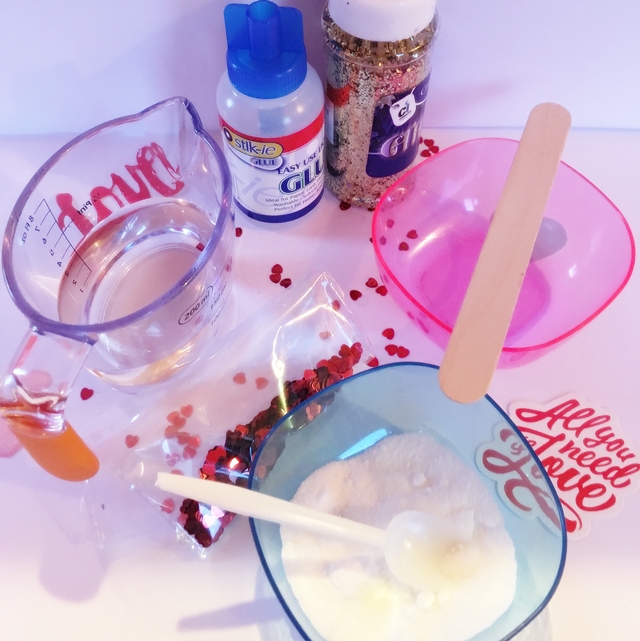
What you will need:
A bottle of clear glue
A jug of water
Bowl and something to stir with
A cup or small plastic cup or a second bowl
Borax powder
glitter and mini hearts (or any decoration of your choice)
Here is what you do:
Pour a small amount of clear glue into your bowl (we used a 10 ml at a guess). Add the little of the love hearts and glitter, just a small sprinkle of each is fine.
Give all that a good mix and then leave to the side while you make up the borax solution
In the cup (or jug) make up your borax solution; you want to dissolve 1/2 teaspoon of borax powder in a cup measure of warm water (about 240 ml); Stir until fully dissolved.
Still the glue constantly and add a very small amount of borax solution. Keep stirring all the time. As soon as the glue is no longer sticky you can pick it up in your hands and start kneading and molding it, for a few minutes.
I will admit that I had a lot of trouble coming up with a good recipe here. I am used to working with white glue (PVA) which makes great slime. The clear glue can get very rubbery slime which breaks easily. So the trick is to use small amounts and add as little borax solution as possible. Also, once the slime forms at all, take it into your hands and knead it.
You can even roll it into a ball and see how bouncy it is…
I know that borax is not easy to buy in Ireland at the moment so I will test out some alternatives and hopefully have a post next week with some borax-powder-free slime recipes!
The science bit:
Congratulation… you have just made a polymer!! In simple terms a polymer is a substance made up of lots of molecules arranged in long chains. If you imagine that the glue is like cooked spaghetti, it slides and slips around the place quite easily. When we add the borax to the glue it causes some of the molecules in the glue to stick together making the glue more rubbery and less liquid! Imagine if you took those strands of spaghetti and tied them together in places, the strands would not be able to slip and slide around nearly as much! The borax and glue mixture is just like your knotted spaghetti!
(Antacid tablets, such as Alkaseltzer – and adult supervision!)
What you do:
First add a few drop of red food colouring to the water until you are happy with the colour.
Add about half a teaspoon of glitter and half a teaspoon of miniature hearts to the water and mix well.
Using the funnel, pour the coloured water into the bottle, filling it to about a third full.
Fill the rest of the bottle with oil (using the funnel again) and replace the lid. You will notice that the oil and water remain as two separate layers.
Hold the bottle on its side and tilt it slowly back and forwards, you will see the water moves like a coloured wave, it gives a lovely effect.
If you want to turn this into a Valentine’s lava lamp just stand the bottle back up again, open the lid and pop in half an antacid tablet (like Alkaseltzer) NOTE: these tablets are not for eating and this part must be supervised by an adult.
Pop the lid back on (don’t seal it fully though as gas will build up in the bottle) and watch your lovely lava lamp.
When it stops you can pop in another piece of Alkaseltzer and watch all over again.
The science bit:
This is a good experiment to explain density. The oil is less dense than the water so it will sit on top of the water, creating two separate layers. The layer of oil keeps the water contained within the bottom half of the water and makes the movement of the water look like waves where the two liquids meet.
When we add the Alkaseltzer tablets to the bottle we get a chemical reaction. The tablets contain an acid and a base (or alkali) in powder form. When the tablet sinks down to the water layer the tablet dissolves and the acid and base get to mix together, forming carbon dioxide gas. The gas forms bubbles, and is lighter than the water and oil so the bubbles float to the top of the bottle where they burst, leaving just a drop of water, which is more dense than the oil so it falls back down. This cycle gives a lovely lava lamp effect of bubbles and blobs rising and falling through the oil layer. We are loving this one in our house at the moment. The glitter and love hearts add a really lovely touch to the whole thing.
So there you have it… five of our favourite Valentine experiments, I’m sure you’ll agree, as well as being educational, these would make great gifts for someone you love! We hope you get as much fun out of making these as we did and remember to let us know how you get on!
HAPPY VALENTINE’S DAY!!!
*****
If you’d like to know a little about the Science of Love, check out this post!
With a name like “Glowing Monster Slime” you just know this experiment is going to be fun! Just look at the photos if you need any convincing!
You will need
You will need…
two small bowls or cups
one large bowl
PVA glue (white or clear is you can get it)
*Borax Powder
Fluorescent paint (you can get non-toxic fluorescent paint in most craft shops)
something to stir or mix with
*You can pick up the borax powder in your local chemist (See note below)
What you do…
To the first cup add half a cup of fluorescent paint and half a cup of PVA glue and mix well.
Mix the glue with the flourescent paint
In the other cup add half a teaspoon of borax powder to one cup of water and mix well until all the powder is dissolved!
Dissolve the borax in the water
Now for the fun bit… pour the glue mixture into the bowl then add the borax solution, mixing all the time.
Mix together the glue mixture ans the borax solution
After a while you can use your hands to mix and mould until you have one big lump of slime and there is little, or no liquid left!
The fun bit
You can store your slime in a ziplock bag or clean jar, it lasts a very long time once you do not let it dry out. You may notice a small layer of liquid separating off the top of the stored slime. This can just be poured off and the slime will become a little more rubbery and less sticky.
When you have finally finished playing just store away
If you have a UV light (black light)** you can make this experiment even more fun by checking out how your slime glows in the dark once the lights go out and the UV light is turned on.
Sooo much fun!
So what is happening?…
Congratulation… you have just experimented with polymers!! In simple terms a polymer is a substance made up of lots of molecules arranged in long chains. If you imagine that the glue is like cooked spaghetti, it slides and slips around the place quite easily. When we add the borax to the glue it causes some of the molecules in the glue to stick together making the glue more rubbery and less liquid! Imagine if you took those strands of spaghetti and tied them together in places, the strands would not be able to slip and slide around nearly as much! The borax and glue mixture is just like your knotted spaghetti!
*Where can I get Borax powder?
In Ireland you need to buy Borax powder in a pharmacy. The production is a little erratic and the larger volumes are no longer available! You should be able to get a 100g tub in any pharmacy and it costs between €2 and €3.
**Where can I get a UV light?
This experiment is lots of fun without the UV light but the glow in the dark bit really does take it to a different level. My youngest nearly burst waiting for the night to fall so we could do that part of the experiment. If you are considering buying a UV light you should be able to get one fairly cheaply. I got mine from Maplin. I will be sharing lots more glow in the dark experiments, so if you do get one remember to check back here for some more ideas.
I hope you enjoy this as much as we did and please let us know if you do try it out!
UPDATE 2017: Borax powder is no longer as readily available in Ireland. here is one alternative, using very simple ingredients… check out this post on how to make silly putty.
Or check out our Ultimate Slime Guide for lots of fantastic slime recipes using contact lens solution or laundry detergent.
There is a lovely linky running over on the Mama Courage blog. It invites bloggers to get over any hang ups they may have and let the kids get… well messy. Messy play is great for children as a fun, tactile, interactive activity. We are all for it in this house. I thought the linky would be a great wayto share some of our favourite messy experiments with you all.
I hope that these entice you to roll up your sleeves and get stuck in to some messy play science, just don’t look at me when it comes time to clean up!
Here are three of our favourite “messy” science experiments…
1. Making Slime
Of course this is top of the list… messy and slime are interchangeable really, aren’t they?
This is one of our popular slime recipes…
You will need… two bowls (or cups), borax powder (you can buy this in pharmacists throughout Ireland), water, PVA glue, some stirrers and food colouring of your choice (optional)
What to do…
Add one cup of water to the first bowl and mix in a teaspoon of borax powder until it is all dissolved.
Add a cup of PVA clue to the second bowl; add a cup of water and mix well.
If you would like to colour the slime add a few drops of your chosen food colouring to the glue mixture and mix thoroughly.
Add the borax solution to the glue mixture and start to stir immediately… you will notice that the glue turned to slime almost straight away.
The slime can be stored in an airtight container and will last for years once it is not allowed to dry out.
Time for slime
What is happening?…
Congratulation… you have just made a polymer!! In simple terms a polymer is a substance made up of lots of molecules arranged in long chains. If you imagine that the glue is like cooked spaghetti, it slides and slips around the place quite easily. When we add the borax to the glue it causes some of the molecules in the glue to stick together making the glue more rubbery and less liquid! Imagine if you took those strands of spaghetti and tied them together in places, the strands would not be able to slip and slide around nearly as much! The borax and glue mixture is just like your knotted spaghetti!
2. Making goo (otherwise called Ooblecks)
Messy but fun
This stuff is very messy but oh so much fun. Not just for the kids either, once adults get their hands on this goo their is no stopping them. It makes a great stress reliever… honestly, have a go!
You will need… A large bowl, cornflour, water, a large spoon to mix and food colouring (optional)
What to do…
Mix the cornflour and water together in the bowl (approximately one cup of cornflour to two cups of water). Add a few drops of food colouring if you wish. Once it is well mixed it’s time to get stuck in. First place your hands into the goo and slowly lift them, watching how it runs through your fingers. Now try punching the surface of the ooblecks with your fist, you may be surprised with the result.
Here is an demo from an enthusiastic member of the Science Wows team:
I left him play while I was making dinner but had to take one more video to show how much fun he was having (you’ve got to watch this one)…
What is happening?…
Ooblecks is what we call a Non Newtonian Fluid… meaning that it does not follow the laws of Netonian Physics. When left to rest it looks just like a regular liquid. However when disturbed by strong hitting, shaking or pulling it acts more like a solid. It is a phenomenon worth studying and although still a bit of an enigma, scientists think that the material normally acts as a liquid but can produce a sudden, local reaction to rapid impact and stress, reinforcing the area and briefly solidifying the suspension.
Ooblecks takes it’s name from the green slime that fell from the skies in the Dr Seuss booh “Bartholomew and the Oobleck“.
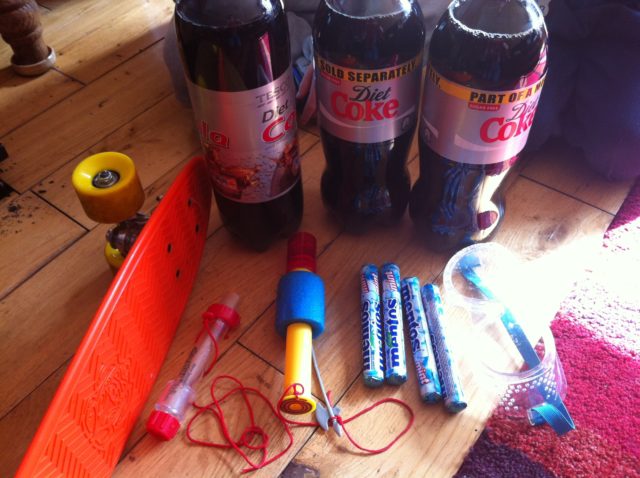
3. Our version of the ‘Coke and Mentos’ experiment
You have probably all seen the coke and mentos experiment, maybe you have even tried it yourself. The basic idea is that you want to get as many mentos as possible into a bottle of coke as quickly as you can.
Last year I found myself minding two boys who were off “sick” from school. As the day went on it was obvious that they were getting a little less sick and a little more bored. So I decided to give them a challenge (you can read the original post here);
I gave them these …
The props
… and told them to devise their own version of the coke and mentos experiment.
This is what they came up with…. (notice the poor teddies that were strapped onto the front of the skateboard!)
So what is happening?...
Firstly, this is not thought to be a chemical reaction between the coke and the mentos. It is most likely a physical reaction known as nucleation; The coke is full of carbon dioxide gas, to give it its fizz; the mentos are full of tiny little craters on the surface of the sweet, the carbon dioxide gas is able to form bubbles in these “craters” producings thousands of tiny bubbles all at once; these bubbles of gas are under a lot of pressure within the bottle of coke and so come shooting out the mouth of the bottle. If anyone knows anything about Newton and his laws they will know that every reaction has an equal and opposite reaction (Newton’s third law of motion)… so the coke comes shooting out of the bottle in one direction and the force of this propels the skate board forward in the opposite direction. PRETTY COOL!
These are just some of our favourite messy play experiments. Check out what others are getting up to in Mama Courage’s Messy Play Project linky.
Here is a fun science experiment that all kids love….. and no matter how many times a child may have done this one, they are always happy to do it again!
HOW TO MAKE SLIME
You will need….
two small bowls or cups
PVA glue (white or clear is fine)
water
food colouring (optional)
Borax* powder.
*You can pick up the borax powder in your local chemist (See note below)
What you do…
To the first bowl add half a cup of water and half a cup of PVA glue and mix well.
If you want to make coloured slime add a few drops of food colouring and mix this in well.
In the other bowl add one teaspoon of borax powder to one cup of water and mix well until all the powder is dissolved!
Now for the fun bit… pour the borax solution into the PVA/water mix and mix, mix, mix!!! YOU HAVE JUST MADE SLIME!
This experiment is as fun as it looks!
If you want to keep your slime just pop it into a Zip-lock bag and seal it and it will be ready for you next time you want some slimey fun!
So what is happening?…
Congratulation… you have just made a polymer!! In simple terms a polymer is a substance made up of lots of molecules arranged in long chains. If you imagine that the glue is like cooked spaghetti, it slides and slips around the place quite easily. When we add the borax to the glue it causes some of the molecules in the glue to stick together making the glue more rubbery and less liquid! Imagine if you took those strands of spaghetti and tied them together in places, the strands would not be able to slip and slide around nearly as much! The borax and glue mixture is just like your knotted spaghetti!
*Where can I get Borax powder?
In Ireland you need to buy Borax powder in a pharmacy. The production is a little erratic and the larger volumes are no longer available! You should be able to get this 100g tub in any pharmacy and it costs about €2.25.
UPDATE 2017: Borax powder is no longer as readily available in Ireland. here is one alternative, using very simple ingredients… check out this post on how to make silly putty.
Or check out our Ultimate Slime Guide for lots of fantastic slime recipes using contact lens solution or laundry detergent.
Check out next week’s Fun Friday post for more slime recipes to try at home!