Can water go uphill? A rainbow water experiment

Can water go uphill? A rainbow water experiment

Can water go uphill? The answer is… yes it can! In some ways anyway; water can travel upwards by a process called capillary action.

Capillary action can be described as water climbing upwards due to weak forces created between the water molecules and the material the water moves up along, or through. In the experiment below the water travels up the paper towel, forming these forces with the paper towel as it creeps upwards.

For this experiment you will need…

  • six clear cups or bottles
  • six pieces of paper towel, folded length-ways into long strips
  • A jug of water
  • Food colouring… red, yellow and blue

What you do…

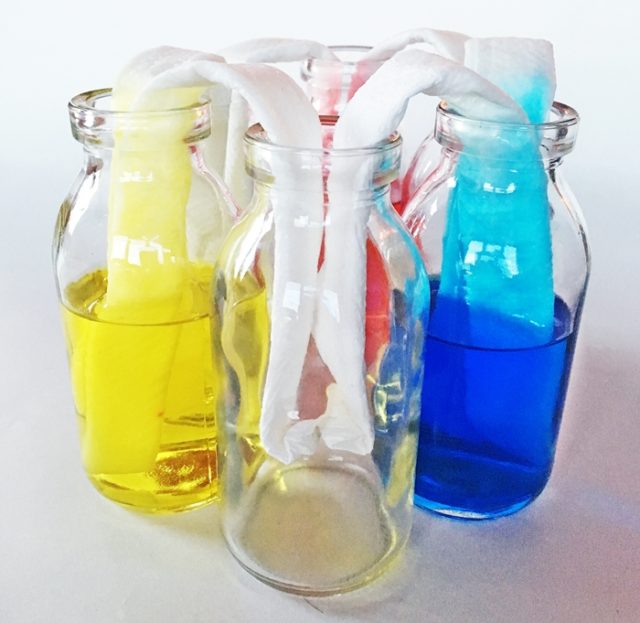
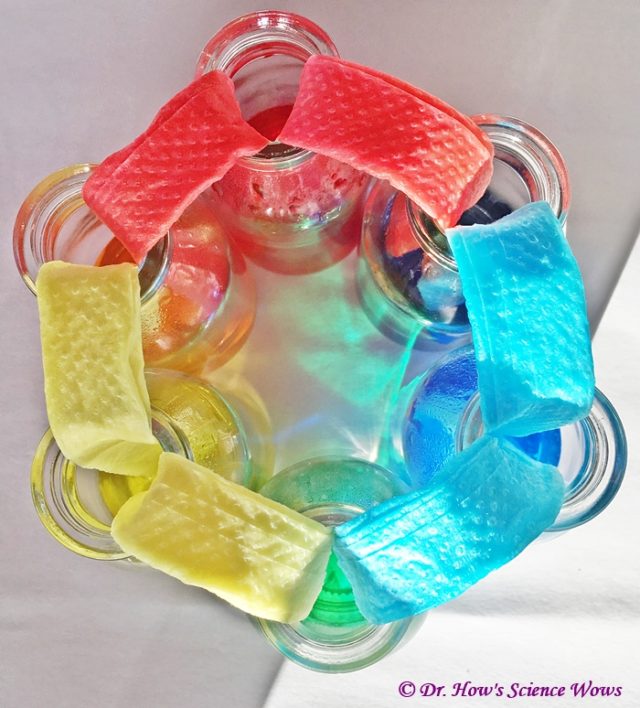
We arranged our six bottles in a circle (but you could do this in a straight line too, if you want to create the same colours as us, you will need seven bottles in a straight line, with one colour repeated… think about it 😉 )

Half fill every second bottle with water, leave the other bottles in between empty.

Add a few drops of food colouring to each bottle containing water, red in one, yellow in the next and blue in the next.

Now take a piece of the folded paper towel and place one end into the bottle containing red-coloured water, and the other end into the empty bottle beside it; make sure the paper towel sits into the coloured water.

Take another paper towel and place one end in the empty bottle (that is now connected to the red-coloured water bottle) and the other end into the bottle containing yellow-coloured water.

Repeat this all around the circle so that the paper towel ‘wick’ goes from the yellow-coloured water bottle to an empty bottle and another from that empty bottle to the blue-coloured water bottle; finally place a paper towel ‘wick’ from the blue-coloured water bottle to an empty bottle and another from that empty bottle to the red-coloured water bottle.

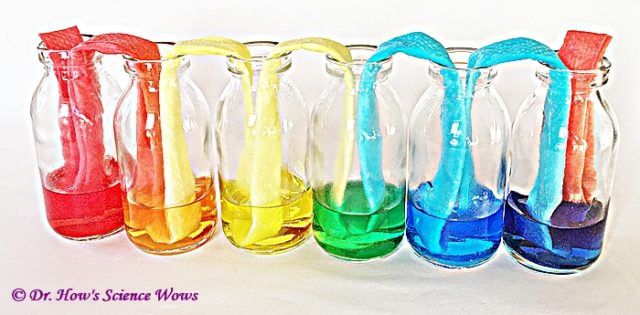
When all set up it will look like this…

walking-water-1

walking-water-2

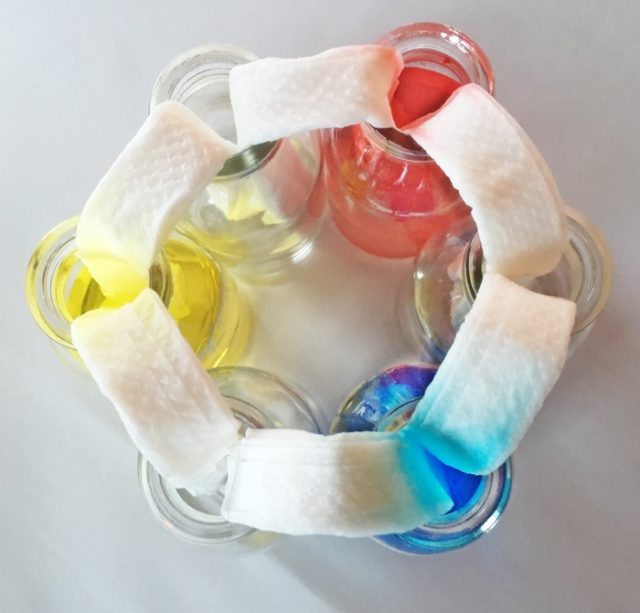
Then all you have to do is wait! You should see the water starting to climb up the paper towel ‘wicks’ within a few minutes. Leave the experiment for a few hours or overnight to get the final result.

Results:

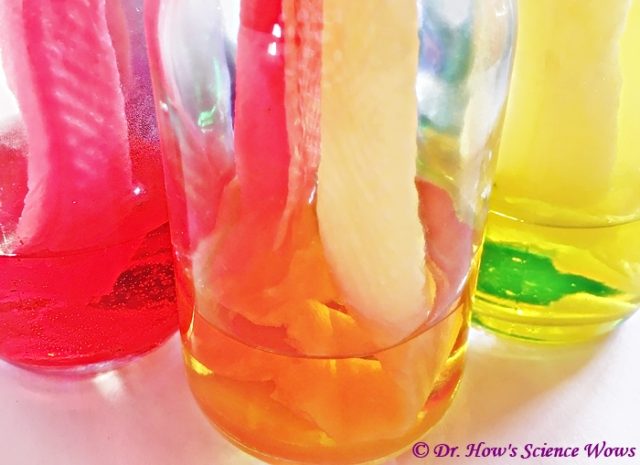
Eventually the water will travel up one side of the paper towel and down the other side, starting to fill the empty bottle. As water comes into the empty bottle from each side, the two colours of water will mix.

The red and yellow-coloured waters will mix in the bottle between them, creating orange-coloured water.

walking-water-4b

The yellow and blue-coloured waters will mix in the bottle between them, creating green-coloured water.

walking-water-3b

The blue and red-coloured waters will mix in the bottle between them, creating indigo-coloured water.

walking-water-5

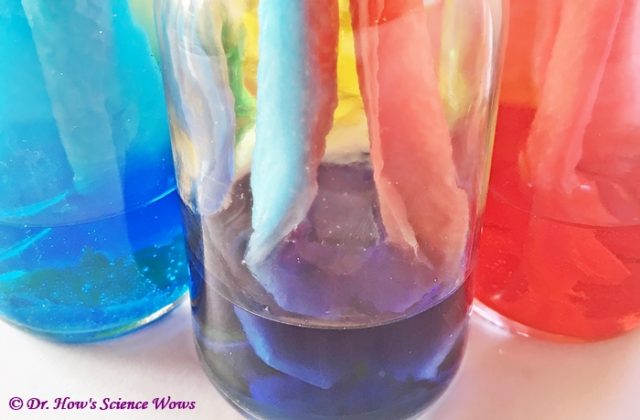
You will notice that all the bottles have now got about the same amount of water in them. Once this happens no more water will transfer between bottles.

walking-water-7b

walking-water-6

What is happening?

As mentioned above, the water is able to climb up the paper towel due to these forces, called adhesive forces, that form between the water molecules and the paper towel.  This process is called capillary action.

********

On the subject of water, if you ever wondered why our fingers wrinkle in the bath check out my recent Appliance of Science column in the Irish Examiner. 

Coloured flower science experiment using tulips

Coloured flower science experiment using tulips

I know I haven’t been blogging much lately, I am trying to work on a little something else that I have wanted to do for a very long time. If I ever get the other project finished I’ll be sharing it right here so watch this space (not literally, it’s taking me a LONG time!).

There is still plenty of science going on in the background though, as is common enough around here. This week we repeated an old favourite, an experiment demonstrating water flow and transpiration in plants… our coloured flower science experiment. I spotted a bunch of pretty white tulips in my local super market and that was all the reason I needed. I had also spotted a set of little bottles while away in Westport last weekend and had to buy them for this experiment, which, I think, elevates my geek status to a whole new level.

I have blogged about this topic before, so if you want more information you can check out this post.

YOU WILL NEED:

  • Some white flowers*
  • Food colouring (I usually use the Goodall’s ones, available in most supermarkets)
  • Water
  • Glasses, cups or other containers, one for each colour you will use

*This will work with all (or almost all) white flowers but it works better with some than others. You can of course use other coloured flowers, daffodils are a popular choice. I have achieved good results with roses, carnations, oxeye daisies and some Chrysanthemums. You can choose the flowers based on what you want to achieve but if working with children (particularly young children) or doing this as a classroom project them I would definitely recommend the tulips. The results are rapid so children will be able to see the colour arriving into the flowers within a fairly short time frame.

WHAT TO DO:

Choose how many different colours you want to use. Place one colour into each glass and add water. I usually use at least 10 mls of food colouring to 20 mls of water (if unsure use a 50:50 ration of food colouring to water).

Choose your flowers, one for each glass, and trim them to the desired length. You will get a more rapid result with a shorter stem.

Then simple place a flower in each glass and wait! With these tulips I began to see a result within less than an hour. I set this experiment up overnight and went from this…

tulips1

… to this…


tulips3

WHAT IS HAPPENING:

Water is transported up the stem of the flower through little tubes called xylem. The coloured water will travel through the xylem all the way up the stem to various parts of the plant and right up to the flower. The coloured water stains the plant as it moves through it and this is most apparent when the white flowers change colour. The water ultimately evaporates out of the plant through little pores called stromata. This process is called transpiration and is much like perspiration in humans.

OTHER SUGGESTIONS:

If you want to take this one step further you can try to make a multicoloured flower, like I did with this rose last year. Just click on the image to go to the post with full instructions.

rose


If you try this experiment, or a version of it, I would love to hear how it you get on!


Mystery Creature Revealed – The Thorny Devil

Mystery Creature Revealed – The Thorny Devil

Did you guess last week’s Mystery Creature? It was the Thorny Devil (Moloch horridus) or Thorny Dragon. This formidable looking lizard is native to Australia. But it he as dangerous as he looks? Here are some interesting facts about the Thorny Devil.


photo credit: Bill & Mark Bell via photopin cc

The name Thorny Devil or Thorny Dragon is quite an intimidating monocle but even more so is the scientific name for these lizards… Moloch horridus; Inspired by the poem Paradise Lost (by Milton) in which the god Moloch is described as “a horrid king besmeared with blood of human sacrifice”!

In reality the Thorny Devil does not live up to it’s name as it is small in stature (no more than 20 cm), slow moving and eats only ants (thousands per day)

As well as ants, the lizard needs water to survive the arid scrub lands and deserts of it’s Central Australian habitat. It has a very interesting way of “harvesting” water. It walks slowly through the scrub letting dew drops fall on it’s thorny body. Between the thorns are tiny channels that carry the water right to the Thorny Devil’s mouth.


The  entire surface of the Thorny Devil is covered in  spiky scales but to defend rather than to harm! photo credit: ccdoh1 via photopin cc
photo credit: ccdoh1 via photopin cc


Another interesting feature of this animal is it’s defense mechanisms. Although in reality it does not have any real weaponry of defense it’s thorny exterior acts as a deterrent to potential predators (mainly wild birds). If this is not enough he bends his head, revealing a false head with big horns above his neck.


So although the entire surface of the Thorny Devil is covered in spiky scales these are to defend rather than to harm!


I don’t really think he deserves the name, but it might just add to his street cred and keep the predators at bay!


What do you think… cute or ugly, or just misunderstood?

Fun Friday – how to make an ocean in a bottle

Fun Friday – how to make an ocean in a bottle

It is a simple and easy Fun Friday experiment today – how to make an ocean in a bottle


All you need for this experiment is…

  • an empty clear plastic bottle (a 1 or 2L soft drink bottle will work fine)
  • water
  • cooking oil (any kind)
  • Blue food colouring
  • A funnel


What you do…

  1. Using the funnel fill the plastic bottle about one third full with water
  2. Add a few drops of food colouring to colour the water blue
  3. Using the funnel again fill the bottle with the oil (you will notice that the water and oil will quickly settle into two separate layers)
  4. Close the lid tightly on the bottle and turn the bottle on its side
  5. The water layer will be on the bottom of the bottle
  6. If you rock the bottle from side to side you can create a wave like motion of the water, looking just like a little ocean in a bottle; see what kind of waves you can make!


Ocean in a bottle
Ocean in a bottle


How does it work…

This is a good experiment to explain density. The oil is less dense than the water so it will sit on top of the water, creating two separate layers. The layer of oil keeps the water contained within the bottom half of the water and makes the movement of the water look like waves where the two liquids meet.

I have discussed density in more detail in this previous post as well as sharing lots more density experiments.

If you get bored of your ocean in a bottle, why not stand it upright again and add some Alka Seltzer tablets to instantly turn it into a lava lamp!


Enjoy!