Can you name this creature?

Week 30th September to 6th October, 2013

Last week’s alien like Mystery Creature was the Tail Emperor Butterfly caterpillar (Polyura pyrrhus sempronius).  Despite its looks it is quite harmless!

photo credit: teejaybee via photopin cc

Found in Eastern Australia this fairly rare caterpillar feeds on the leaves of various species of wattle (Acacia) as well as Poinciana, Illawaera flame tree, lacebark and kurrajong.  It weaves a loose white cocoon on the leaves of the plant where it stays when not feeding.

As a mature caterpillar it is easy to identify with its four horned head, green body and (usually) two yellows stripes on the third and fifth segments of its body. The caterpillar grows to about 8 cm before pupating into into… the beautiful Tailed Emperor Butterfly!

photo credit: LindaRo2011 via photopin cc

The upper side of the butterflies wings are predominantly white and black.

Some fun science jokes…

  • What are black holes? Things you get in black socks!
  • What do you call the leader of a biology gang? The Nucleus!
  • Why are chemists good at solving problems? Because they have all the solutions!
  • What is a nuclear physicist’s favourite meal? Fission chips!
  • What does a geneticist wear when they want to look good? Designer genes!
  • Why are frogs such happy creatures? Because they can eat whatever bugs them!
  • What is the opposite of a cold front? A warm back!

Fun Friday – making slime!

Here is a fun science experiment that all kids love….. and no matter how many times a child may have done this one, they are always happy to do it again!

HOW TO MAKE SLIME

You will need….

  • two small bowls or cups
  • PVA glue (white or clear is fine)
  • water
  • food colouring (optional)
  • Borax* powder.

*You can pick up the borax powder in your local chemist (See note below)

What you do… 

  • To the first bowl add half a cup of water and half a cup of PVA glue and mix well.
  • If you want to make coloured slime add a few drops of food colouring and mix this in well.
  • In the other bowl add one teaspoon of borax powder to one cup of water and mix well until all the powder is dissolved!
  • Now for the fun bit… pour the borax solution into the PVA/water mix and mix, mix, mix!!! YOU HAVE JUST MADE SLIME!


This experiment is as fun as it looks!

If you want to keep your slime just pop it into a Zip-lock bag and seal it and it will be ready for you next time you want some slimey fun!

So what is happening?…

Congratulation… you have just made a polymer!! In simple terms a polymer is a substance made up of lots of molecules arranged in long chains.  If you imagine that the glue is like cooked spaghetti, it slides and slips around the place quite easily.  When we add the borax to the glue it causes some of the molecules in the glue to stick together making the glue more rubbery and less liquid!  Imagine if you took those strands of spaghetti and tied them together in places, the strands would not be able to slip and slide around nearly as much! The borax and glue mixture is just like your knotted spaghetti!


*Where can I get Borax powder?

In Ireland you need to buy Borax powder in a pharmacy.  The production is a little erratic and the larger volumes are no longer available!  You should be able to get this 100g tub in any pharmacy and it costs about €2.25.

UPDATE 2017: Borax powder is no longer as readily available in Ireland.  here is one alternative, using very simple ingredients… check out this post on how to make silly putty.

Or check out our Ultimate Slime Guide for lots of fantastic slime recipes using contact lens solution or laundry detergent.


Check out next week’s Fun Friday post for more slime recipes to try at home!

Life on the edge – a maths question!

I was just asked a great maths question from the wonderful boys and girls at Screen National School (5th and 6th class) in Wexford.  These children are on the ball with their technology as the question came through twitter and they also have a fab blog that you should check out!

So here is the question…..

“Does a cone have one edge or is it not an edge at all because it is a curved line?”

The answer is …. it depends on how you define and edge!

photo credit: L. Marie via photopin cc


The basic definition of an edge is the line where two faces meet.  If we look at any geometrical object that has flat surfaces, such as a cube, then it is easy to count the number of edges.

This definition works well for all polyhedra. However it gets a lot more tricky when we talk about solid objects with curved surfaces.  If we go by this definition when talking about a cone shape then we would have to say NO, the cone does not have a line where two faces (flat surfaces) meet.

So the answer is …. a cone has zero edges!

However…
… if we look at the definition of an edge as being the line where two surfaces meet we could count the curved surface of the cone as one surface and the flat circular base as the other surface, so we have an edge where both meet.  This is how my daughter’s teacher (3rd class) approaches the issue of how many edges a cone has… she counts the circular line where the base touches the curved face of the cone as one edge!

So the answer is … a cone has one edge!

BUT…
…an edge can also be defined as a boundary of a geometric figure.  This definition works better when we are considering curved surfaces like the one we find on the cone.  If we look at the cone with this definition then we could say that the cone has one curved edge.  When I posed this question to Helen Bullock of Anseo a Mhuinteoir she said she includes this classification when counting edges of cones within the classroom.

So the answer is…. a cone has two edges!

So there you go, ask a question and sometimes you get more answers than you bargained for!  It would appear that all three answers are correct once you state which definition of an edge you are using!

A bit more fun…

  • There are lots of fun ways to learn with geometry, here are some on line geometry games: 3D Games and Maths Play .
  • Test your knowledge with this Geometry Quiz.
  • There are some great ideas on this blog, I particularly like this DIY Geoboard project!
  • I really love the idea of these Geometry Dominos, it could be a great class project to create your own!
Did you know that……Ireland’s Maths Week 2013  takes place from 12th to 20th October with events all around the Country?  Check out the official website for more details!

If you have any questions or ideas to add please leave your comment below, I always love to hear from you!
Furter Resources:

Can you name this Creature?

Mystery Creature: 23rd to 29th September, 2013

There were plenty of correct answers to last week’s Mystery Creature, it was a Malay Civet (Viverra tangalunga).

photo credit: bluefuton via photopin cc

Also known as the Malasian civet or Oriental civet this animal is found on a number of Indonesian islands, the Malay peninsula, the Philipines and Singapore.Their body length is between 50 and 100 cm from head to tail.  They are greyish in colour with black spots on the torso, a black stripe down the back and upper part of the tail.  There are usually three black stripes on each side of the neck and the under part of the tail is banded black and white.


Found in a range of habitats including forests, cultivated lands, grassland and even on the outskirts of villages.  These animals like to stay in the cover of vegetation during the day, emerging into the open areas at night (primarily nocturnal).  Although land dwellers they are capable climbers.   They are good hunters, eating small mammals, reptiles and frogs.  They are omnivores and will eat fruit and vegetation also.

A litter is made up of one to four young and a female can have two litters a year. The young are kept in dense grasses or in a shallow hole in the ground.  Civets are usually solitary, non aggressive animals,with a life span of up to 15 years.

Civets are of particular interest to humans for two reasons.  The first is the secretion of a type of musk,  called Civet that is used in the perfume industry.  The other is in the processing of a rare and valued type of coffee called Civet coffee. Civet coffee is a rare and exclusive coffee that has been prepared from partially digested coffee cherries, collected from the dung of the Asian palm civet.  The coffee bean is exposed within the digestive system of the civet and is then partially digested in the stomach.  This is thought to add to the unique flavour and aroma of the coffee.  A cup of civet coffee can cost up to $100 in some parts of the world although the production of this rare coffee is often thought to include entrapment and force feeding of the animal in a cruel and inhumane fashion.

Note: Many species of civet are similar in colouring and markings.  The image source of the above photo identified the civet as a Malay civet but without a reference to scale and an image of the animal from different angles it is possible that the civet in the above image is a small Indian civet and not a Malay civet.

Fresh air, Nature’s bounty and Microscopic Art

The wind and the rain have arrived here in the West of Ireland as Autumn matures and prepares to shed her leafy robes for winter clothing.  Autumn has arrived gently this year though, giving us plenty of time to adjust. Every hedge and ditch has been scoured and plucked as the Sun shone long and the berries were plentiful.  As the children headed back to school we kept our afternoons for rambling around our country lanes, filling our buckets with the bounty!
Blackberrying on an Autumn afternoon

Sun dappled roads on an Autumn ramble

Blackberry bounty

We gathered other treasures too as we walked, it wouldn’t be a real adventure without a pocket full of sticks and stones and other odd delights.  Discarded branches full of lichen and moss are a really precious find, especially if there is a microscope at home!

Caer was intrigued to know what they might look like from a different perspective… a more minute perspective, so we got out the microscope and I left her to explore.

She was very excited with what she discovered and thought her branches full of lichen and moss looked very beautiful when she got to see them up close.  Suddenly something small on a branch turned into a magical scape… a forest within a forest.  

Lichen on a branch … by Caer

Lichen up close…. by Caer

Lichen and moss Part 1… by Caer

Lichen and moss Part 2 … by Caer

I hope you liked this little photo story of our Autumn ramble and what we found looking at nature through a different lens…. 

“If you look the right way, you can see that the whole world is a garden.” 
― Frances Hodgson BurnettThe Secret Garden
…..just a thought!

Can you name this creature?

Week 16th – 22nd September, 2013

How did you do with last week’s  Mystery Creature? It is the Magpie Goose (Anseranas semipalmata)… not native to our Irish shores so a bit tricky for some!

photo credit: Frankzed via photopin cc

This unusual water fowl can be found in northern Australia and southern New Guinea.  With their distinctive black and white plumage these birds are often referred to as pied geese.  Their feet are a striking orange colour, and unlike most water fowl their feet are only partially webbed, their toes are very long and strongly clawed and their legs are so long that they extend beyond their tail when in flight.

Although called geese these birds are classified in a sub family (Anseranatinae) all on their own.  Considered by some as living fossils their ancestors existed more than 60 million years ago.  The evolutionary divergence of the Magpie goose is thought to have occurred long before ducks, geese or swans.

These birds are found in a variety of open wetland areas feeding on seeds and other aquatic vegetation.  They often breed in threes, with the male doing most of the nest building.  Both females will lay their eggs in the same nest (up to eight eggs per female) and all three parents will help raise the young.  They are the only known water fowl to directly feed their young (bill to bill).

Magpie geese make a loud honking sound that can carry long distances over the wetlands.  They molt their flight feathers gradually, removing the need for a flightless period.

Fun Friday – Making butter!

Last week the Fun Friday blog was all about density, how less dense liquids will sit on top of more dense liquids and how some liquids such as oil and water do not mix!

Milk and cream are quite like the oil and water mix as they are made up of fat and water.  So why do they not separate into two layers like the oil and water we used last week?  That is because the fat is broken up into tiny little droplets that float evenly throughout the water.  This is an example of an emulsion.  

For today’s Fun Friday we separated the fat from the water in cream and made some yummy butter!  My Fun Friday Science Team really enjoyed this experiment especially as they got to eat the results… spread thick on their favourite bread!

How to make butter…

What you will need: double cream, salt (optional) a jar with a screw tight lid (preferable plastic!) and a
marble (optional)

Add the marble (if using) and the cream to the jar (no more than half full).

Add salt (if using) … we used about half a teaspoon.

Put the lid on tight and start shaking….

….And shaking….

…And shaking!

First it turned to whipped cream, then small lumps of butter started to form!

Keep shaking (about 10-15 minutes) until the butter lumps start to get bigger and clump together
and you can see the watery bit separate out.

At this stage you can stop shaking (phew!); now you want to separate the butter from the watery bit
(which is actually buttermilk!).

We used clean muslin to separate the butter from the buttermilk, but a few sheets of
kitchen roll will work too, or even a clean tea towel.

Squeeze the lump of butter to remove more of the liquid!

Et voila!  You end up with a lovely yellowy lump of butter and some buttermilk
(we used our buttermilk for making bread!)

You can add salt at this stage instead if you prefer!

We made this! 

So what happened (the science bit!)?…

As I mentioned the cream is an emulsion…. a liquid suspension of tiny droplets of one liquid floating in another liquid.  In this case tiny droplets of milk fats float in mainly water.  When we shake the mixture the tiny droplets of fat collide with each other and the fat sticks together.  If we keep mixing most or all of the fat will stick together in one big lump, completely separated from the water.  The resulting lump of milk fats is our butter!
This was a really fun and simple experiment that made my kids think about the science behind their food and where it comes from.  It has started a number of discussions in our home and no doubt will lead to a few more posts on this blog!  Of course once we had made the butter I had to make some yummy bread to put it on and now the kids want me to make the blackberry jam from our stash in the freezer.  🙂
Enjoy your weekend!
If you try out this experiment or have any questions or things to add, do please leave a comment below, we love to hear from you!
What is the difference between a butterfly and a moth?

What is the difference between a butterfly and a moth?

My nine year old daughter went a bit crazy on the butterflies and moths this Summer.  It was great to see so many of them and herself and her friend spent hours catching them, minding them in the insect observer they have, identifying which type they were and eventually setting them free.  To my knowledge none of them were harmed in the process and along with plenty of fresh air she also got to learn a lot about nature!


Caer asked me the other day…. “What is the difference between a butterfly and a moth?”
Moths and butterflies both belong to the order Lepidoptera (which means scaled wings).  They both start their lives as caterpillars and then transform into winged insects that eat nectar in the adult phase of their life.  There are however many general differences between butterflies and moths, although for each difference there is usually a moth or butterfly that is an exception to the rule!

So here are some differences between butterflies and moths….

Most moths are active at night (nocturnal) while butterflies usually fly during the day (diurnal ).
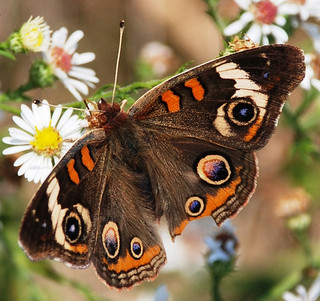
The antenna on butterflies tend to have a little ball at the end, these are referred to as clubbed, while the antenna of moths are usually plain or feathered.
Clubbed antennae on buckeye butterfly
photo credit: jjjj56cp via photopin cc
Feathery antennae on white ermine moth
photo credit: e³°°° via photopin cc

Butterflies fold their wings together behind their back when at rest while moths tend to place their wings down their backs.

Wings folded back along the body of a tiger moth
Wings folded together on a Queen butterfly
photo credit: jjjj56cp via photopin cc

The forewing and hindwing of a moth are attached together by a filament called a frenulum.  This allows the wings to move together in flight.  Butterflies do not have frenulums.

Both butterflies and moths undergo a complete metamorphosis (homometabolism) from egg to caterpillar, to chrysalis to adult.   However the chrysalis of a moth is usually enclosed in a cocoon of silk while that of a butterfly is not.
Butterflies tend to be more colourful than moths, although this is not always the case!

Moths tend to have hairy, plump bodies while most butterflies have more smooth, slim bodies.

An exception to the rule…

There are, as I mentioned, plenty of exceptions to all these rules…. the Madagascar sunset moth (Chrysiridia rhipheus) is a good example.  The bright colours of this day flying moth are more akin to the colours we expect from a butterfly rather than a moth!  As always, Mother Nature likes to keep us on our toes!

The Madagascar sunset moth
Image credit: Anaxibia via Wikimedia Commons
If you have spotted any unusual butterflies or moths lately or have anything to add please leave your comment below!

Can you name this creature?

Week 9th to 15th September 2013

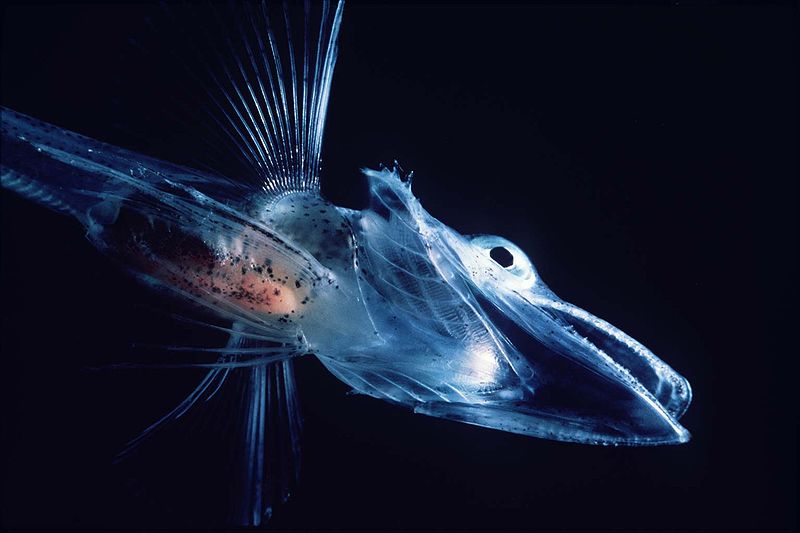
How did you do with last week’s Mystery Creature? It was an Antarctic icefish, did you guess it?

Image source: Wikimedia Commons

There are a number of different types of Antarctic icefish but this one is from the Channichthyidae family. These fish are found in the cold waters off the Antarctic, as their name suggests.  They are capable of surviving in waters that often reach temperatures below 0oC in the Winter months.  There are some very unusual features to this fish.  When first discovered in 1927 they were observed to be scaleless fish with pale, sometimes translucent skin.  Further investigation revealed that these fish are unique among vertebrates in that they do not contain any red blood cells.  It appears they lack haemoglobin, a protein used by red blood cells to bind and transport oxygen around the body.  Haemoglobin also binds iron and is responsible for the red colour of oxygenated blood.

So how and why do these fish survive without this oxygen carrying protein? It would seem that this is an accident of evolution, the haemoglobin gene has mutated resulting in a non functional gene, however the fish has managed to adapt and survive.  In order to do this it have developed larger hearts and wider vessels in their circulatory system.  The water within which it lives has high levels of oxygen which it absorbs directly through the body (hence the thin, scaleless skin) as well as through the gills.  Without haemoglobin it carries only 10% of the normal levels of oxygen within its blood.  The cardiac system of the icefish has to work at a much faster rate in order to compensate for this.

Antarctic icefish also produce an antifreeze protein to prevent their ice crystals forming within their bodily fluids under such cold conditions.