Our new arrivals … very cute but needing some names

Our new arrivals … very cute but needing some names

There has been great excitement in our house this week!


We had been keeping a close eye on our broody hen and the clutch of eggs she had under her. Usually when a hen goes broody we let them off to do what they do naturally. A broody hen will build up a clutch of up to a dozen eggs or more before sitting on them for about 21 days until they hatch. This hen had nine eggs under her and we were expecting things to start happening last Tuesday.

Did you know… the term to feather ones nest comes from a broody hen plucking it’s own chest feathers to allow skin to egg contact which is necessary for the correct temperature incubation of the eggs?

We kept checking on her over the weekend and on Monday my husband spotted the first chick had arrived, but was dead when we saw it. We were quite concerned and upset about it but felt it was too late to move mama and eggs indoors for observation.

Tuesday morning and my husband reported another chick, alive this time and sticking it’s head out from under mama’s wing. An hour later and unfortunately things were not good, this chick was dead and another with it. I had read that sometimes a hen will kill the chicks once they hatch and although I didn’t know of anyone who had ever experienced it, it was a possibility here and time to take action.

Our "hatchery"
Our “hatchery”


We don’t own an incubator but managed to borrow a UV light from a friend. We moved all remaining (six) eggs from under mama hen and placed them indoors in a box under the warmth of the light.

Suddenly our home turned into a chick maternity ward… we could hear chirping from three of the eggs and knew that these ones at least were ready to hatch. As we are such a nerdy household we happened to have a little digital monitor that can tell temperature and humidity… we put it to good use in the new hatchery… and I spent the day moving the UV light up and down to control the temperature and spraying a fine mist of water over the eggs to maintain the humidity.


When using an incubator the temperature must be kept between 36 to 39oC and the humidity between 50 to 60%.


The hatching process seemed never ending…. one chick broke a little hole through the egg and then did very little else for the day. Another managed to chip away until he had made a break around the entire top of the shell and then he stopped too.

Eventually, with all the family watching, this chick made its debut. It was very exciting for all of us to watch.

The arrival of the first chick


The activity seemed to rally the second chick because within an hour it had arrived too… about half the size of it’s sibling but still perfect in every way. At 4.30 am the third chick made its appearance. I know this because I got up frequently during the night to check that they were all okay!! At this stage hubby had left for a business trip and I was solo on maternity duty!

I felt if they could make it through the night they had a good chance.

Next morning the children were delighted to see that there was now three little chick alive and well and oh so cute!


The Trio
The Trio


So let me introduce you to the three youngest member of our “family”….


First to hatch was this little one…

First one to arrive
First one to arrive


Next came this tiny little one, small but perfect….

The second to hatch and the smallest


And finally, this little blondie….

Number three: lighter in colour but not in temperament

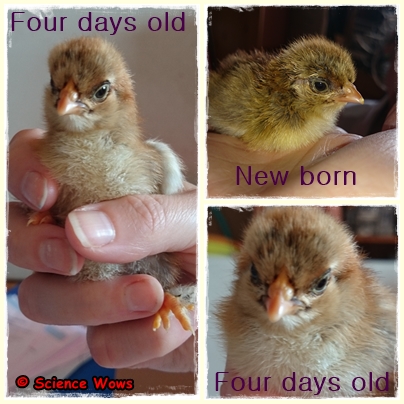
The chicks are now four days old and growing by the minute! Their real feathers are already starting to appear… growing up fast! As you can see from some of the photos they have feathery feet. This is a feature of the pekin hen. They father is a Pekin, their mother a cross between a Pekin and a Hamberg (both are bantam breed).


Our only problem now is that we still have not decided names for each of them, so we were hoping you could help? We would love some suggestions so if you have any ideas please let us know in the comments below. The children will pick their favourite names in a few days and we will let you know which ones we picked!


Fun Friday – Magnets Part 2… learning about the compass and another great game

Fun Friday – Magnets Part 2… learning about the compass and another great game

We can’t get enough of magnets in this house it seems! Last week we shared one of our favourite games and this week it is all about how the compass works, how to make one and another great game to try!


Who invented the first compass


The ancient Greeks knew about lodestone, an iron rich rock that was naturally magnetic. The Chinese are credited with discovering that loadstone would always point towards North if suspended to allow it turn freely. A Chinese Scientist called Shen Kua described the first magnetic needle compass in 1088 AD; his experiments with suspended strips of magnetised iron showed how the strip always points North and how this could be used in navigation.

The arrival of the compass modernised navigation and travel, especially by sea. Before the compass, sailors relied on navigation by the stars but this was tricky on a cloudy night!

Did you know… sailors were forbidden to eat onion or garlic as their breath was thought to interfere with the compass needle?


How to make your own compass


Make your own compass

You will need… a circle of paper, a needle, a magnet and a bowl of water.

……….
What to do… thread the needle through the circle of paper so that nearly all the needle lies on one side of the paper (see below). Stroke the needle 30 times in one direction with one end of a strong magnet.  Lift the magnet between strokes. Float the circle of paper on top of the water in the bowl (needle side up).  The paper should spin around slowly for a few moments and then stop.  The needle should now be pointing North-South.  You can confirm this with a compass if you wish!
……..
So what is happening? The needle contains little particles of iron that are all jumbled up.  When the needle is stroked with the magnet it makes all the iron particles align in the same direction (North-South); the needle is temporarily magnetised!


A really fun game to keep the children entertained


You will need
You will need…


You will need…. some non see through cups or bowls, some treats or treasure to find, a compass, a notepad and a pen.

Setting it up… this is an easy game but it does require a little setting up before you let the children loose! Place the cups (upturned) all around the garden, hiding a treat underneath a few of them. One treat per child.

Decide on a starting point. Map out a route for each child starting at that point and walking X steps North/South/East or West.

Map a different route for each child to a different cup containing the treasure, here is an example…

take 3 steps North

take 3 steps East

take 11 steps North

take 14 steps West

take 5 steps South

take 10 steps East

take 11 steps West


You can make is as long and winding as you like. Remember to get an idea of each child’s step length before you start! Once you have prepared a route for each child you can call them out and let the fun begin.

Each child starts at the same point and needs to follow the instructions given to them, using the compass for direction! Once the instructions run out the child lifts the nearest cup to (hopefully) reveal their prize.

All ready at the starting point!

This game is great for teaching children direction, learning how to follow instructions, read a compass and how to work as a team, if you change the rules to teams instead of individuals.


The beauty of this game is that you can make it as simple or as complicated as you like, adjusting each set of instructions to a child’s age so children of different ages can get involved.

Lots of fun for all ages

My children are ten, eight and four and they really loved this, we have plans to make it bigger and better next time!

Whatever way you play it I hope you enjoy!


This week’s Mystery Creature

This week’s Mystery Creature

One of the best things I have found from setting up Science Wows, is how interested my children are in what I do! Questions, advice and suggestions come around the clock…

“Mum, can we play the magnet game again?”

“Mum, I have a science joke for you”

“Mum how does my body make poo?”


Even more commonly I hear “Mum, come quick… this would be great for your blog!”

When I got home from the shops the other day my eight year old son had found something for me… he had roped Dad in to taking a picture so I could have it for my blog… what a great family effort!

So this week’s Mystery Creature comes courtesy of my wonderful eight year old junior scientist… can you name it?


Can you name it?
Can you name it?
Mystery Creature Revealed – The Thorny Devil

Mystery Creature Revealed – The Thorny Devil

Did you guess last week’s Mystery Creature? It was the Thorny Devil (Moloch horridus) or Thorny Dragon. This formidable looking lizard is native to Australia. But it he as dangerous as he looks? Here are some interesting facts about the Thorny Devil.


photo credit: Bill & Mark Bell via photopin cc

The name Thorny Devil or Thorny Dragon is quite an intimidating monocle but even more so is the scientific name for these lizards… Moloch horridus; Inspired by the poem Paradise Lost (by Milton) in which the god Moloch is described as “a horrid king besmeared with blood of human sacrifice”!

In reality the Thorny Devil does not live up to it’s name as it is small in stature (no more than 20 cm), slow moving and eats only ants (thousands per day)

As well as ants, the lizard needs water to survive the arid scrub lands and deserts of it’s Central Australian habitat. It has a very interesting way of “harvesting” water. It walks slowly through the scrub letting dew drops fall on it’s thorny body. Between the thorns are tiny channels that carry the water right to the Thorny Devil’s mouth.


The  entire surface of the Thorny Devil is covered in  spiky scales but to defend rather than to harm! photo credit: ccdoh1 via photopin cc
photo credit: ccdoh1 via photopin cc


Another interesting feature of this animal is it’s defense mechanisms. Although in reality it does not have any real weaponry of defense it’s thorny exterior acts as a deterrent to potential predators (mainly wild birds). If this is not enough he bends his head, revealing a false head with big horns above his neck.


So although the entire surface of the Thorny Devil is covered in spiky scales these are to defend rather than to harm!


I don’t really think he deserves the name, but it might just add to his street cred and keep the predators at bay!


What do you think… cute or ugly, or just misunderstood?