Fun Friday – Magnets Part 2… learning about the compass and another great game

Fun Friday – Magnets Part 2… learning about the compass and another great game

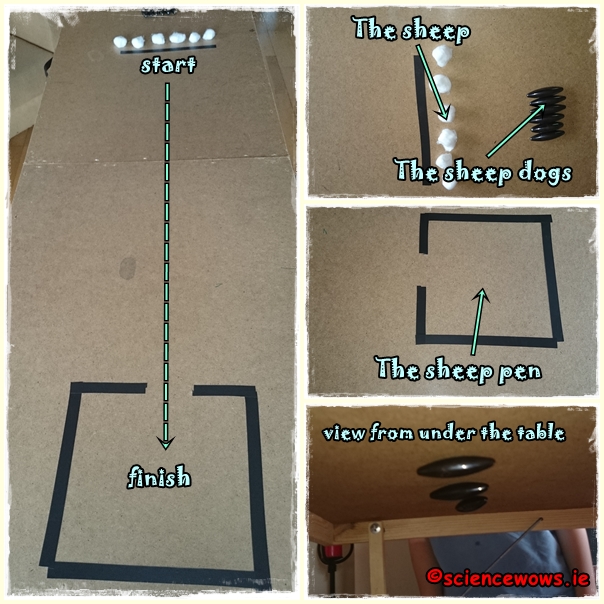
We can’t get enough of magnets in this house it seems! Last week we shared one of our favourite games and this week it is all about how the compass works, how to make one and another great game to try!


Who invented the first compass


The ancient Greeks knew about lodestone, an iron rich rock that was naturally magnetic. The Chinese are credited with discovering that loadstone would always point towards North if suspended to allow it turn freely. A Chinese Scientist called Shen Kua described the first magnetic needle compass in 1088 AD; his experiments with suspended strips of magnetised iron showed how the strip always points North and how this could be used in navigation.

The arrival of the compass modernised navigation and travel, especially by sea. Before the compass, sailors relied on navigation by the stars but this was tricky on a cloudy night!

Did you know… sailors were forbidden to eat onion or garlic as their breath was thought to interfere with the compass needle?


How to make your own compass


Make your own compass

You will need… a circle of paper, a needle, a magnet and a bowl of water.

……….
What to do… thread the needle through the circle of paper so that nearly all the needle lies on one side of the paper (see below). Stroke the needle 30 times in one direction with one end of a strong magnet.  Lift the magnet between strokes. Float the circle of paper on top of the water in the bowl (needle side up).  The paper should spin around slowly for a few moments and then stop.  The needle should now be pointing North-South.  You can confirm this with a compass if you wish!
……..
So what is happening? The needle contains little particles of iron that are all jumbled up.  When the needle is stroked with the magnet it makes all the iron particles align in the same direction (North-South); the needle is temporarily magnetised!


A really fun game to keep the children entertained


You will need
You will need…


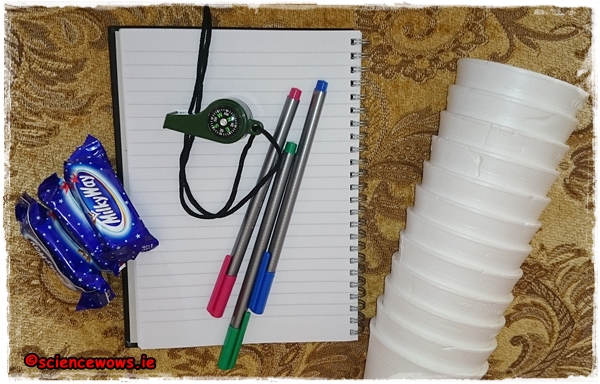
You will need…. some non see through cups or bowls, some treats or treasure to find, a compass, a notepad and a pen.

Setting it up… this is an easy game but it does require a little setting up before you let the children loose! Place the cups (upturned) all around the garden, hiding a treat underneath a few of them. One treat per child.

Decide on a starting point. Map out a route for each child starting at that point and walking X steps North/South/East or West.

Map a different route for each child to a different cup containing the treasure, here is an example…

take 3 steps North

take 3 steps East

take 11 steps North

take 14 steps West

take 5 steps South

take 10 steps East

take 11 steps West


You can make is as long and winding as you like. Remember to get an idea of each child’s step length before you start! Once you have prepared a route for each child you can call them out and let the fun begin.

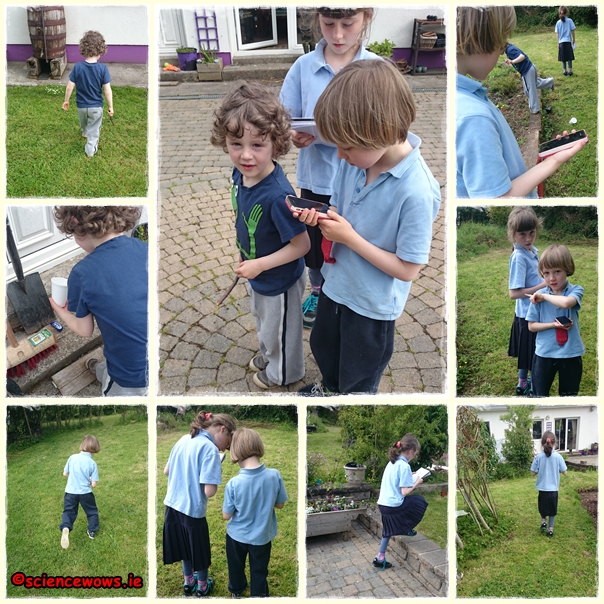
Each child starts at the same point and needs to follow the instructions given to them, using the compass for direction! Once the instructions run out the child lifts the nearest cup to (hopefully) reveal their prize.

All ready at the starting point!

This game is great for teaching children direction, learning how to follow instructions, read a compass and how to work as a team, if you change the rules to teams instead of individuals.


The beauty of this game is that you can make it as simple or as complicated as you like, adjusting each set of instructions to a child’s age so children of different ages can get involved.

Lots of fun for all ages

My children are ten, eight and four and they really loved this, we have plans to make it bigger and better next time!

Whatever way you play it I hope you enjoy!


Fun Friday – Magnets Part 1… a favourite magnet game

Fun Friday – Magnets Part 1… a favourite magnet game

We love magnets in this house. Some rainy days my children like to take out my box of magnets and are happy to play away with them for hours. Recently I brought my magnet collection along to local Beavers Club for the children to explore and learn… and play some great magnet games. This game was a favourite so I thought I would share it with you!

Before you start this game you might want to let the children explore how magnets work, how they attract or repel each other and how all magnets have two sides, a North and a South. Explain the invisible magnetic forces at play. Check out this post on magnets before you get started!


“Herding sheep” magnet game


You will need...
You will need…


For this game you will need some magnets* (two per player), a table, some cotton balls and some duct tape or masking tape.

*We used torpedo magnets for this but any magnets will do once they can attract each other through the table… so the choice of table is important. Wood is good, or plastic, but thin and without many/any crossbeams or bars underneath. We used a light chipboard wallpapering table.


The Set Up...
The Set Up…


 Set Up:


Using the tape mark a starting line at one end of the table and a box with a small opening at the other end; this is the “sheep’s pen”.

Place one magnet from each pair on top of the table and the other under the table… the magnet under the table should be held in place by it’s attraction to the magnet above. Each child is designated a pair of magnets, these represent the sheep dogs.

Place the cotton balls (these are the sheep) behind the starting line.


The aim of the game:


The aim of the game is that the children must “herd” the sheep along the table and into the “pen” at the other end. They can only move the “sheep dog” by moving the magnet under the table! The children keep going until all the sheep are transferred to the pen.

You can use a timer for this game if you wish. Time how long each team takes or get a group of children to try again and see if they can beat their previous time.


Ready-Steady-Go!


Ready-Steady-Go… let the fun begin! I have yet to meet a child (or adult) who does not get totally engrossed in this game!

Here is a game in action in our house…


Let the fun begin!
Let the fun begin!


 What do they learn?


This game is great for children’s fine motor skills and coordination, it also teaches children to work as a team. Children learn about the attractive forces between magnets. You can follow on this game by asking the children if they think the magnets would still be attracted through other materials… paper, plastic, glass?


Make it your own:


Once the children get the idea of the game they will probably come up with their own modifications. What else could you try? Adding obstacles along the route? trying magnets of different shapes and strengths? Changing the number of sheep? What about replacing the top magnet with something metal?

The only limit to this game is the child’s imagination… which is usually limitless! I hope you enjoy!

What would you alter? If you come up with a different way to play this game please do let me know!


Eh... which way is North?
Eh… which way is North?


Next week we will share another favourite game and learn a little about compasses too, so see you next Friday for Part 2!