Aurora borealis and Aurora australis – how are they formed?

Aurora borealis and Aurora australis – how are they formed?

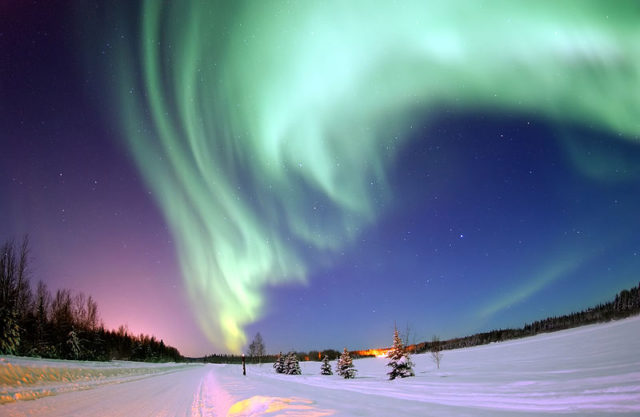
Aurora borealis and Aurora australis, also known as the Northern and Southern lights, are amazing displays of light in the sky, most often seen towards the polar regions. The colour displays range from green, to reds to purples and vary from small wisps to large dramatic streaks through the sky.

Aurora2

To understand how these light displays happen we need to understand a little about solar winds. The surface of the sun is constantly bubbling and boiling. Sometimes particles of plasma are released from the sun’s surface at areas called sun spots. This plasma escapes the pull of the sun’s magnetic field and is released into space as solar winds.

These solar winds can travel to Earth where they are attracted to the Earth’s magnetic fields, particularly at the north and south poles. When particles from the solar winds enter the Earth’s atmosphere they collide with particles of oxygen and nitrogen giving off these wonderful displays of colour.

The colour of the Auroras depends on the particles that interact with the solar wind and their altitude. Green and yellow colours are typically associated with collisions with oxygen, while red, violet or blue colours result from interactions with nitrogen. While these displays are best seen in regions closer to the poles we are sometimes lucky enough to catch site of them right here in the skies over Ireland.

Have you ever seen them? Next time you hear of a lot of solar flares it might be worth remembering to look to the skies in the hope of catching these spectacular light shows.

A simple slice of science – Why is the sky blue?

A simple slice of science – Why is the sky blue?

This week’s question for Dr. Simple came from a source very close to home… my eight year old wants to know

“Why is the Sky blue?”


I told him we would put it to Dr. Simple, so here it is, in 30 seconds…


blueSky


If you have any other questions on this topic or another do leave a message in the comments below. There are lots of great questions coming in for Dr. Simple but he always loves getting more!


If you need a little convincing about all this information on light and colour you can check it out for yourself as I will be sharing some great experiments on tomorrow’s Fun Friday post!

Fun Friday- Make a simple kaleidoscope

Fun Friday- Make a simple kaleidoscope

The weekend already…Yay! Hope you are doing something fun…. if you are looking for an activity to entertain your children why not try this?… My junior scientists had great fun making these simple kaleidoscopes and learning about light and reflection!

Fun Friday - Make a Simple Kaleidoscope
Fun Friday – Make a Simple Kaleidoscope


Here is what you will need:

  • a sheet of mirrored card* (we found a packed of A4 mirrored card in our local craft shop)
  • a ruler
  • a scissors
  • some felt pens
  • tracing paper/transparent paper
  • a sheet of clear plastic (optional)


What to do…

1. Cut a 6cm strip off the long end of our A4 mirrored card leaving the card 24 cm in length

2. Fold the card in half (mirror side in) so that the short ends meet

3. Open back out the card and next fold the short ends in so that they meet in the middle

4. You should now have a card with three folds and four sections, 6 cm wide

Kaleidoscope1


5. Next fold the card into a triangle (mirrored side in), with one of the strips overlapping

6. Tape this overlapping strip along the edge so the triangle is now secure – this will be the tube of your kaleidoscope

The tube of the kaleidoscope - mirrored surface on the inside
The tube of the kaleidoscope – mirrored surface on the inside


7. Now it is time to prepare the designs for your kaleidoscope… we used the coloured pens to draw designs on a square piece of clear plastic, at least 6 X 6 cm in size.

The design team at work


Some of the finished designs

8. Once finished tape the coloured squares on to a piece of transparent paper (or you can just draw your design directly onto transparent paper if you wish)

9. Now it is time to use your Kaleidoscope… hold the transparent paper with the design up to a window or a light source, look at it through the kaleidoscope… rotate the paper and see how the patterns change

Using the kaleidoscope


We love the results
We love the results

What is happening?

Light travels through the transparent paper into the kaleidoscope where is bounces off each of the three sides before reaching our eyes. As each side is mirrored it reflects the light that bounces off it and also the light bouncing off the other mirrored sides of the kaleidoscope. All this reflecting makes multiple images of different parts of the pattern and create a very interesting effect.

Do have a go it is great fun! 

*Note: if you cannot get mirrored card you can use cardboard covered in aluminium foil. This will work better if you also add a layer of clear plastic on top of the foil… creating a better mirror!