#FunFriday – exploring Magnets

#FunFriday – exploring Magnets

What is a Magnet?


A magnet is an object that can produce a magnetic force around it called a “magnetic field”.  Magnets attract certain types of metals such as iron, nickel and cobalt.


Let’s learn more!


A magnetic field is not visible to the human eye, however iron filings can be used to show the pattern of a magnetic field. The magnetic field around all magnets is strongest at it‛s ends – these ends are called the Poles. One end is called the North Pole and the other is called the South Pole, just like the Earth.

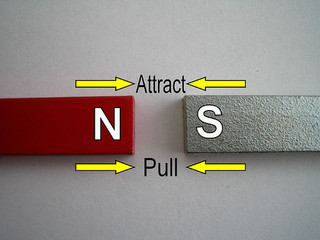
If you put the poles of two magnets together they will either pull together (attract) or push apart (repel); Different poles attract (North and South), similar poles repel!

photo credit: daynoir via photopin cc


Did you know… small iron rocks on the Earth‛s surface are often natural magnets and these are called Lodestones.

The Earth as a magnet


The Earth is one big magnet – it‛s magnetic field is created by the iron that is in the core of the Earth. The Earth‛s magnetic field is strongest at the North Pole and the South Pole.

photo credit: *~Dawn~* via photopin cc
Did you know… many objects is space are magnetic including the Sun!

photo credit: Najwa Marafie - Free Photographer via photopin cc
photo credit: Najwa Marafie – Free Photographer via photopin cc


Did you know… the Earth‛s magnetic field deflects charged particles that come from the sun (Solar Wind) and this creates the wonderful lights called AURORA that can sometimes be seen in the sky.

Magnetic compasses use the Earth‛s magnetic field to determine North, South East and West.


Electromagnets


An electromagnet is a magnet that is produced when an electric current is passed around a piece of iron.  Unlike true magnets, electromagnets are only magnetic while the electric current is switched on!

Did you know… the first person to notice that electric currents produce magnetism was a Danish scientist called Hans Christian Oersted, in 1820.
Some countries have started to use high speed trains called “MagLev” trains that are operated by powerful electromagnets.
photo credit: Erwyn van der Meer via photopin cc


These wheel less trains float on magnetic tracks and can reach speeds of more than 500 km/h.

Two experiments to try at home:

Make a compass:

You will need… a circle of paper, a needle, a magnet and a bowl of water.
What to do… thread the needle through the circle of paper so that nearly all the needle lies on one side of the paper (see below). Stroke the needle 30 times in one direction with one end of a strong magnet.  Lift the magnet between strokes. Float the circle of paper on top of the water in the bowl (needle side up).  The paper should spin around slowly for a few moments and then stop.  The needle should now be pointing North-South.  You can confirm this with a compass if you wish!
So what is happening? The needle contains little particles of iron that are all jumbled up.  When the needle is stroked with the magnet it makes all the iron particles align in the same direction (North-South); the needle is temporarily magnetised!

Make an electromagnet:

You will need.. 1 metre of thin insulated wire, a large iron nail, blue tac, a 1.5 volt battery, paper clips;
What to do… wind the insulated wire tightly around the nail at least 30 times then ask an adult to strip back the insulation from both ends of the wire, exposing about 2 cm of the wire beneath.  Using the blue tac stick one end of the wire to the + side of the battery and the other end to the – end.  Now see if your electromagnet can pick up some paperclips.  If you disconnect the batter the paperclips should fall!!
photo credit: Steve Wilhelm via photopin cc


So what is happening? When the wire is attached to the battery it creates an electric current that runs through the wire, temporarily magnetising the iron particles in the nail. When the battery is disconnected the nail no longer acts as a magnet!


Hope you have fun with these this weekend!  If you have a question or something to add please drop me a note in the comments below!
Fun Friday – Rockets!

Fun Friday – Rockets!

 What is a rocket?


A rocket can describe any object that is propelled by fast moving liquid or gas!


Most rockets have a nose or cone at the top, a body that houses the fuel and fins at the base.
Rockets are usually powered by a chemical reaction (explosion) within the rocket itself. This chemical reaction requires both fuel and oxygen, both of which must be carried within the rocket.
The fuel and oxygen are called the propellant. There are two types of propellant, liquid propellant and solid propellant.
A solid propellant rocket is easier, simpler and cheaper to make.  However, these rockets are harder to guide and control as once the chemical reaction is started it is hard to stop.
A liquid propellant rocket is more complex and expensive to make but the burning of the liquid fuel is allot easier to control.
 photo credit: Flying Jenny via photopin cc

photo credit: Flying Jenny via photopin cc

A bit of history


The Chinese were the first to invent rockets when they started filling bamboo tubes with gunpowder and lighting them.
Rocket science really began with an English man called Isaac Newton. He formulated three laws to explain the physics of motion. These laws explain how rockets work!

Newton‛s 3rd Law of Motion states that every action has an equal and opposite reaction!


To understand this law think of a balloon full of air.
Demonstrating Newton's Law of Motion
Demonstrating Newton’s 3rd Law of Motion
If the balloon is untied and the air suddenly let out, it will escape the balloon with such force that it will propel the balloon in the opposite direction.
The force of the air leaving the balloon is called the thrust! The thrust that powers the launch of a rocket comes from the force of the gas (generated by the burning fuel) being ejected from the rear of the rocket!

The first liquid propellant rocket was launched in 1926 by an American called Robert Goddard.  He is considered the father of modern rocket science!

Rocket to the Moon


Neil Armstrong... photo credit: NASA's Marshall Space Flight Center via photopin cc
Neil Armstrong…
photo credit: NASA’s Marshall Space Flight Center
via photopin cc

In 1969 Neil Armstrong and Edwin Aldrin became the first men on the moon.

Armstrong and Aldrin traveled to the Moon in a rocket called Saturn V. It was 100 metres tall and weighed more than 3,000 tonnes! It was the largest rocket ever launched!

An Experiment to try at home


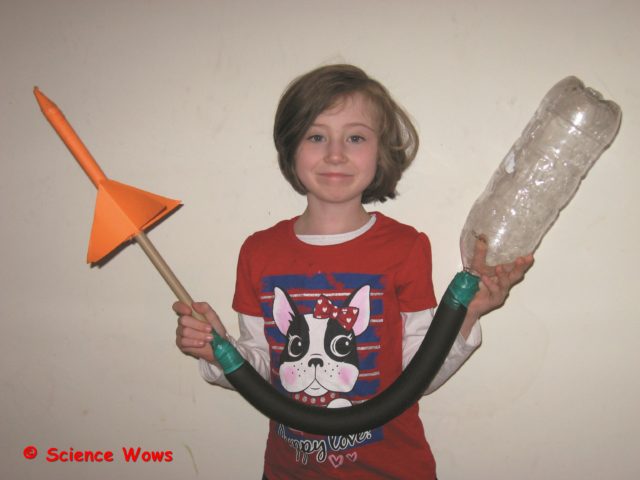
Make a stomp rocket!


You will need… an empty 2L plastic bottle, paper, insulation tape, a 1/2 inch PVC pipe, a length of rubber tubing;

What to do… tape one end of the rubber tubing to the neck of the bottle and tape the other end to one end of the PVC pipe. Next make the body of the rocket by wrapping a piece of paper around the PVC pipe and secure it with tape at the overlap. Remove the rocket from the pipe. Cut four triangles of paper and attach to the body of  the rocket near one end; these are the rocket fins. Make a nose (cone shape) for the other end of the rocket and attach it with tape.  You are now ready to launch your rocket. (Best to do this outside!).
Sit your paper rocket over the PVC pipe and place the 2L bottle on the ground on its side. Stomp on the bottle and watch your rocket shoot off!
This is what your stomp rocket should look like

So what is happening?
… when you stomp on the bottle the air inside it shoots out through the tubing and the pipe, forcing the rocket off the end of the pipe! Just blow into the pipe to re-inflate to bottle to start again!

An Experiment to try at home


Make a teabag rocket

I have shared this one with you before, but for those of you who have not seen it I thought it would be a nice addition here…. a double for the Bank Holiday Weekend ;0)


If you try any of the experiments or have any comments or questions, please let me know in the comments below!


#FunFriday – experiment with sound

This weeks #FunFriday experiment is a simple and easy way to teach children how sound moves in air.

What you will need:

  • An empty plastic bottle
  • Scissors
  • A piece of plastic (cut from a plastic bag or equivalent)
  • An elastic band or tape
  • Small candles
  • Matches

(Adult assistance required!)

Just follow the steps in the video… and the “big kids” among you might like the second half of the video… where I scale things up a little!

So what is happening?

When you tap the plastic it acts like a drum.  The sound waves it creates make the air molecules vibrate.  These vibrating molecules then make the molecules beside them vibrate.  The vibrations travel through the air in the bottle and blow out the flame.

Hope you enjoy this one… if you like it please share it and if you have any comments or questions I’d love to hear from you!

Pass the butter

The other day I was standing in my kitchen when I heard a little snigger from behind me.  You know someone is up to mischief before you even turn around…and they were!  My little three year old had a block of butter in one hand and a spoon in the other and he was ready to dive right in….

……………………………”MAMMY, CAN I HAVE SOME BUTTER?!

I am probably about to unleash a tirade of abuse when I reveal my reaction to the request…I walked over, dug the spoon into the butter and presented it to my happy child.  I then removed the butter – job done.  In my mind a win-win situation.  I believe there can be benefits to feeding a spoon of butter to a growing child now and then!  My mother in law reared nine children and she wisely observed that each went through a stage in their younger years of literally craving butter.  She believed they were following their instinct for necessary saturated fats, required for their rapidly developing brains and nervous system – and I am in her camp!


FIRST, A BIT OF HISTORY

Butter making in Ireland goes back thousands of years and was originally performed by women who herded and milked the cattle on higher pastures in the Summer.  As time progressed milk production evolved techniques to enhance preservation, such as adding large quantities of salt and burying the butter in bogs (due to the turfs antiseptic properties).

In the seventeenth and eighteenth centuries Ireland was the dominant exporter of butter to Northern Europe and the Americas.


SOME BENEFITS OF BUTTER

I have always had the opinion that we should aim for the more natural source of a food, the least processed the better.  Following this gut instinct I have always chosen butter over margarine or spreads.  Before I get into the fat and cholesterol issues let’s look at what else can be found in our pound (or 454 g for all the metric people) of butter….

Butter contains the fat soluble vitamins A, E, K and D.

Vitamin A is required for healthy body growth and development, for maintenance of a healthy immune system and for good vision.  It also acts as an antioxidant, but how much is really in butter?  One teaspoon of butter will provide about 2 percent of your RDA (recommended daily allowance) of Vitamin A.

Vitamin E is another good antioxidant and also contributes to healthy skin, hair, nails.  One teaspoon of butter contains approximately 0.7 percent RDA.

The primary role of Vitamin K in the body is to assist in the correct clotting of blood, without it we cannot seal and heal wounds.  There is about 0.3 percent RDA of Vitamin K in a teaspoon of butter.

Vitamin D plays an important role in the absorption of calcium and phosphate within the body, thereby required for healthy bones.

While some of these levels of vitamins are low, they are fat soluble vitamins and are therefore more easily absorbed into our bodies due to presence of fat within the butter.

Butter contains the water soluble vitamins B and C

Low levels of B Vitamins and Vitamin C are found in butter.

Butter contains Minerals and trace elements

Butter contains Calcium, Phosphorus, Magnesium, Potassium and Iodine, all essential for healthy bodily function and immune system;  Butter also contains trace elements such as selenium which is a natural antioxidant.


BUTTER VERSES MARGARINE

Most of the butter found on Irish tables is typically made from just one natural ingredient – cow’s milk.  It is made from churning fresh or fermented milk or cream.  The Vitamins and Minerals found in butter are naturally present (although these may sometimes be added during production).  Butter usually contains salt.

Butter is high in saturated fats (often associated with cardiovascular disease).

Margarine is made from a number of ingredients, the base ingredient is typically a plant oil.  These oils contain a lot more poly unsaturated fats than butter. However in order to make the product solid  a small amount of saturated fats are introduced.  The processing of margarine and the introduction of saturated fats requires high temperatures which create additional unwanted fats… called trans fats.  Vitamins and Minerals are often added to the margarine during manufacture.  Additional colouring is also added, otherwise the margarine would be grey!


SO WHAT ARE ALL THESE DIFFERENT TYPES OF FATS?

Saturated fats, Polyunsaturated fats, Trans fats…. what does it all mean.  Basically saturated, polyunsaturated and trans fats are made of of the same things, put together in a slightly different way.

Saturated fats are typically solid at room temperature and are found in animal derived products, such as butter, milk, cheese and meat.  There are also some vegetable fats that are high in saturated fats, usually tropical oils such as coconut oil, palm oil and cocoa butter.

Polyunsaturated fats are usually liquid at room temperature and are found in larger qualities in vegetable and plant oils, some nuts and cold water fatty fish.

Trans fats are sometimes found naturally in trace amounts but the larger amount in our diets comes from processing of polyunsaturated fats.  Partial hydrogenation of these fats results in the production of trans fats. Consumption of artificially produced Trans fats have been connected with an increased risk of hearth disease.  Trans fats present naturally in ruminant animals may actually have health benefits and are not directly linked to the negative effects on health associated with their industrial counterparts.


CHOLESTEROL … LDL AND HDL, WHAT IS THE DIFFERENCE?

These days cholesterol is thought of as a dirty word, but it is not all bad.  Cholesterol is an essential fat and plays an important role in maintaining a healthy body.  Some cholesterol we get from our diet and some is made in our livers.

Cholesterol cannot move around the body on its own, it need to be transported through the bloodstream by carriers called lipoproteins. The lipoproteins we hear about most often are LDL (low density lipoprotein) and HDL (high density lipoprotein).

LDL transports cholesterol around the body using the bloodstream as its highway. However, when we have too much cholesterol the LDL starts depositing it in the arteries and these can build up and form blockages.  This is why high levels of LDL cholesterol is considered a BAD thing.

HDL on the other hand goes around mopping up excess cholesterol and transports it back to the liver.  This is why HDL cholesterol is considerd the GOOD guy!


DISPELLING A FEW MYTHS

Saturated fats are essential for healthy development and function of the body.  A diet with sufficient saturated fats allows for a healthy immune system, blood cells, nervous system and brain function.
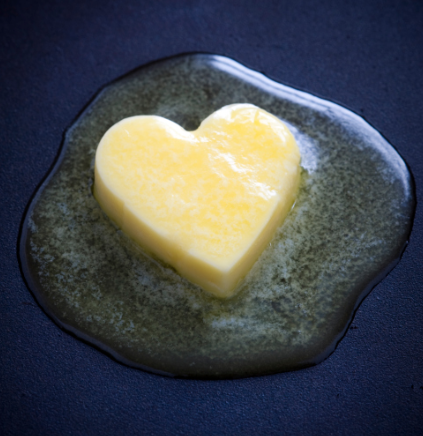
Image source: chriskresser.com

The first food we make for our babies – breast milk – contains more than 50% saturated fats… this really emphasizes the importance of saturated fats in the development of babies and young children.  Our brains are made up of about 60% fat; this fat content includes polyunsaturated fats such as the Omegas  (3 and 6) but the largest portion is saturated fats.  We need saturated fats in our diet in order to maintain a healthy immune system: without it we deplete the ability of our white blood cells to recognise and destroy invading antigens such as viruses and bateria.  So our need for saturated fats extends far beyond our early development, saturated fats are a constant requirement throughout life (they can even reduce the signs of aging by maintaining a healthy elasticity to our skin). 

Our lungs need a thin layer of a lubricant, called a lung surfactant, within the air spaces, in order to function correctly and stay healthy.  This surfactant is made up of 100% saturated fats.

Despite the fact that saturated fats in the diet have been linked with an increased risk of heart disease there is much evidence to the contrary.  Saturated fats in the diet can actually increase levels of good cholesterol (HDL) that is used to mop up excess cholesterol, as explained above.  Also, saturated fats within the diet have been shown to reduce the levels of a substance called lipoprotein (a) which is linked to an icreased risk of heart disease.

More and more studies are being conducted to examine the effect of saturated fats on our health and investigate the correlation between saturated fats and risk of heart disease.  These studies are now reporting a diet containing significant levels of saturated fats is not directly related to an increased risk to cardiac disease. Some reports suggest a diet rich in saturated fats reduced a risk of heart disease while other suggest the issue may lie more with the consumption of large amounts of carbohydrates along with the saturated fats.

photo credit: Aristocrats-hat via photopin cc

Recent studies conducted on a group of men in Australia examined the benefit of substituting saturated fats in the diet with unsaturated fats.  All the men (458 men aged 30 – 59) in the study had suffered a recent coronary event.  Results from these studies showed an increase in the risk of death from coronary heart disease and cardiovascular disease in the group that substituted vegetable derived polyunsaturated fats for saturated fats in their diet.


MY FINAL WORD

You can tell from this blog that my fridge contains only butter (no margarine need apply); I should also point out that my family does not contain any dairy intolerant members!  So butter it is…however I do acknowledge that butter can contain a lot of salt, that the fat content is very high and that, although made from one basic ingredient, the quality of that ingredient – cow’s milk – depends on the quality of the cow!  How the cow is fed and treated naturally effects the butter produced.    So, like anything else, we need to shop wisely, choose the food that meets our own standards as much as possible (be that reduced salt, organic etc) and keep to that age old recommendation…. EVERYTHING IN MODERATION!

Now, can someone please pass the butter…
Fun Friday – Rainbow Explosions

Fun Friday – Rainbow Explosions

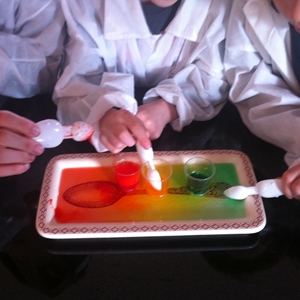
Wow, its Friday again, so that must mean another Fun Friday post.  This week’s experiment is quick and simple… and lots of FUN….rainbow explosions –  a BIG hit with all three of my children.

You probably have everything you need already in your kitchen!


RainbowExplosionIngredients1


You will need:

Vinegar
Bread Soda
Some different colours of food colouring
Some small spoons
Some small plastic cups (or similar)
A plate to contain it all


What you do:


Hope this is as much fun in your house as it was in ours;  Let me know how you get on!


They liked it so much they had to have a rerun….love the colours, don’t you?

RainbowExplosion

Fun Friday – make a periscope

Fun Friday – make a periscope

We had fun making this one… a bit fiddly at parts but worth it, the boys love their new periscope! You will need…. 2 clean empty juice/milk cartons (1 Litre) Some duct tape Scissors Pen Ruler 2 small mirrors (I got a little double mirror in a make-up set in The Two Euro Shop (for €1.50) )

What you need

What to do: First, cut the tops off the two cartons and tape them one on top of the other (taping them at the open ends)

Cut tops off
Tape together

Next mark off a square on the top side of one of the cartons with your marker (I made the square 5cm X 5cm);  Cut out the square. Repeat this step on the opposite end and side of the other carton… so if the first square is on the bottom right side of your periscope cut the second square out of the top left of the periscope.

Cut a square

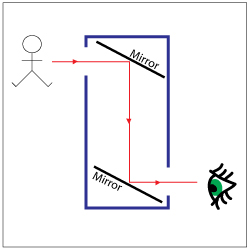
Now you want to fit a mirror into each end of the carton so that the reflective side of the mirror is facing you as you look in the hole and each mirror is tilted at an angle of approximately 45 degrees.  The bottom mirror is tilted up at an angle of 45 degrees and the top mirror is tilted down at an angle of 45 degrees. I was lucky, my mirrors fitted the exact width of my milk cartons so I was able to place them inside, tilt them as required and then tape them in place.  If your mirrors are wider than your carton then mark a line at the side of your carton, cut a slit and slide in your mirror.  Repeat for the other mirror then tape into place.

You should be able to look into the bottom hole and see what is reflected through the top hole….

Now all that remains is to decorate your periscope and have some fun…. you can use it to look around things or over things, great for playing spies, which is a very popular game in this house.

Enjoy!

How does it work? The object we see is reflecting light, this light is bounced off the top mirror onto the bottom mirror which bounces the light right onto our eyes!

How it works
How it works

FEEDBACK: I love hearing from people who have tried some of these experiment so please let me know if you try this one, or even send me some photos of your finished periscope;  If you have any questions just ask!

Fun Friday – make a balloon hovercraft

Here is a simple and fun experiment to try at home – how to make a balloon hovercraft.  I was temporarily abandoned by my junior scientists so had to step in front of the camera for a change….. so everybody…. meet Dr. How ;0)

Hope you have fun with this experiment and do please drop me a line or a little comment to tell me what you think or how you got on!

…and if you like it, please spread the word!

"a can of worms"

"a can of worms"

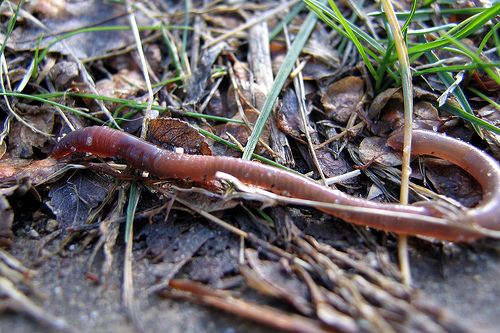
My daughter asked me the other day if you cut an earthworm in two will it grow back again?  And will you have two worms?  Suddenly the whole family is in on the act with talk of geckos tails and why we can’t grow back a limb.  So to dispel a few myths and legends I thought I’d take a look for this weeks blog!

photo credit: schizoform via photopin cc


CAN YOU CUT A WORM IN HALF AND GET TWO WORMS?

The short answer is NO, so please don’t go trying!  It is true that the anatomy of the earthworm is very different to our own and if part of a worm is cut off, one part may survive.  The part that can survive is the “head” end. First let’s look at some of the unusual features of the inside of an earthworm.

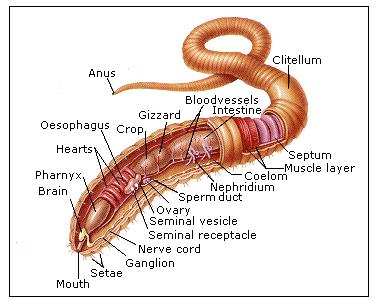
ANATOMY OF AN EARTHWORM

Image credit: the weather report

The earthworm’s body is made up of segments called annuli.  These segments are stuck together just like a series of rings all lined up; each segment contains little bristle like hairs called setae and these allow the earthworm to move.  Earthworms are invertebrates meaning they don’t have any internal “boney” skeleton.

The earthworm does not have one heart as we do… it has FIVE!  These hearts help pump the blood through the worm’s body.  The worm needs oxygen just as we do but it has no lungs to fill with air, instead it has time pores on it’s skin which absorb oxygen from outside it’s body.  In order for this to happen the worm needs to keep it’s body moist, which is why they often feel a bit slimy.  Too much moisture though and the worms can drown; when it rains earthworms will move closer to the surface to prevent them from drowning!

Earthworms have a “head” and a “tail” but no eyes, ears or nose, so they can’t see, hear or smell as we can.  However their skin is covered with sensors for light and movement so thy can react to too much light (sunshine) or movement (rain falling or soil being disturbed by digging predator).

SO WHAT HAPPENS IF WE CUT AN EARTHWORM IN TWO?

Firstly, cutting up earthworms or any other creature is a very cruel thing so please don’t do it!  However if an earthworm’s body was to be cut into two parts its survival would depend on a number of factors:

  • Where in the body is the earthworm cut?  The earthworm would have a better chance of surviving if it’s body is cut closer to it’s tail end.  This end does not contain the vital organs.  Research by Dr. Thomas H. Morgan (1901) found that the head end of the earthworm may survive if the head end contained at least 16 segments.  It is possible that some of the tail end will even be regenerated. Some repair and regeneration is also possible at the head end, but usually only within a small number of segments.
  • Chance of infection:  the earthworm can pick up a bacterial infection just as we can.  If the earthworm can seal the cut or regenerate the segment before infection sets in it has a better chance of surviving.
  • The speed at which the earthworm heals:  regenerating part of the body would require an awful lot of energy for the earthworm, the quicker it can heal the quicker it can get back to eating and refuel its body.  If the earthworm does not have enough energy to complete the process it will die.

THE ROLE OF EARTHWORMS IN OUR GARDENS

The earthworm is often called “nature’s plough” as it digs through the soil , turning and rotating as it goes.  Earthworms are herbivores, they feed on leaves, root and other decaying plant matter. The earthworm deposits this matter through out the soil through its faeces.  An earthworm can eat up to one-third of its own body weight in a day!

The burrowing of earthworms helps the soil in two ways, it allows air and water into the soil through the channels it forms and it moves different layers and types of soil around, distributing nutrients and making the earth more fertile. Although earth worms often stay close to the surface of the soil they can burrow down as deep as two metres.

EXPERIMENT: Make your own wormery

A wormery (or worm farm) allows us observe the work that worms do within our soil.

  • Fill a large see-through container with alternative layers of soil and sand.
  • Put a layer of leaves and vegetation on the top.
  • Add enough water to keep the soil damp.
  • Collect some worms and add them to your wormery.
  • Cover the outside of your bowl with a large piece of card or paper to block out the light.
  • Put your wormery in a safe place and check on it every day – remember to keep adding some water to keep the soil moist.
  • You sould notice very quickly that the different layers of soil and sand are getting mixed together, the work of the industrious worms.
  • Remember to keep adding leaves and vegetation to the top layer and do let your worms safely back out into the garden once you have finished the experiment!

References:
Morgan, T. H., 1901. Regeneration. MacMillan, New York.
Chris Maynard, 2001. Backyard Science. Dorling Kindersley, US.

Further reading:

Earthworm facts and photos

"Mammy I hatched an egg!"

"Mammy I hatched an egg!"

As a mother of three young children I have had many charming moments that I feel I will remember forever…. first steps, first words, how they pronounced a certain word, the list is endless.  Memories to cherish for a lifetime…. and then I forget!! Startling but true!  More moments forgotten than remembered.  However, certain things will stay with me forever…. like when my daughter was five and we got chickens for the first time; she was beginning to learn the joy of finding and collecting the eggs each day.  One day she came to the back door with her bounty only to trip at the step and drop an egg.  The poor thing burst into tears with the dramatic exclamation…

……………………………….”MAMMY, I HATCHED AN EGG!

Image credit: Graham Ettridge

I will never forget that one!  It was hard to keep a straight face as I tried to console my sobbing child.  With all the egg activities and treats of the Easter it has certainly got us talking and thinking about eggs in this house, have you ever wondered about these marvels of nature?

WHAT IS AN EGG MADE OF?

Firstly, what exactly is an egg made of and what purpose does each component have?

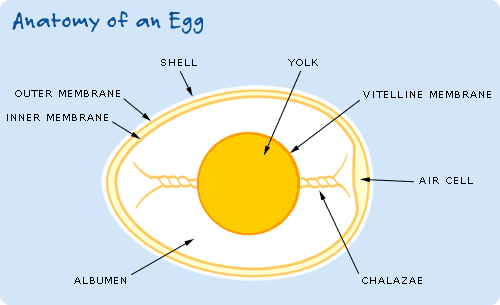
Image source: http://www.exploratorium.edu

The shell:  the egg shell is made of calcium carbonate (95%), just like the enamel of our teeth (see previous post).  The other 5% of the egg shell is made up of calcium phosphate, magnesium carbonate and proteins. Although the shell gives the egg it’s strength you might be surprised to learn that it actually contains up to 7,000 tiny holes (pores);  these pores allow air and moisture pass through the shell.

The bloom/cuticle:  this is a protein coating outside the egg shell that acts as a natural barrier to bacteria and dust while reducing moisture loss.

The membrane:  there are two layers of membrane just inside the shell called the outer and inner membrane.  These membranes are like layers of skin and contain a protein called keratin, which is found in our own nails and hair!

The yoke: the yellow of the egg contained within a membrane called the vitelline membrane.  The yolk is the part of the egg that feeds the developing embryo – it has a very high protein content and is also rich in vitamins and minerals.  The yolk contains all of the egg’s fat and cholesterol.  The yolk is the primary food store for the developing chick.

The Albumen: this is the white of the egg; it has a high protein and water content. The albumen cushions the developing chick and keeps it moist while still in the egg.

The air cell: this is a pocket of air at the wide end of the egg, created between the outer and inner membrane.  The air cell gets bigger as the egg ages.

The chalazea:  these are spiral ropes of egg white that keep the yolk in place.

WHAT ANIMALS LAY EGGS?

Animals that lay eggs are called oviparous and they include birds, fish, amphibians, many reptiles, many arachnids and insects, some molluscs and two mammals – the echidna and the platypus.  Mammals that lay eggs are referred to as momtremes.

A BIT OF EGG EVOLUTION

The reptile is credited as inventing the egg shell, allowing their young to develop outside the mother’s body.  All true dinosaurs are reptiles and they all laid eggs.  The development of the egg shell has been a fundamental step in evolution as it allowed the embryo develop in self contained egg, without the requirement for water.  This removed animals’ dependence on water for breeding.

HOW IS AN EGG MADE?

In the hen it takes about 24 to 26 hours to produce an egg.  An egg is made from the inside out, starting with the yolk which is released from the hens ovary and moves through various parts of the body where another element of the egg is added until finally the finished egg reaches the vent and the egg is laid.  Within 30 minutes of laying an egg, the process will start for the hen all over again.

SO WHAT GOES ON INSIDE THE EGG?

The embryo has started to develop in the egg while it is still being made within the body of the hen.  Once the egg is laid the development of the embryo will only continue if conditions are correct.  If the temperature and humidity levels are right (temp approx 22oC, relative humidity 50% ) the development of the embryo will continue after the egg is laid.  This process continues for approximately 21 days.  If the egg is being hatched under a broody hen then the hen must turn the eggs regularly.

THE HATCHING PROCESS

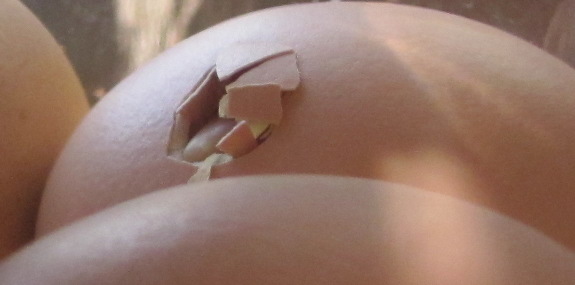
Image credit: http://www.waldeneffect.org

Finally, when the time is right, its time to crack out and see the world.  The young of many egg-laying species are equipped with an egg tooth – a tooth like projection on the end of a beak (birds) or protruding from a jaw (reptiles) that helps the young animal tear through the membrane and break through the hard shell.  The egg tooth will eventually be reabsorbed or fall off.

Chicks and many other animals will hatch from the larger, rounded side of the egg.  That is because this is the end where the air cell is usually located.  Once the chick becomes too larger to receive enough oxygen from inside the egg it will use it’s egg tooth to pierce through the inner membrane into the air cell space.  This provides them with an extra supply of oxygen, just enough to sustain them as they continue the hatching process and crack and break though the egg shell.

We have been lucky enough to hatch a few broods of chicks over the years and it is always so exciting to meet the little ones for the first time.

This is chips – one of our brood!

So the only other question to be addressed is “which came first – the chicken or the egg?” but I think that’s a blog in itself, perhaps for another day!

AN EXPERIMENT TO TRY – HOW STRONG IS AN EGGSHELL?

You would be amazed how strong an egg shell is, although you might want to try this one over a sink!
Hold a raw egg between your thumb and first finger, holding at the two ends and then apply pressure – as hard as you can!  You might be surprised to notice that the egg doesn’t break!

If you repeat this but apply the pressure to the sides of the egg, things might not go so well and you might find yourself covered in egg!

So why is this?  Although an egg shell can be very fragile, it’s shape can provide it with great strength.  This is because the egg is dome shaped at the top and the bottom, just like a bridge structure;  this structure means that when you apply pressure the force is distributed evenly over the shell, not just on one point, hence the egg does not crack!

Further reading:
Anatomy of an egg
Eggshell
Poultry reproduction and incubation


Science through the eyes of a child!

Science through the eyes of a child!

As a mother I have watched with fascination at how my children grow and learn, constantly testing, evaluating and questioning life around them.  For Newton (at the age of 23) it was apparently an apple from a tree that led to his evaluation of gravity but have you ever observed a toddler in a high chair dropping their spoon?  Every parent I know has gone through this phase with eventual exasperation, but look at it through the child’s eyes…. why does it always fall down?  Why does it not fall upwards and stick to the ceiling? Over and over again they test their results, natural scientists!

It has become an interest of mine to observe how our environment, lifestyles and educational facilities feed this wealth of natural scientific curiosity.  As my children passed through playschool and Montessori I observed the wonderful manner of learning and development through play and interaction that is encouraged through the guidelines of Aistear (the Early Childhood Curriculum Framework).

“Tell me and I forget; show me and I may remember; involve me and I learn.” Benjamin Franklin

Now that my older children have moved into primary school I notice things are very different from my day.  Technology has made it to the classroom!  Chalk and blackboard have largely been replaced with interactive white boards and computers.

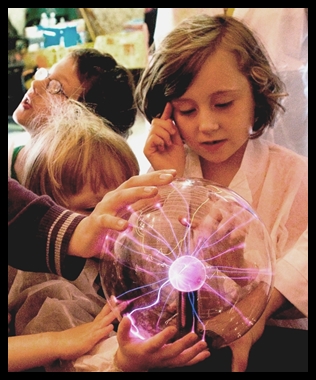
Children with Static BallThe internet has opened up a wealth of learning for our children where they can link to others on an international level to promote their learning in STEM (Science, Technology, Engineering and Maths) subjects.  Our local school uses Manga High for interactive maths games, quizzes and learning.  Children are being educated in computers and programming technology through the global collaboration that is CoderDojo!

What about how science is taught in our primary schools?  The curriculum encourages children to learn through investigation and exploration of their physical and natural surroundings.  Teachers are encouraged to promote hands-on learning and it is certainly a requirement in the training of new teaching staff.  Online resources are available to encourage and assist in the teaching of science in the classroom.  The reality depends on how comfortable the teacher feels with the subject, the class sizes and time!  In my experience of bringing interactive science to the classroom, I have found the two types of teachers that show the most enthusiasm for what I do are those that are madly into science themselves and those that are totally intimidated by it!

Outside of the school environment there is more to stimulate the young scientist than ever before.  The Aquarium is a favourite in our family, as is the Zoology department at our local University.  We took in an interactive display on oscillation at the Science Gallery, on our last trip to Dublin.  The National History Museum is next on our list along with a science walking tour.  School holidays can now be filled with science camps, construction camps and outdoor nature workshops, to name but a few.

My observations have shown me how much has changed since my school days.  I learnt science from a book with little emphasis on questioning.  I am pleased to see that my children learn in an environment that encourages questioning and active exploration.  Just as they began their scientific enquiry with the early dropping of the spoon, they are moving through a life that is rich in scientific options, wonder and promotion.  It is even written into their school curriculum!  I have also learnt through my children, I am learning now more than ever, by simply….. looking at life through the eyes of a child!

This article originally appeared as a “guest post” on sciencecalling.com