New chicks and a new look

New chicks and a new look

Nearly half way through the Summer holidays and it has been busy. We have had work and weddings and adventures and even hosted a barbeque in the Sun (it may have been the only sunshine we have seen this Summer but I’m not complaining). One big adventure so far this Summer is our new brood of chicks!

We decided to test out an incubator this year and somehow the five eggs we had planned to hatch turned into a little more.

Eggs


I am glad to report that the incubator worked to great success… as our kitchen turned into a chick maternity ward. This little one was looking a bit dazed after his arrival!

NewBorn


Some of the chicks seemed to want to get to grips with some life skills from a very young age. I think this one has aspirations to be a writer…

Chick on laptop


And this one has a more adventurous side!

Chick on a skateboard


They are all destined to be stars though as they had their very own camera crew right in our kitchen. To see their tv debut you’ll have to tune in to the “Is Eolaí Mé” series on Cúla 4 (TG4) in early 2016.

Chicks on film


In total twelve chicks hatched and we finally managed to watch and record the event, it was really beautiful.


Looking at that it is not hard to accept that birds are the living relatives of dinosaurs! Especially now that we know that dinosaurs had feathers.

Chickens are thought to be the descendants of a class of dinosaurs called Maniraptorans, three-toed meat-eaters that walked upright, had shorter forearms, hollow bones and fused collarbones just like the birds wishbone.

Now all we need to work out is which came first, the chicken or the egg?


On a completely different note, there have been some changes around here as the website finally got a well needed revamp. I hope you like the new look, let me know what you think!

Coloured-bouncy egg experiment

Coloured-bouncy egg experiment

This egg experiment is a new take on an old favourite. We have made bouncy eggs before, we even made them fluorescent! This year we decided to add more colour.

This is a really simple experiment, you probably have everything you need already in your kitchen and it is guaranteed to entertain both the young and the young at heart!


You will need:


bouncyegg3

Clear malt vinegar, a glass or cup, a whole raw egg, food colouring


What to do:


Place the raw egg in the glass and cover with vinegar, making sure the egg is completely covered.

Leave overnight or up to 48 hours if necessary.

After this time, remove the egg carefully and rinse it in a bowl of water.

The vinegar will have dissolved all the shell of the egg, leaving just the egg membrane keeping the structure together. The “naked” egg will be soft and bouncy and a little delicate so do be carefully when washing any remaining shell off.


A bouncy "naked" egg after the first stage of the experiment
A bouncy “naked” egg after the first stage of the experiment


Next place the egg into an empty glass and cover with water, add at least two teaspoons of your chosen food colouring (we used red here) and leave overnight again.

The next day carefully remove the egg from the coloured water, rinse and pat dry (you may find your fingers will get a little stained from the food colouring but it will wash off).


After step 2 of the experiment our "naked" egg has a little more colour
After step 2 of the experiment our “naked” egg has a little more colour


Now you have a coloured, bouncy egg, but be carefully when you bouncy it…


What has happened:

When the egg is in the vinegar you will notice some bubbles forming and eventually a foam will appear at the surface of the vinegar. The eggshell is made up of calcium carbonate. The vinegar (an acid) reacts with the calcium carbonate (a base) producing a salt and a gas called carbon dioxide (these are the bubbles you see). The vinegar will keep reacting with the calcium carbonate until it is all gone, leaving the egg contained in just the cell membrane.

A delicate, but bouncy egg.

When the egg is then placed in coloured water the water will travel into the egg by a process called osmosis. The egg will swell a little with the extra water.

I hope you have fun with this one, and please do let us know if you try it out. We are currently repeating the experiment as my Junior Scientists want to see the eggs with different colours… we will keep you posted!
The best Easter Egg Hunt… ever!

The best Easter Egg Hunt… ever!

We are spending a lovely few days away as we visit Grandparents and the children get to catch up with cousins. After a long chocolate and fun filled day, some very happy children went to bed declaring “That was the best Easter Egg Hunt ever” …

The loot for hiding
The loot for hiding


We chose seven hiding places around the garden and prepared seven rhyming clues for the children to work out where each stash was hidden.


There was a treat to find at each hiding point
There were treats to find at each hiding place


Clues to find...
Clues to find…


There was a lot of reading and deciphering of clues
…and read and decipher!


There was lots of searching...
There was lots of searching…


...and running!
…and running!


And the best bit of all was the personalised mini mug by Colorines Wonderful for each child! A real treasure!


Very happy with their treasure
Cousins…. very happy with their treasure


We hope you had a very happy Easter too!!


Our five favourite Easter experiments (or should that be eggsperiments)

Our five favourite Easter experiments (or should that be eggsperiments)

Are your children just starting their mid term break? Looking for some exciting activities to entertain them over the next two weeks? How about some Eggsellent Eggsperiments to keep everyone happy?

Here are five of our favourite experiments for Easter… or any other time of the year.

Easter Experiments

1. THE FLOATING EGG EXPERIMENT


Take the floating egg experiment one step further!


Take this one step further….

We mentioned in the video that you can take this experiment a step further.

Float the egg in the salty water as before.

Add a few drops of food colouring to a jug of unsalted water.

Carefully pour this coloured water down the side of the glass so that it sits on top of the salty water.

The egg will sit between the two layers… can you see it in this picture?


2. BALANCING EGG EXPERIMENT

Amaze your friends with this egg balancing trick


The junior science team were a little enthusiastic

with their salt levels in this video

but you can get this to work with A LOT less salt.


3. HOW CAN YOU TELL IF AN EGG IS RAW OR COOKED?


4. IMPRESS YOUR FRIENDS WITH THIS EGG IN A BOTTLE TRICK


5. MAKE A BOUNCY EGG

Not only did we make a bouncy egg, but we also made a fluorescent one…. check out these experiments here.


There will be plenty of great Easter blog posts by fellow Irish Parenting Bloggers over the next week or two…. here are a few already posted and if you check back I will keep this list updated as new posts are available.

You may also like…

Easter gift tag printables over at My Country Girl Ramblings

Check out these great dairy free treat ideas over at Dairy Free Kids

Easter Hama bead activity and Things I love (and hate) about school holidays over at Learner Mama

Easy Easter bonnets at Where wishes come from

Office Mum wonders “Is the Easter Bunny a thing?”

There is an Easter trip involving “Hot cross buns and Vikings in the Park” over at The Busy Mama

Tyler Lee’s Easter basket over at Dolly Dowsie

or check out what Bumbles of Rice has planned for Easter with this lovely Easter Ideas post


Happy Easter!


Fun Friday – the bouncy egg experiment!

Fun Friday – the bouncy egg experiment!

With all the excitement of the Easter bunny we forgot about our last egg- experiment…”the bouncy egg” so I thought it might be a fun one to start off this new blog spot… “Fun Friday”, where I will share a new experiment for you to try!

So firstly, this is how we set up the experiment….


We left the eggs in the vinegar for two days and then removed them and gently washed them in a bowl of water … unfortunately,  when I was washing the egg from the plain vinegar experiment, I burst it… Ooops!

No harm done as we substituted the other just to show you how the “bouncy” bit worked!


The result…(we had a very cautious scientist in the video but you can get quite a bounce out of the egg!)


What has happened to the shell?

The vinegar is an acid (acetic acid); it reacts with the calcium in the egg shell (calcium carbonate) and breaks it down, producing a gas as it does so.  You may have observed the gas as bubbles being formed, during the experiment.  Effectively the vinegar (acid) eats away at the egg shell until it is all gone.


The fluorescent bit

Then for a bit more fun I turned on a UV light!  Ok, I know, most of you don’t have one of these lying around at home but as I’m a Mad Scientist I do ;0) …and I was curious to know what would happen if we left it sit in fluorescent vinegar.

The results were Fab!! A fluorescent egg… check it out!  (I hope you can hear me in the video, sound is a bit low!)


So there you go, it worked better than I expected… the egg is completely fluorescent…. and bouncy, just for that extra bit of fun!


What is fluorescence?

In case you are wondering “WHAT IS FLUORESCENCE?”….let me explain… it is the emission of light from an object after it has absorbed light (or electromagnetic energy)…. usually the light absorbed has a short wavelength (in this case the UV light) and the light emitted has a longer wavelength.

When I shone the UV light onto the egg it “glowed”, even in daylight it  looks bright – just like a fluorescent pen!

The flourescent egg in daylight!
The fluorescent egg in daylight!
"Mammy I hatched an egg!"

"Mammy I hatched an egg!"

As a mother of three young children I have had many charming moments that I feel I will remember forever…. first steps, first words, how they pronounced a certain word, the list is endless.  Memories to cherish for a lifetime…. and then I forget!! Startling but true!  More moments forgotten than remembered.  However, certain things will stay with me forever…. like when my daughter was five and we got chickens for the first time; she was beginning to learn the joy of finding and collecting the eggs each day.  One day she came to the back door with her bounty only to trip at the step and drop an egg.  The poor thing burst into tears with the dramatic exclamation…

……………………………….”MAMMY, I HATCHED AN EGG!

Image credit: Graham Ettridge

I will never forget that one!  It was hard to keep a straight face as I tried to console my sobbing child.  With all the egg activities and treats of the Easter it has certainly got us talking and thinking about eggs in this house, have you ever wondered about these marvels of nature?

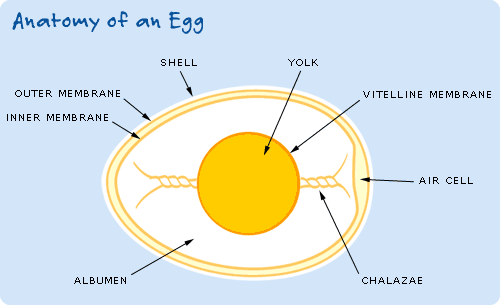
WHAT IS AN EGG MADE OF?

Firstly, what exactly is an egg made of and what purpose does each component have?

Image source: http://www.exploratorium.edu

The shell:  the egg shell is made of calcium carbonate (95%), just like the enamel of our teeth (see previous post).  The other 5% of the egg shell is made up of calcium phosphate, magnesium carbonate and proteins. Although the shell gives the egg it’s strength you might be surprised to learn that it actually contains up to 7,000 tiny holes (pores);  these pores allow air and moisture pass through the shell.

The bloom/cuticle:  this is a protein coating outside the egg shell that acts as a natural barrier to bacteria and dust while reducing moisture loss.

The membrane:  there are two layers of membrane just inside the shell called the outer and inner membrane.  These membranes are like layers of skin and contain a protein called keratin, which is found in our own nails and hair!

The yoke: the yellow of the egg contained within a membrane called the vitelline membrane.  The yolk is the part of the egg that feeds the developing embryo – it has a very high protein content and is also rich in vitamins and minerals.  The yolk contains all of the egg’s fat and cholesterol.  The yolk is the primary food store for the developing chick.

The Albumen: this is the white of the egg; it has a high protein and water content. The albumen cushions the developing chick and keeps it moist while still in the egg.

The air cell: this is a pocket of air at the wide end of the egg, created between the outer and inner membrane.  The air cell gets bigger as the egg ages.

The chalazea:  these are spiral ropes of egg white that keep the yolk in place.

WHAT ANIMALS LAY EGGS?

Animals that lay eggs are called oviparous and they include birds, fish, amphibians, many reptiles, many arachnids and insects, some molluscs and two mammals – the echidna and the platypus.  Mammals that lay eggs are referred to as momtremes.

A BIT OF EGG EVOLUTION

The reptile is credited as inventing the egg shell, allowing their young to develop outside the mother’s body.  All true dinosaurs are reptiles and they all laid eggs.  The development of the egg shell has been a fundamental step in evolution as it allowed the embryo develop in self contained egg, without the requirement for water.  This removed animals’ dependence on water for breeding.

HOW IS AN EGG MADE?

In the hen it takes about 24 to 26 hours to produce an egg.  An egg is made from the inside out, starting with the yolk which is released from the hens ovary and moves through various parts of the body where another element of the egg is added until finally the finished egg reaches the vent and the egg is laid.  Within 30 minutes of laying an egg, the process will start for the hen all over again.

SO WHAT GOES ON INSIDE THE EGG?

The embryo has started to develop in the egg while it is still being made within the body of the hen.  Once the egg is laid the development of the embryo will only continue if conditions are correct.  If the temperature and humidity levels are right (temp approx 22oC, relative humidity 50% ) the development of the embryo will continue after the egg is laid.  This process continues for approximately 21 days.  If the egg is being hatched under a broody hen then the hen must turn the eggs regularly.

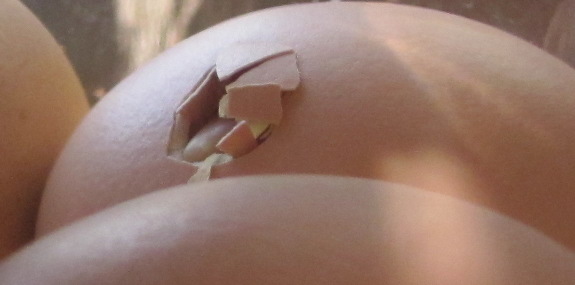
THE HATCHING PROCESS

Image credit: http://www.waldeneffect.org

Finally, when the time is right, its time to crack out and see the world.  The young of many egg-laying species are equipped with an egg tooth – a tooth like projection on the end of a beak (birds) or protruding from a jaw (reptiles) that helps the young animal tear through the membrane and break through the hard shell.  The egg tooth will eventually be reabsorbed or fall off.

Chicks and many other animals will hatch from the larger, rounded side of the egg.  That is because this is the end where the air cell is usually located.  Once the chick becomes too larger to receive enough oxygen from inside the egg it will use it’s egg tooth to pierce through the inner membrane into the air cell space.  This provides them with an extra supply of oxygen, just enough to sustain them as they continue the hatching process and crack and break though the egg shell.

We have been lucky enough to hatch a few broods of chicks over the years and it is always so exciting to meet the little ones for the first time.

This is chips – one of our brood!

So the only other question to be addressed is “which came first – the chicken or the egg?” but I think that’s a blog in itself, perhaps for another day!

AN EXPERIMENT TO TRY – HOW STRONG IS AN EGGSHELL?

You would be amazed how strong an egg shell is, although you might want to try this one over a sink!
Hold a raw egg between your thumb and first finger, holding at the two ends and then apply pressure – as hard as you can!  You might be surprised to notice that the egg doesn’t break!

If you repeat this but apply the pressure to the sides of the egg, things might not go so well and you might find yourself covered in egg!

So why is this?  Although an egg shell can be very fragile, it’s shape can provide it with great strength.  This is because the egg is dome shaped at the top and the bottom, just like a bridge structure;  this structure means that when you apply pressure the force is distributed evenly over the shell, not just on one point, hence the egg does not crack!

Further reading:
Anatomy of an egg
Eggshell
Poultry reproduction and incubation