Coloured flower science experiment using tulips

Coloured flower science experiment using tulips

I know I haven’t been blogging much lately, I am trying to work on a little something else that I have wanted to do for a very long time. If I ever get the other project finished I’ll be sharing it right here so watch this space (not literally, it’s taking me a LONG time!).

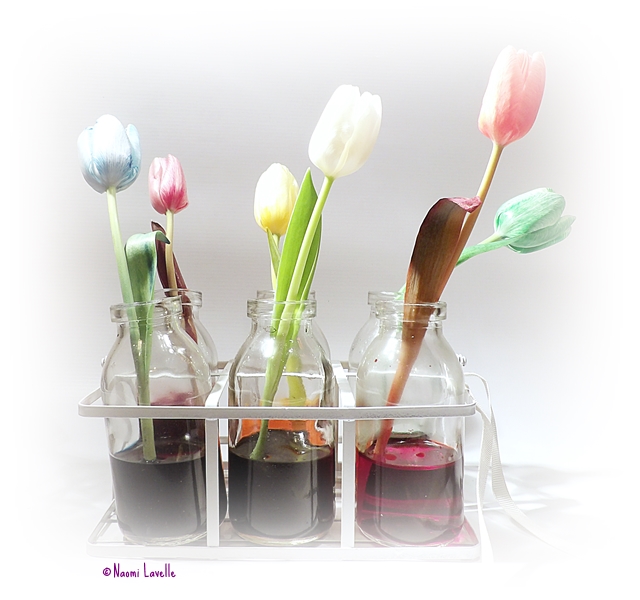
There is still plenty of science going on in the background though, as is common enough around here. This week we repeated an old favourite, an experiment demonstrating water flow and transpiration in plants… our coloured flower science experiment. I spotted a bunch of pretty white tulips in my local super market and that was all the reason I needed. I had also spotted a set of little bottles while away in Westport last weekend and had to buy them for this experiment, which, I think, elevates my geek status to a whole new level.

I have blogged about this topic before, so if you want more information you can check out this post.

YOU WILL NEED:

  • Some white flowers*
  • Food colouring (I usually use the Goodall’s ones, available in most supermarkets)
  • Water
  • Glasses, cups or other containers, one for each colour you will use

*This will work with all (or almost all) white flowers but it works better with some than others. You can of course use other coloured flowers, daffodils are a popular choice. I have achieved good results with roses, carnations, oxeye daisies and some Chrysanthemums. You can choose the flowers based on what you want to achieve but if working with children (particularly young children) or doing this as a classroom project them I would definitely recommend the tulips. The results are rapid so children will be able to see the colour arriving into the flowers within a fairly short time frame.

WHAT TO DO:

Choose how many different colours you want to use. Place one colour into each glass and add water. I usually use at least 10 mls of food colouring to 20 mls of water (if unsure use a 50:50 ration of food colouring to water).

Choose your flowers, one for each glass, and trim them to the desired length. You will get a more rapid result with a shorter stem.

Then simple place a flower in each glass and wait! With these tulips I began to see a result within less than an hour. I set this experiment up overnight and went from this…

tulips1

… to this…


tulips3

WHAT IS HAPPENING:

Water is transported up the stem of the flower through little tubes called xylem. The coloured water will travel through the xylem all the way up the stem to various parts of the plant and right up to the flower. The coloured water stains the plant as it moves through it and this is most apparent when the white flowers change colour. The water ultimately evaporates out of the plant through little pores called stromata. This process is called transpiration and is much like perspiration in humans.

OTHER SUGGESTIONS:

If you want to take this one step further you can try to make a multicoloured flower, like I did with this rose last year. Just click on the image to go to the post with full instructions.

rose


If you try this experiment, or a version of it, I would love to hear how it you get on!


Fun Friday – Five Fantastic Facts about DNA and how to extract DNA from a banana

Fun Friday – Five Fantastic Facts about DNA and how to extract DNA from a banana

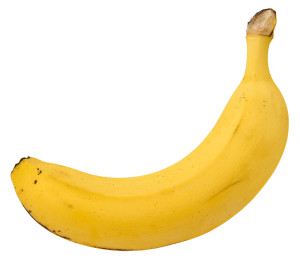
Dr. Simple was explaining a little about DNA in the last post, so I thought I would share one of the first experiments my children ever asked me to do with them…. they wanted to see DNA, so we extracted it from a banana.

Did you know that we share approximately 50% of our DNA with bananas?


You will need

… a banana, a fork, a bowl, washing up liquid, ice cold surgical spirits (or isopropanol – both available from a pharmacy), salt, a sieve, a glass jar.


What to do…

Remove the banana skin and mash the banana in the bowl, using the fork. Add two teaspoons of washing up liquid and stir slowly.

Add a teaspoon of salt and one to two tablespoons of water and stir carefully.

You want to avoid making bubbles.

Leave for five minutes then strain carefully through the sieve into the jar.

Tilt the glass jar and carefully pour the surgical spirits down the side of the jar, at least as thick as the banana layer.  This will form a separate layer on top of the banana mixture.

Do not mix.

After five to ten minutes you will see a long, stringy substance appear in the top layer. This is the banana’s DNA.

You can use a tooth pick to lift and examine the DNA.


So what is happening?

The salt and washing up liquid break open the banana cells, releasing the DNA.

The DNA will not dissolve in the surgical spirits (or any alcohol) so it floats in this layer.


Here are a five fantastic facts about DNA…

5 Facts about DNA
5 Facts about DNA

The experiment described above is just a quick and simple method that I have used before but if you want something more scientific and a lot more fun… check out Cell Explorers! They do amazing school visits, for junior infants right up to secondary level students,  which I am sure would be of interest to teacher or parents making suggestions in their own schools. Run by Dr. Muriel Grenon and her wonderful team of students and graduates these activities are really top class!  Contact them by email at cellexplorers@nuigalway.ie


Fun Friday – Exploring Density

What is Density?

Density is the mass of an object per unit volume.  A bit of a mouthful but this is how I explained it to my own children today….

…imagine you have a pebble and a marshmallow of the same size and shape… which one do you think is heavier?

My three year old got this straight away… “the pebble of course Mum” (with a “silly question” look that I am use to at this stage).

The Fun Friday Science Team!

So if they are the same size (volume) then why does one weigh so much more than the other?  If you remember that everything is made up of molecules… the heavier object simply has more molecules packed more tightly together (a greater mass); the molecules in the lighter object (in this case the marshmallow) are much more loosely packed together (a smaller mass)!

The pebble is said to have a greater density than the marshmallow.

A bit of History:

A Greek scientist called Archimedes (250 BC) is credited with discovering the concept of density.  The story goes that Archimedes was given the task of determining if the newly minted King’s gold coins were genuine (or if they had been mixed with silver).  Archimedes was pondering this idea while lowering himself into the bath.  When he noticed how his body displaced a volume of water he realised he had cracked it!  If he compared a coin of pure gold with the newly minted ones he could check if they displaced the same amount of water i.e. that their densities were the same.  Turns out they were not and the King was beings duped!

They say that Archimedes was so excited when he realised the solution that he jumped out of the bath and ran all the way home naked shouting “Eureka, Eureka”…. (“I found it, I found it” in Greek).

Here are some experiments on density that you can try at home…

The children and I spent the afternoon trying out these cool experiments that are easy to do at home.  Hope you get to try some too!

1. Make a density rainbow

You will need:

A clear glass, golden syrup or honey, maple syrup, milk, washing up liquid, water, food colouring, cooking oil or baby oil, a clear alcohol (we used isopropanol but you could use methylated spirits or vodka – with adult supervision!), funnels, a dropper or a spoon.

What to do:

Place some water in a glass and add a few drops of food colouring and mix. Place some alcohol in another glass and add a few drops of a different food colouring. Mix.

Carefully add each layer in the following order….

  1. golden syrup
  2. maple syrup
  3. milk
  4. washing up liquid
  5. coloured water
  6. baby oil (or cooking oil)
  7. coloured alcohol
Try to add each layer carefully down the side of the glass, using a spoon, a dropper or a funnel (as below).  Make sure each liquid makes a complete layer that fully covers the layer underneath.  If the layers mix a little, allow to settle before adding the next layer.
Add each layer carefully down the side of the glass
Two junior scientists admiring their work!
We think it looks lovely!


What is happening:

We added the most dense material first (the golden syrup) and then the next dense and so on.  So each layer is a little lighter or less dense than the previous one and therefore floats on it.

You can of course add other things are leave some of these layers out!

2. Lava lamp in a glass

You will need: a clear glass, sunflower/vegetable oil, water, food colouring, some effervescent tablets such as AlkaSeltzer.

What to do: Place water in the glass to about one third full.  Add a few drops of food colouring to the water and mix. Gently pour the oil down the side of the glass filling the glass to almost the top.  If the oil and water mix a little don’t worry, just wait a while until the two layers separate out with the oil sitting on top of the water. Break the tablet into pieces and add one or two pieces to the glass…. I will let Caer explain it to you (with a little prompting from her brother)!

What is happening:

When the AlkaSeltzer tablet reaches the water layer it starts to dissolve and fizz, releasing a gas called carbon dioxide.  This gas forms in small bubbles surrounded by water, they start to rise to the top of the glass because the gas is lighter (less dense) than the water and oil.  The bubbles pass all the way through the oil layer to the top of the glass where the bubble eventually bursts, releasing the carbon dioxide gas.  Once the gas is gone the bubble is just water, which is heavier (more dense) than the oil so it starts to drop down again.  The process continues until all the carbon dioxide has escaped to the top.  Adding more AlkaSeltzer starts it all off again!

3. Fireworks in a glass

You will need: A glass, water, food colouring and sunflower (or vegetable) oil

What to do: Fill the glass with water to about two thirds full.  Carefully pour a layer of oil on top of the water to fill the glass.  Add drops of food colouring to the top of the oil layer and watch as they slowly drop down and enter the water layer.  They streak through it like some mini fireworks!

Add the drops of food colouring to the top of the oil…
…and wait for the fireworks display to begin!

What is happening:

Food colouring and oil do not mix so the drops will fall until they meet the water layer.  Food colouring dissolves in water, the colour diffuses out into the water as the drops fall to the bottom of the glass, giving a lovely fireworks type display!

Hope you enjoyed this week’s Fun Friday as much as we did.  If you have any comments, questions or suggestions please leave a comment below, I always love the chat and feedback!  

Have a great weekend!

Fun Friday – the Tornado

Fun Friday – the Tornado

(Apologies I am posting the Fun Friday blog a day late due to broadband difficulties yesterday )

We all thought we had been visited by a small tornado here in Galway yesterday, a photo of a waterspout just off Salthill was the talk of the town.  Turns out it was just a hoax, but for any junior scientists that may be disappointed I thought I would share a great experiment with you explaining how to make your very own tornado in a bottle!  There are plenty of fun and interesting tornado facts too.

What is a Tornado?

photo credit: Niccolò Ubalducci Photographer via photopin cc


A tornado is a rapid swirling column of air that stretches from a cloud (usually a thunder cloud) to the earth below.

A tornado that forms over water is often referred to as a waterspout.

If the column of air does not touch the earth it is referred to as a funnel cloud.

How do Tornadoes form?

The formation of a tornado requires a combination of a number of specific weather features but usually tornadoes form when an area of warm, wet air meets and area of cool, dry air and alter the atmospheric conditions.  When this causes the warm wet air to rise and cool rapidly thunder clouds are formed.  Under the correct conditions of wind strength and speed the rising air starts to tilt and rotate and the tornado begins to form.

How fast is a tornado?

Most tornadoes have a wind speed of less that 160 km and hour (100 miles an hour), however, some extreme tornadoes can reach much greater speeds, up to 300 km an hour!

Did you know… the fastest recorded tornado was the Tri-State Tornado (Illinois, Missouri and Indiana) of 1925 had a forward speed of 117 km per hour (73 miles and hour)?

How are Tornadoes measure?

Tornadoes are detected using weather spotting and doppler radar.  Tornado warnings may be issues for certain areas by observing the formation of developing weather patterns while radar can be used for more accurate forecasting once thunderclouds have developed.

Image credit: Wiki Commons; a category F5 tornado in Manitoba, Canada, 2007.

It is not easy to determine Tornado strength and wind speed for two main reasons..

  1. as the exact location of a tornado is hard to predict it is very hard to have the required equipment in the right place at the right time;
  2. the force and strength of a tornado can destroy the equipment used for such analysis.

One of the devises used to measure wind speed within a tornado is called an anemometer. Doppler radar can also be used for this purpose.  When these measurements are successful, wind speed will be expressed against the Beaufort wind scale, ranging from 0 -12 in wind speed.

In 1971 Dr. Tetsuya Fijita developed a scale to rank Tornadoes, this scale ranges from 0 to 5 and is expressed as F0, F1, F2, F3, F4 and F5.  This ranking is retrospective, estimating wind speed and strength by examining the damage resulting from the Tornado.  This scale has been further refined in the US leading to the Enhanced Fijita Scale.

Do we get tornadoes in Ireland?

There are certain places around the world that are “tornado hot spots” such as many central states in the US, South Africa, Canada and Bangladesh.  However tornadoes can form almost anywhere and there are genuine cases of tornadoes in Ireland.  If we do get visited by a tornado it is usually small and brief.

Did you know…the earliest recorded tornadoes in Europe occurred in Rosdalla, near Kilbeggan, Co. Westmeath, on April 30th 1054?  

The only continent where tornadoes have not been recorded is the Antartic.

Did you know that the UK has the largest number of tornadoes per land mass?  Usually these tornadoes are small.

An experiment to try at home

Make a tornado in a bottle

You will need… two empty 2 Litre plastic bottles, an O-ring, strong duct tape, food colouring, glitter (optional). Alternatively use a tornado tube to replace the O-ring and duct tape.

What to do… Fill one 2 Litre bottle 2/3 full with water, add a few drops of food colouring and about a teaspoon of glitter, if using.  Place the O-ring on top of the bottle and tape into place with the duct tape, ensuring that you do not cover the whole.

Place the second (empty) bottle upside-down on top of the first one and tape securely into place.

If using the Tonrado tube you just twist the tube onto the first bottle 2/3 full with water and then upturn the second bottle and twist it securely into place into the other end of the tornado tube!

Once you are confident that the bottle is taped well enough to prevent any leakage you can turn the bottles upside-down so the one containing the coloured water is on top.  Turn the upper bottle in a circular motion about five times and then hold the bottles steady and see what happens.  You should a mini tornado forming in the bottle as the water drains.  if this does not work for you first time don’t worry, it make take a few attempts to get the knack of turning the bottle correctly.

So what is happening?… When we turn the bottle we get the water moving in a vertical, circular motion, just like the air in a tornado.  Once we stop turning the bottle and hold it steady the momentum created causes the water to keep turning and form into a “twister” inside the bottle.  The food colouring and glitter or only present to make the tornado more visible.

Alternatives:

You can change this around a little by adding different things to the water in the bottle and compare how the tornado looks;  Some suggestions include adding grains of pepper, small pieces of coloured paper or a squeeze of washing up liquid.  You can also try the experiment by adding some coloured oil to the water.

Challenge your friends and family:

You can change this into a fun challenge for your friends and family and help them learn about air pressure while too.  Give your friend the bottles all set up and ask them how long they think it will take them to get the water from the top bottle to the lower bottle, without squeezing the bottle.  Let them have a go and time it.  You can then ask if anyone else thinks they can beat that time and give them a go.  Everyone should get about the same time.

Now it is your turn, upturn the bottle and start the tornado and time how long the bottle takes to empty now!  They should be impressed to find out you have beaten their time!

So what is happening?
The hole in the O-ring allows air to pass into the bottle, producing a funnel of air within the column of twisting water.  The movement of air from one bottle to the other equalizes air pressure and allows the water escape into the lower bottle much more quickly.
Fun Friday – Static Electricity

Fun Friday – Static Electricity

What is Static Electricity?

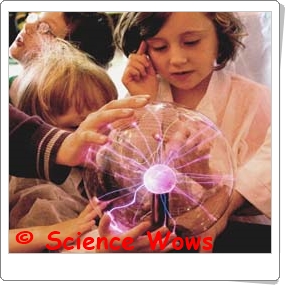
Static electricity is a charge that builds up when two things are rubbed together. Matching charges of static electricity push each other away (repel) while opposite charges attract each other.

Let’s Learn More!

Everything is made up of atoms.  An atom is the smallest piece you can break an object down to while still maintaining it’s properties.

photo credit: ProLithic 3D via photopin cc

Atoms are made up of protons, neutrons and electrons.  Protons have a positive (+) charge, neutrons have no charge (neutral) and electrons have a negative () charge.

At the centre of each atom is a nucleus, this is where the protons and neutrons are found.

The electrons are found to the edge of the atom, they are constantly moving in a circular motion around the nucleus.

When two objects are rubbed together electrons pass from one to the other, making one more positively charged and the other more negatively charged.  This charge is called static electricity.

How does lightning work?

photo credit: Brujo+ via photopin cc


Lightning is caused by a build up of static electricity in clouds.  As the charge in the cloud grows, the base of the cloud builds up a strong negative charge.  This negative charge creates a build up of positive charge in the ground.

If the attraction between the cloud and the ground (or between two clouds) becomes strong enough, a spark of lightning will jump between the two.  This lightning is a giant spark of moving electrons travelling between the cloud and the ground.


Did you know… that the heat of a lightning bolt is hotter than the surface of the sun?

Some things give up or take on electrons more easily than others.

Objects can be ranked according to how easily they give up or take on electrons and this ranking is called the triboelectric series.  Things listed at the top of the triboelectric series give up electrons more easily than those ranked below.

Experiment to try at home

photo credit: Kevin Baird via photopin cc

1. Hair raising fun!

You will need… a balloon and a good head of hair!

What to do… blow up the balloon and tie it tight.  Rub the balloon all around your hair (this is called charging the balloon); Now move the balloon slowly away from your head and watch your hair stand on end!

So what is happening?… When the balloon is rubbed on your hair electrons are passed from your hair to the balloon.  This gives the balloon a negative charge and your hair a positive charge.  As opposites attract, your hair is attracted to the balloon and sticks to it while you pull it away.

2. Attract a can!

You will need… a balloon, a good head of hair and an empty aluminium can!

What to do… charge the balloon on your hair as before.  Lay the empty aluminium can on it’s side on a table.  Then bring the charged balloon close to the can, but do not let it touch it.  Slowly draw the balloon away from the can and watch the can follow.

So what is happening?… The aluminium can becomes attracted to the negatively charged balloon as the area around it becomes positively charged.

3. Bending water!

You will need… a balloon, a good head of hair and a running tap!

What to do… Turn on a tap to a small, steady stream of water and leave it running.  Charge the balloon on your hair as before.  Bring the charged balloon slowly towards the stream of water and you should see the stream of water slowly bend towards the balloon! (If the experiment does not work for you just reduce the flow of water).

So what is happening?… Just as with the aluminium can, the stream of water becomes attracted to the negatively charged balloon as the area around it becomes positively charged.

I hope you have some hair raising fun with these experiments :0)  If you have any questions or queries, or would like me to cover a particular subject in the Fun Friday blog, please just leave me a comment below!

I am going to take a little blogging break for a couple of weeks but will return in August for plenty more fun, facts and experiments to share.

Fun Friday – exploring Acids and Bases

Fun Friday – exploring Acids and Bases

I know, I know, I shouldn’t call in Fun Friday when I am posting it on a Saturday, but ignoring the fact that I am a day late with this regular blog post, I hope you enjoy!

Exploring Acids and Bases

What are Acids and Bases?

Acids and Bases are chemicals that occur naturally in lots of different substances.
Acids can be found in things like lemons and vinegar; Bases (also called Alkali) are found in toothpaste or many cleaning products. Bread soda is a base.

Lets learn more!

The Bronsted-Lowry Definition of an acid and a base is…
  • Acids are substances that gives up hydrogen ions (H+).
  • Bases are substances that accept hydrogen ions (H+).
  • These hydrogen (H+) ions can change things in many ways, including taste and colour!

Did you know… that the word acid comes from the Latin word acidus meaning sour!

Lemons contain an acid called
citric acid that gives them that
sour taste!

The pH Scale

The pH scale is a scale that measures how acidic or basic a substance is.
The pH scale goes from 0 to 14. The scale for acids goes from 0 to 7. A very strong acid has a pH of 0. The scale for bases goes from 7 to 14. A very strong base has a pH of 14.
Something with a pH of 7 is said to be neutral (neither an acid or a base). Pure water has a pH of 7.
photo credit: ViaMoi via photopin cc


“Did you know… that bee sting venom contains an acid called formic acid!”

Acids and bases in plants!

An indicator is something that can determine whether a substance is an acid or a base. Many indicators are natural chemicals.
A group of chemicals called anthocyanins are naturally present in a number of different plants such as apples, grapes, the leaves of many trees and flowers such as roses and poppies.
photo credit: Jason A. Samfield via photopin cc

The colour of anthocyanin changes depending upon the acid levels (pH) of the plant. The bright red and pink colours of Autumn are due to anthocyanin and acid levels in leaves (for more on this see my previous
post “Carrots, Cabbages and Cups of Tea“).

Anthocyanin changes colour from red to pink, to purple, to blue, to green as the pH changes from 0 to 14.
photo credit: Parvin via photopin cc

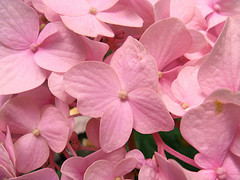
“Did you know… Hydrangea flowers can change colour depending on the pH of the soil. In acidic soils chemical reactions occur to make aluminium available to the plant, turning the flowers blue, in alkaline (basic) soil these chemical reactions cannot occur so the flowers remain pink.”


Experiments to try at home:

Make your own sherbet

You will need… icing sugar, citric acid, bread soda, flavoured jelly crystals, a teaspoon, a tablespoon and a mixing bowl.
What to do… add one teaspoon of citric acid and one teaspoon of bread soda to the bowl. Add three tablespoons of icing sugar and two tablespoons of flavoured jelly crystals. Mix all together then place a small amount on your tongue! The sherbet should bubble a little and you should feel a tingle on your tongue!
So what is happening?… you have just created an  acid-base reaction in your mouth! When the citric acid, bread soda and saliva in your mouth combine they react together to give off a gas, called carbon dioxide, that forms tiny bubbles that you feel fizzing on your tongue!

Cabbage juice experiment

You will need… a red (purple) cabbage, a knife, a saucepan, a sieve, an ice tray, clear vinegar, water and bread soda
What to do… cut up half the red cabbage and add it to a pan.  Ask and adult to cover with water and bring it to the boil then leave to cool.  Once cool pour the cabbage juice through a sieve, collecting the juice in a bowl.  Pour the juice into an ice tray and freeze until it hardens into ice-cubes.
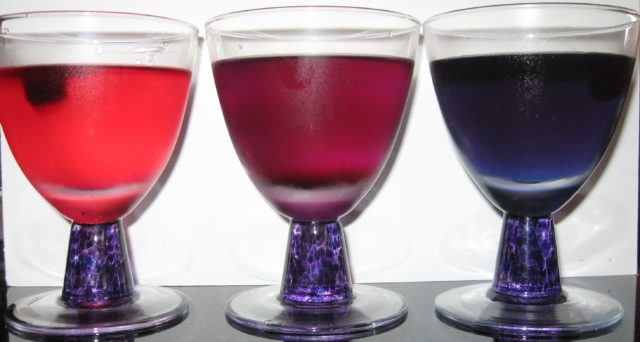
Half fill three glasses, one with water, one with clear vinegar and one with water mixed with half a teaspoon of bread soda. Now drop a cabbage juice ice-cube into each glass and see what happens.
Cabbage Juice ice cube experiment


So what is happening?… red cabbage contains anthocyanin. When the cabbage juice mixes with the acid (vinegar) it turns a red/pink colour; when it mixes with the bread soda solution (base) it turns a blue/green colour.  The water is neutral (pH 7) so it does not alter the purple colour of the cabbage juice.