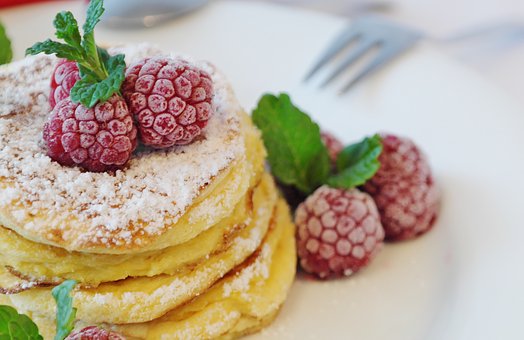
We are big fans of pancakes in this house; I’m pretty casual with my batter making at this stage, I throw a few things into a bowl or blender, a bit of a mix, into the pan, quick flip and hey presto! It seems I am going about it all the wrong way. There are formulas that I should be following, such as…
The batter formula
If you take your pancakes seriously, you’ll want the appearance to be just right. It’s not just luck or habit; it is all about the flour to liquid ratio, according to a group of researchers at University College London.
The thickness of the pancake determines the way the water in the pancake is released during cooking and ultimately determines the overall appearance of the finished product.
The experts devised a formula…
Mixture (ml) required per pancake : (D² x T x π) / 4
Total mixture (ml) required: (D² x T x π) / 4
… where D is the diameter of the pancake pan and T is the thickness that you want your pancakes!
And believe it or not, this pancake study has medical benefits too: the team are using what they learned to create better surgical methods for treating glaucoma, which is a build-up of pressure in the eyes caused by fluid.
The perfect batter calculator
If this all sounds a bit too complicated then don’t worry, maths students at the University of Sheffield have taken this formula and generated a calculator that does all the maths for you. All you need to do it type in how many pancakes you want, how thick you want them and how wide your pan is and voila, you get an exact recipe!
The super formula
If you like your pancakes with some extra maths then don’t worry, there is a formula for you too, but hold on to your whisks, this one is pretty tricky!
100 – [10L – 7F + C(k – C) + T(m – T)]/(S – E)
Apparently, the closer you get to 100, the better the pancake.
L is the number of lumps in the batter; C is that consistency.
F stands for the flipping score, k is the ideal consistency of the batter and T is the temperature of the pan.
M is the ideal temp of pan is, S is the length of time the batter stands before cooking and E is the length of time the cooked pancake sits before eating.
Are you still with me? If not don’t worry. If everyone in your house is happy to eat your usual offerings then I’d go back to the old reliable. Me? I’m taking my inspiration from this post and I’m going to add some colour and sprinkles… without a calculator in site.
Whatever way you make your pancakes today, I hope you enjoy 🙂
*******
If you want to know a little more about your pancakes, from history, to ingredients, to science, check out my post over on Headstuff.org today!
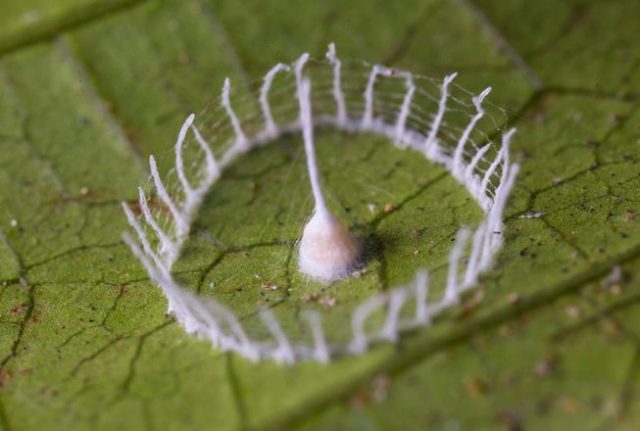
This tiny structure is made up of two parts, a central spire on the inside and an outer (round) fence like structure, a little more than 0.5 cm in diameter. The entire structure is made of silk and there are threads attaching both the inner column and the outer ring.
This structure is amazing for so many reasons;
Firstly, it was only discovered as recently as 2013, by Troy Alexander, in the Tambopota Research Centre in the South Eastern Peruvian Amazon. Originally there was much speculation as to whether a spider was actually the creator at all. Some suggested it was the work of a caterpillar, others thought it was a fungal structure of some sort.
Secondly, no spider has ever actually been seen creating these structures! Researchers did finally observe small spiderlings that had hatched from the central structure. Usually there is just one solo spiderling , occasionally there are two. This is extremely rare for spiders, as you are much more likely to find tens, or even hundreds of eggs within the one egg sac. It is possible that the female spider that makes these structures, makes many, maybe there are better chances if survival of the eggs are dispersed over a wider area. A literal case of not putting all your eggs in one basket?
Check out this fantastic video by Phil Torres and Aaron Pomerantz as they capture the moment two spiderlings hatch (it really captures an exciting moment in the discovery process)…
Thirdly, scientists are still unsure what purpose the structures serve. Do they have a protective role: a fence to keep out predators? Or do they act like a typical web, trapping insects and filling the nursery larder with a food supply for the hungry hatchling?
Finally, the most bizarre part of this story is that the adult spider, the skilled architect behind these constructions, is still unknown. As mentioned in the video above, DNA barcoding has not yielded any positive results. No doubt the answer will come soon, but in the meantime, it is still a case of speculation and wonder, often a very fun part of scientific research 🙂
I’ll be posting March’s mystery creature next Monday so remember to stop by!
It is all about snails here this week; snail questions, bad weather and midterm break. I was planning a written blog in response to all his questions, but, spirits were high this morning (in the kids, not me!) so writing time was limited. Instead we went for something a little different and if you like it, I think it could become a regular feature.
We made a little video, the snail questioning one and I. So go get a cuppa and settle down for five minutes with us… it’s time to TAKE FIVE!
So what do you think? We hope you liked it, let us know what you think in the comments below and, if you have a question you’d like covered in a TAKE FIVE video, let us know!
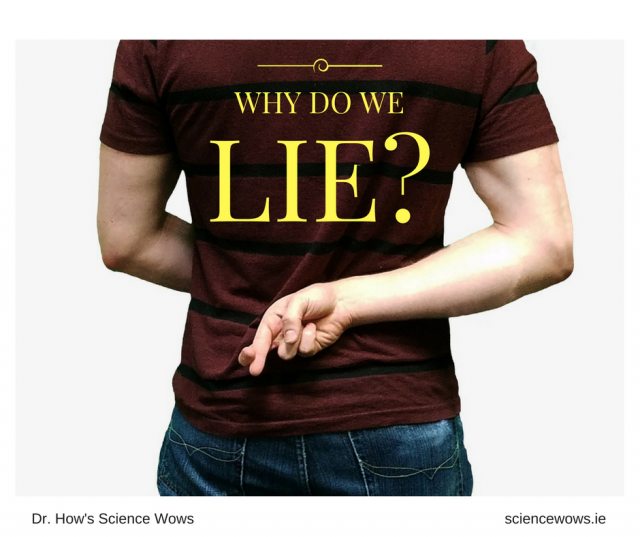
I watched a great documentary on Netflix* recently all about lying… it is called Dis(honesty): the truth about lies and I would highly recommend it.
It really got me thinking about lying, why do we do it, what would happen if we don’t and is it a uniquely human activity?
First off, we all do it! If you are shaking your head in disagreement, then you’ve just lied too! Sometimes we do it for good reasons, sometimes just to save our skin, but we all lie from time to time. So why do we do it and is it a purely human activity?
We lie for a number of reasons, it may be a little white lie to make someone feel better or it might be a big lie for our own gain, or to save our skin!
Many of the lies we tell are to present a better side of ourselves; make ourselves appear a little nicer, a little smarter, or a little more popular. We don’t often even recognise these lies, we don’t realise we are doing it – we are lying to ourselves!
On a base level, we probably lie because evolution has shown us that it works to our benefit and the benefit of society. As our social connections have developed, so too have our abilities at lying. It is actually a valuable tool to have and brings with it many advantages. Lying is a sign of intelligence and is considered a complex cognitive skill.
Different types of lies and liars
There are different types of lies and different categories of liars! There are the little white lies that we all do, usually for social acceptance or compliance. There are lies of exaggeration, usually of little harm either; and then there are the bigger lies that are often more serious and come with a lot more consequences if found out.
There are also different types of liars. We are all contributors to the pool of common-or-garden, everyday liars, but things get more serious when we look at the compulsive or pathological liar.
Compulsive liars tell lies as the norm, it is an automatic reflex and it takes a lot less effort for them than telling the truth does. Pathological liars tend to take it one step further; they lie for their own gain, with little thought to the consequences of their lies, for either themselves or others.
What happens in our brains when we lie?
Lying is a complex process; in order to do it our brains must focus on two opposing pieces of information at the same time: the truth and the lie. If we want to process or deliver a lie we need to believe that it could be true. The brain has to work much harder to lie than to tell the truth. Activity in the prefrontal cortex (at the front of the brain) has been shown to increase when a person lies. This is the part of the brain involved in decision making, cognitive planning and problem solving.
Usually when we tell a small lie, for personal gain, we feel bad. These emotions of regret and guilt are controlled by a part of the brain called the amygdala. However, the more we lie, the more we desensitize the amygdala so that it produces less of these bad feelings.
Studies on the brains of pathological liars show that they have about 25% more white matter in their prefrontal cortex, suggesting more connections between different parts of the brain. However, they also have about 14% less grey matter, the part that can help rationalise the potential consequences of each lie told.
No man has a good enough memory to be a successful liar- Abraham Lincoln
Do other animals lie?
Yes some do. One famous example that my children love to hear about is of Koko the gorilla. Koko is renowned for her sign language abilities, with an impressive vocabulary of more than 1000 words. Koko has a pet kitten that has come in handy for more than just cuddles and companionship. One day Koko tore a sink from a wall in her enclosure. When her carers returned and asked what happened, Koko signed ‘the cat did it!’
When do we start lying and how often do we do it?
Some scientists believe that we begin the act of deception as young as six months old! This usually starts as fake crying, or smiling, to get attention. At that age we don’t do a very good job (although it is probably quite cute and amusing to watch) and we likely do not do it as a conscious lie.
By the age of two however, we have put in a little more practice and can deliver an outright lie with more commitment and conviction.
Some of us are better liars than others and there is no detection system, including lie detectors, that work for all. However, many of us amateurs give away some tell-tale signs when we are lying, such as…
We make and keep direct eye contact (contrary to common held belief)
We keep our bodies very still, but we may…
jerk our heads a lot
We give more information than is necessary
We touch or cover our mouths with our fingers
We breathe at a more rapid rate
We cover vulnerable parts of our bodies, such as the throat, head or chest
Interestingly, we are better at lying when we lie for altruistic reasons than for our own good and these lies are more difficult to detect.
So that is the low-down on lying, and not a word of a lie 😉
Have you any facts or stories to add? I’d love to hear them, just leave them in the comments below.
*Disclosure: As a member of the Netflix Stream Team I have received a years subscription to Netflix, free of charge, and an Apple TV, for streaming purposes. As part of Netflix Stream Team I will be posting monthly updates on what we are watching and what is on offer. All opinions expressed will be my own.
I must admit that I am not a big fan of the commercial side of Valentine’s day but I have no problem with the idea of telling someone you love just how much they mean to you. When I get to couple the sentiment with some science experimenting then my heart really does skip a beat. Check out these cool valentine science experiments that would make some pretty unique (and educational) gifts for the someone special in your life.
Say it with flowers
Who doesn’t love flowers on Valentine’s Day? With a little bit of science you can add an extra twist to this staple gift. Try these CHROMATOGRAPHY flowers…
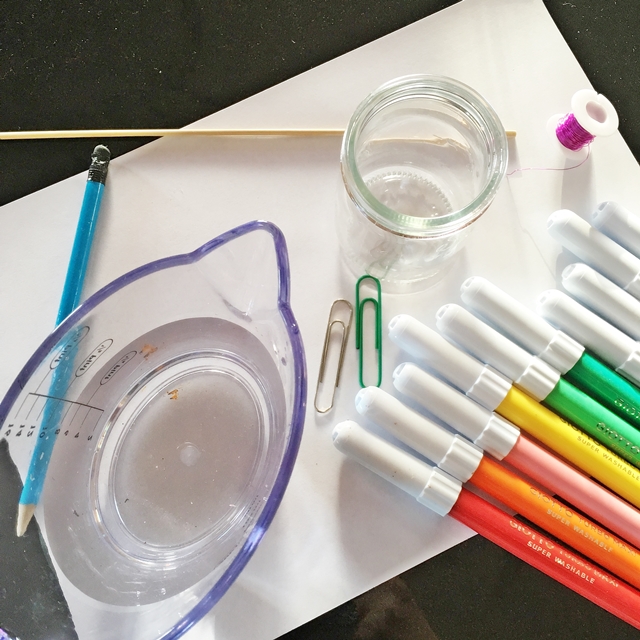
Here’s what you’ll need:
Some paper (we used regular white A4 paper here)
A selection of water soluble coloured markers
A pencil
A ruler
A paperclip
A glass or beaker
A jug of water
Some wire or pipe cleaners
What to do:
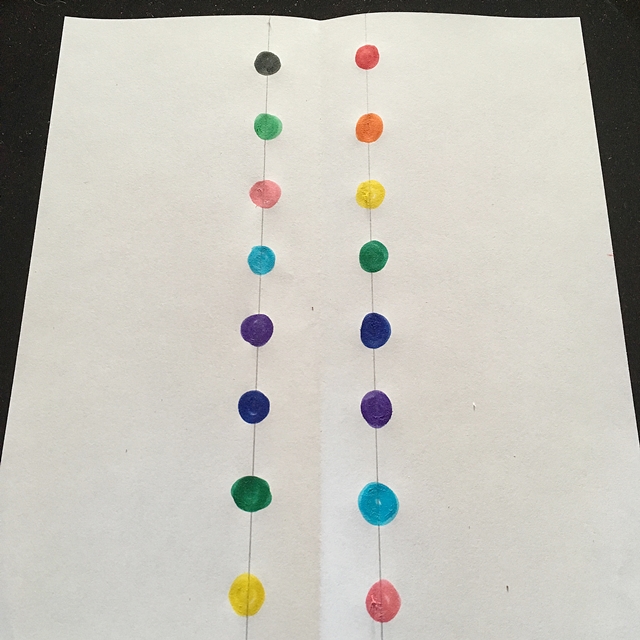
Fold your paper in half down the long side and then open it out again.
Using your ruler and a pencil, draw a line either side of the crease, the line should be about 2 cm from the crease on each side.
Choose the colours you would like to use and place large dots of each colour along these lines, leaving about 1 – 2 cm between each dot. Alternate the colours in whatever way you wish.
Once you have that done it is time to fold your paper. You need to fold along the shorter side, start at one end and fold the edge of the paper in about 2 cm. Turn over the paper and fold back another 2 cm. Turn over the paper and keep going like this until you reach the other side of the paper.
Keeping the paper folded, fold it in half and secure with a paperclip.
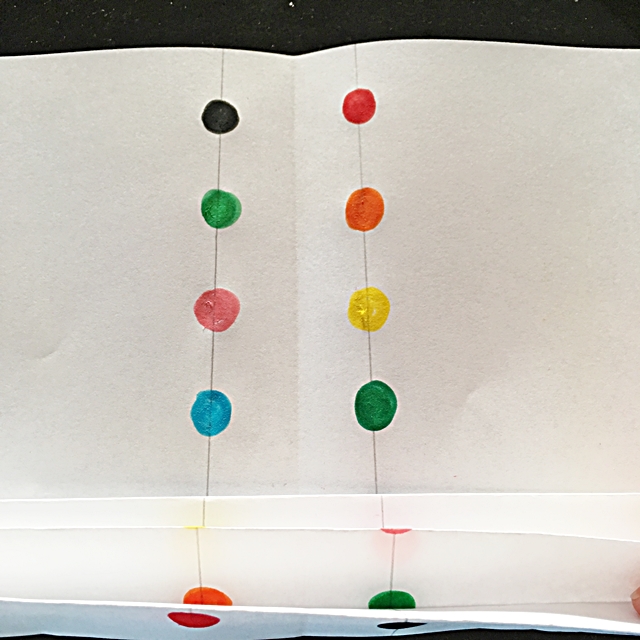
Trim the tops of the folded paper on each side. I used a serrated scissors but you could just cut into a pointy shape or round off the ends, whatever you prefer.
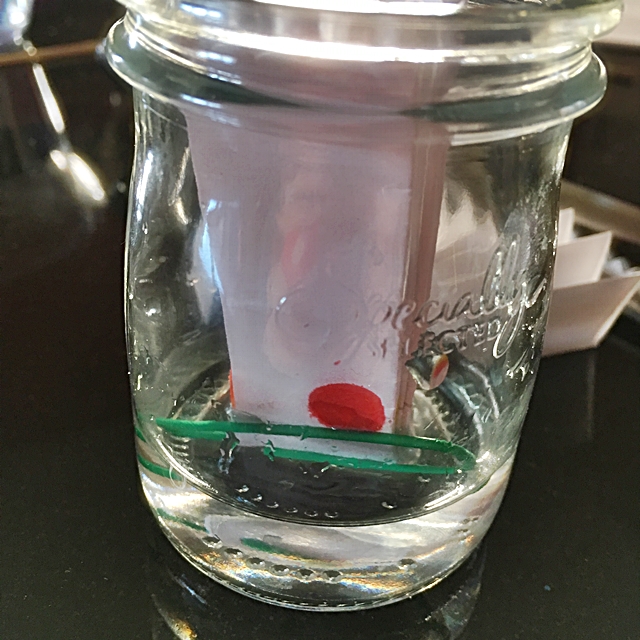
Pour about 1 cm of water into your glass (or beaker) and place the folded paper into the glass, as in the photo below. You want the end of the paper to sit into the water below the dots of markers, you don’t want the water level to reach the dots though.
Now you just need to wait a while. You should see the water creeping up the paper, spreading out the marker ink as it moves upwards. Once the water reaches the top of the paper you can remove it from the beaker and place it somewhere warm to dry.
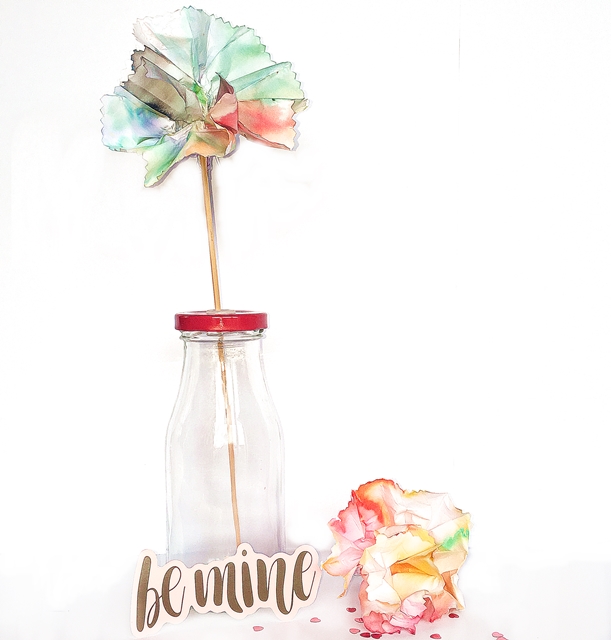
Replace the paper clip with a strip of wire or a pipe cleaner, and twist it to close. This will be the stem of the flower.
Once dry it is time to open out the paper, into a flower shape, and see what a colourful CHROMATOGRAPHY flower you have made. You can try different types of paper, blotting paper works really well.
The science bit:
This experiment used a scientific technique called CHROMATOGRAPHY to separating different chemicals; in this case the chemicals are the inks in coloured markers. As the water creeps up the paper (by a process called CAPILLARY ACTION) it dissolves the different inks that make up the colour. These inks separate out as the water moves upwards and you get lovely streaks of colours through the paper.
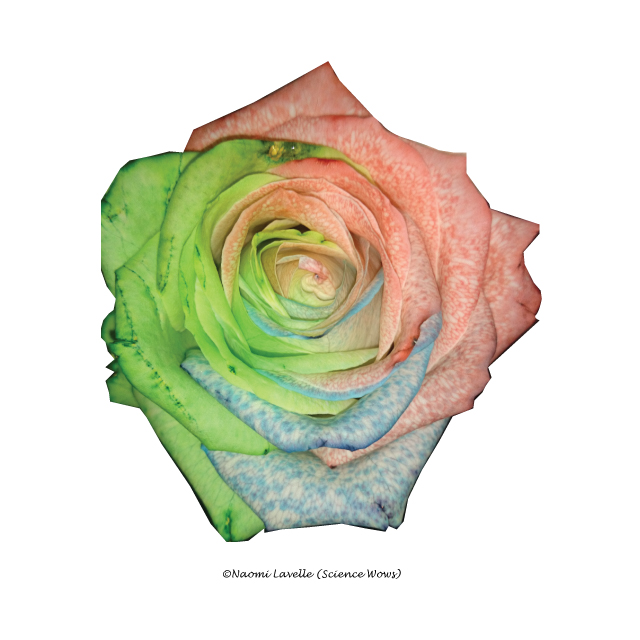
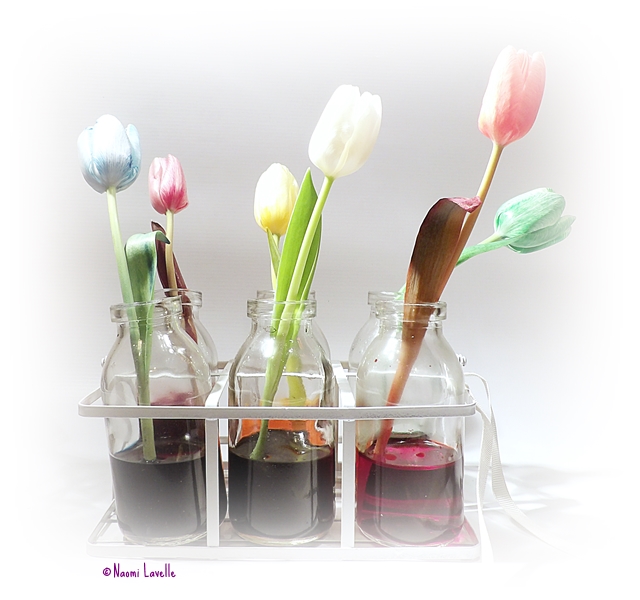
If you prefer real flowers to artificial ones you can still use a bit of science to add some extra colour; Here are two of our favourites (click the images below to find out how to make these beautiful coloured flowers while learning all about TRANSPIRATION!).
Make a multicoloured Rose (click the image to find out more).
Or try making a rainbow bunch of flowers, click the image above to go to the blog post.
2. You make my heart spin
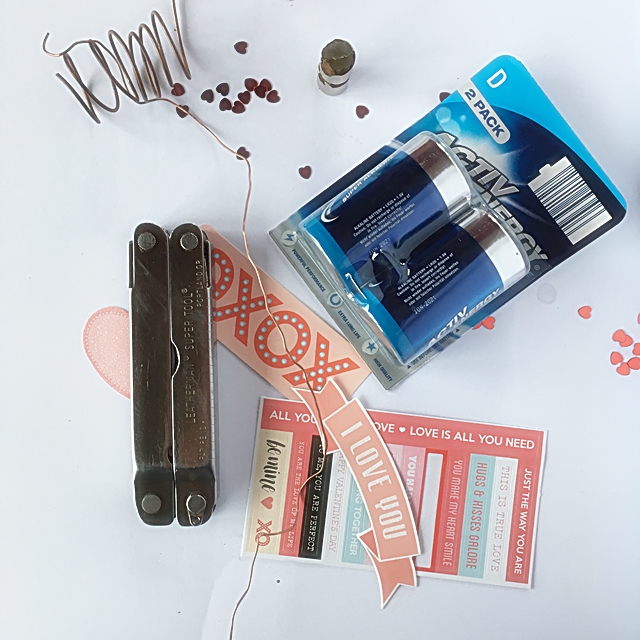
I’ll admit these do take an extra bit of time and effort but they are really worth it and give a nice WOW factor. Your Valentine will be amazed with a gift like this… left wondering just how you did it. This experiment requires ADULT SUPERVISION!
Here is what you’ll need:
Some copper wire
a pliers
a strong scissors or wire cutter
A battery (AA work just fine), I used a D battery here
A neodymium magnet (these are strong, rare earth magnets, often found in electrical appliances but can be purchased in many specialised shops)
Some items to decorate (optional)
And this is what you do:
You can start by decorating your battery with love hearts or similar stationary if you wish.
Place the neodymium magnet on the base (minus side) of the battery, it will ‘stick’ to the metal.
Now for the tricky bit, you need to make a connection from the positive end of the battery, to the other side (the magnets in this case) to complete an electrical circuit. You can see from the photo and video below that I shaped one end of the copper wire into a heart shape with a little ‘stalk’ to sit on the top of the battery. I then wrapped the remaining wire around the battery and finally, I wrapped the end of the wire around the neodymium magnet (in this case I used two small neodymium magnets, one on top of the other). You will know if the circuit is complete as the battery and copper wire will heat slightly. However in order to get the wire to start to move you need to ensure that the wire is balanced correctly and is not wrapped too tightly around the battery or magnet. It will take a bit of patience and ‘tweaking’ to get this right, but, hopefully you will be rewarded by a lovely spinning heart 🙂
Want to know how it works?
Congratulations, you have just created a HOMOPOLAR MOTOR and, by combining an elctrical current and a magnetic field, working in specific directions, you have generated a force called LORENTZ force, that makes the copper wire move.
To put it as simply as possible, the copper wire connect to the positive and negative ends of the battery, completing a circuit and creating an electrical current that runs through the wire. The neodymium magnet generated a permanent magnetic field. In this set up the electrical current is perpendicular to the magnetic field and this generated teh Lorentz Force which acts on the copper wire, making it move!
NOTE: This experiment requires adult supervision! An electrical current can generate heat and you need to be careful that nothing gets too hot.
3. Gooey with love
Slime may not be the first thing that comes to mind when thinking of a Valentine’s day gift but this one is the prettiest slime I’ve ever made, and it has love hearts and sparkles in it, so what’s not to love. Plus… a few minutes playing with this stuff is time well spent, it is actually a great stress busting exercise, try it and see!
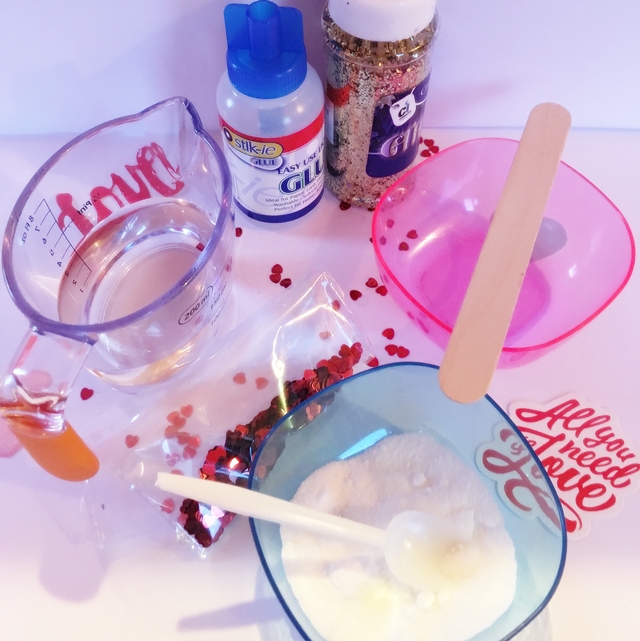
What you will need:
A bottle of clear glue
A jug of water
Bowl and something to stir with
A cup or small plastic cup or a second bowl
Borax powder
glitter and mini hearts (or any decoration of your choice)
Here is what you do:
Pour a small amount of clear glue into your bowl (we used a 10 ml at a guess). Add the little of the love hearts and glitter, just a small sprinkle of each is fine.
Give all that a good mix and then leave to the side while you make up the borax solution
In the cup (or jug) make up your borax solution; you want to dissolve 1/2 teaspoon of borax powder in a cup measure of warm water (about 240 ml); Stir until fully dissolved.
Still the glue constantly and add a very small amount of borax solution. Keep stirring all the time. As soon as the glue is no longer sticky you can pick it up in your hands and start kneading and molding it, for a few minutes.
I will admit that I had a lot of trouble coming up with a good recipe here. I am used to working with white glue (PVA) which makes great slime. The clear glue can get very rubbery slime which breaks easily. So the trick is to use small amounts and add as little borax solution as possible. Also, once the slime forms at all, take it into your hands and knead it.
You can even roll it into a ball and see how bouncy it is…
I know that borax is not easy to buy in Ireland at the moment so I will test out some alternatives and hopefully have a post next week with some borax-powder-free slime recipes!
The science bit:
Congratulation… you have just made a polymer!! In simple terms a polymer is a substance made up of lots of molecules arranged in long chains. If you imagine that the glue is like cooked spaghetti, it slides and slips around the place quite easily. When we add the borax to the glue it causes some of the molecules in the glue to stick together making the glue more rubbery and less liquid! Imagine if you took those strands of spaghetti and tied them together in places, the strands would not be able to slip and slide around nearly as much! The borax and glue mixture is just like your knotted spaghetti!
(Antacid tablets, such as Alkaseltzer – and adult supervision!)
What you do:
First add a few drop of red food colouring to the water until you are happy with the colour.
Add about half a teaspoon of glitter and half a teaspoon of miniature hearts to the water and mix well.
Using the funnel, pour the coloured water into the bottle, filling it to about a third full.
Fill the rest of the bottle with oil (using the funnel again) and replace the lid. You will notice that the oil and water remain as two separate layers.
Hold the bottle on its side and tilt it slowly back and forwards, you will see the water moves like a coloured wave, it gives a lovely effect.
If you want to turn this into a Valentine’s lava lamp just stand the bottle back up again, open the lid and pop in half an antacid tablet (like Alkaseltzer) NOTE: these tablets are not for eating and this part must be supervised by an adult.
Pop the lid back on (don’t seal it fully though as gas will build up in the bottle) and watch your lovely lava lamp.
When it stops you can pop in another piece of Alkaseltzer and watch all over again.
The science bit:
This is a good experiment to explain density. The oil is less dense than the water so it will sit on top of the water, creating two separate layers. The layer of oil keeps the water contained within the bottom half of the water and makes the movement of the water look like waves where the two liquids meet.
When we add the Alkaseltzer tablets to the bottle we get a chemical reaction. The tablets contain an acid and a base (or alkali) in powder form. When the tablet sinks down to the water layer the tablet dissolves and the acid and base get to mix together, forming carbon dioxide gas. The gas forms bubbles, and is lighter than the water and oil so the bubbles float to the top of the bottle where they burst, leaving just a drop of water, which is more dense than the oil so it falls back down. This cycle gives a lovely lava lamp effect of bubbles and blobs rising and falling through the oil layer. We are loving this one in our house at the moment. The glitter and love hearts add a really lovely touch to the whole thing.
So there you have it… five of our favourite Valentine experiments, I’m sure you’ll agree, as well as being educational, these would make great gifts for someone you love! We hope you get as much fun out of making these as we did and remember to let us know how you get on!
HAPPY VALENTINE’S DAY!!!
*****
If you’d like to know a little about the Science of Love, check out this post!
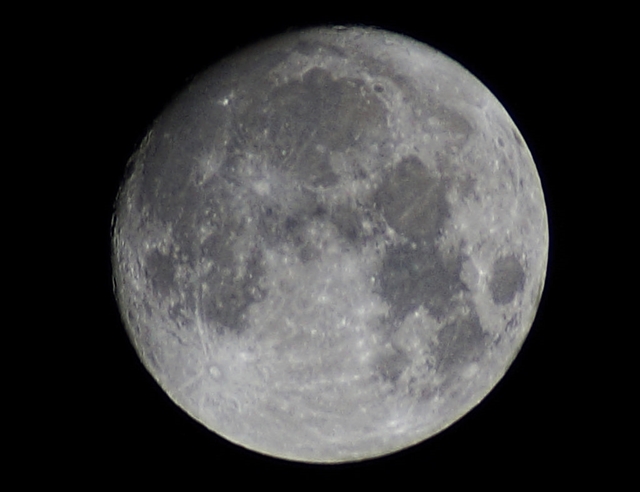
That was a questioned posed by one of my kids this week. It lead to lots of discussion and interesting debate until finally we were talking about werewolves!
Firstly, lets consider how the Moon got there in the first place.
The Moon is approximately 4.51 billion years, about 60 million years younger than the Solar System. It formed from the debris from created by a massive collision between a large asteroid (about the size of Mars) and the early Earth.
Originally the Moon spun on its own axis much more quickly than it does today, as did the Earth. However, over time the Moon’s spin slowed down. This is because the gravitational pull of the Earth on the Moon distorted its shape, making it bulge in the centre and ultimately (it took an estimated 1,000 years) it slowed it down until the speed at which is spun on its axis matched the rate at which it orbited the Earth. This is why we only see one face of the Moon. If you still find that hard to understand test it out with two balls or check out this great video by Minute Earth.
Almost all moons in our solar system spin on their axis at the same speed as they orbit their planet.
Of course the gravitational forces between the Earth and the Moon are not one sided, the Moon also has a gravitational pull on the Earth and this causes some obvious effects here on Earth, like the tides in our oceans and seas.
Not that we know how it got there, let’s consider what would happen if it suddenly disappeared.
Darker nights
Although the night sky would still be lit by so many stars in our galaxy we would definitely notice it darker without the Moon. The full Moon on a cloudless night provides enough light for us to navigate by, in fact we can nearly read by its light. On these nights the Moon is about 1500 times brighter than Venus, the next brightest object in our night sky.
Shorter days
Without the stabilizing effect of the Moon, the Earth would begin to spin more quickly. It is estimated that a day on Earth would eventually only be about eight hours long, meaning there would be about three times more days (1095) in a year. However, this effect would happen very, very slowly. How long?
Less extremes between high and low tides
The gravitational forces exerted by the Moon causes tides to rise and fall in our seas and ocean, this is called lunar tides. Without the Moon we would see a big drop in the difference between high tide levels and low tide levels. There would still be some tidal difference (as the Sun exerts a gravitational force too – solar tides) but it would be a lot less, maybe as much as 40% less than what we have now.
A more extreme climate
As mentioned above, the Earth would spin more quickly on its axis without the Moon around to slow it down. The Earth is also tilted slightly on its axis as it spins. At the moment the Earth is at a tilt of 23.5 degrees on its axis. The Earth’s tilt can wobble slightly, but, due to the Moon, it never stays between 22 and 26 degrees. Without the stabilising forces of the Moon the Earth would wobble a lot more as it spins. This would lead to changes in our seasons. Sometimes it would tilt too far, resulting in extremes of temperatures and seasons. Sometimes there would be no tilt at all, meaning no seasons at all. Whatever way it goes, we would certainly find some extremes in our weather conditions if we had no Moon.
No solar eclipse
A solar eclipse happens when the Moon gets between the Sun and the Earth, casting a shadow over the Earth. There are different types of solar eclipses, but a complete solar eclipse is quite a spectacular show, the entire sun can be blocked briefly by a full moon, causing complete darkness from the correct viewpoint on Earth. Without a Moon, these spectacles (which can occur somewhere on earth every 18 months or so) would cease! Of course lunar eclipses would no longer exist either; A lunar eclipse occurs when the Sun, Earth and Moon align with the Earth in the middle, casting a complete shadow on the Moon and preventing any of the Sun’s light from reflecting off it .
No Werewolves!
We are back to the werewolves. My kids put up a good argument that without a moon Were-people could not change into Werewolves, and they therefore wouldn’t exist. I know better than to argue with that one!
I’ll admit that this one is particularly tough so here is a clue: there is a hint in the structure, it resembles a pre-historic monument that features in the creature’s name!
Have fun researching this one and remember to check back soon when I’ll post the answer with some pretty amazing facts about this creature.
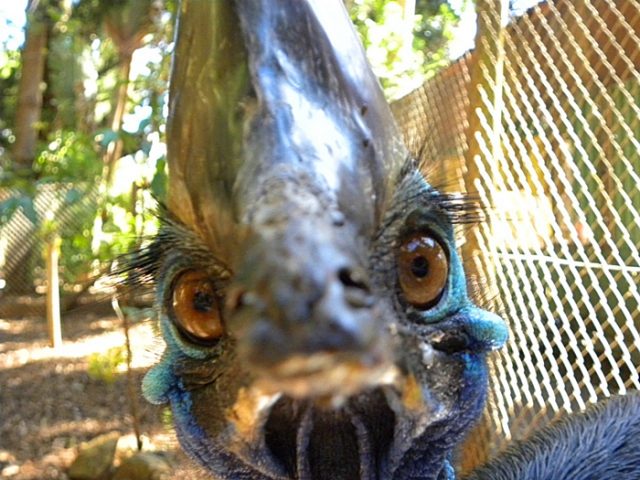
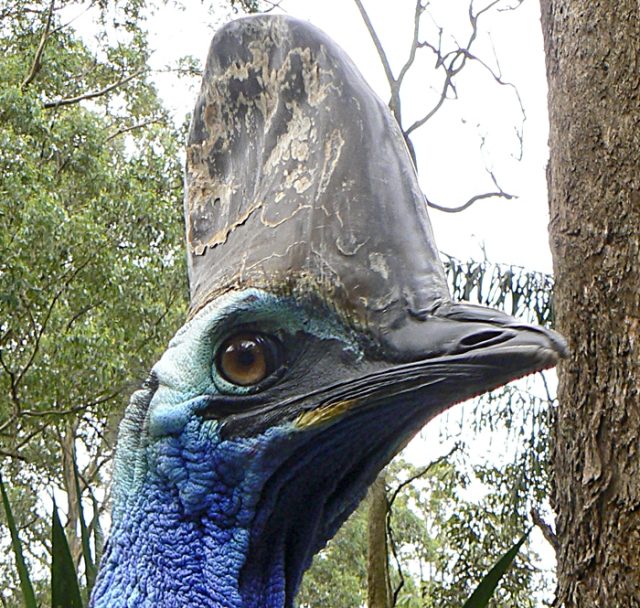
How did you do with January’s Mystery Creature? It was a Cassowary, a Southern Cassowary to be exact. Did you guess it? I know that seven year-old Daniel from Singapore did, well done Daniel!
Here are ten interesting facts about the Cassowary:
There are three species currently recognised, the Southern Cassowary, the Northern Cassowary and the dwarf Cassowary. They are all considered endangered species. The Southern Cassowary is the largest, growing up to 1.6 M in height, making them the third largest bird on Earth (behind the Ostrich and the Emu).
Cassowaries live in New Guinea and surrounding Islands as well as north-eastern Australia.
The Southern Cassowaries are the only ones found in Australia.
They are shy creatures by nature, usually keeping to the dense habitat of tropical forests.
They may also be found in shrub lands, grasslands and swaps on the outskirts of dense forests. They are easily spooked and tend to run away if approached.
Cassawaries are considered very dangerous birds.
Although shy by nature, if cornered, these birds can attack with serious consequences. They have a very powerful kick and a large, spiked nail on their middle toe can cut a deep gash in a victim.
They can run very fast;
Cassowaries can run at speeds of up to 50 km/hr.
Cassowaries are omnivores.
They prefer a dies of fruit and seeds but will also eat small vertebrates and invertebrates. They are very important seed distributors within the rain forest.
The female Cassowary is stronger and larger than her male counterpart.
Unlike with many other bird species, the female is also equally as colourful.
Parenting is a father-only affair.
Once the female lays her eggs she disappears, leaving the male to sit on the eggs and rear the young. The egg incubation period lasts for about 50 days and the male can loose a third of his body weight during this time. Juvenile cassowaries have a dull brown plumage.
Cassowaries can live for decades.
In captivity they will often live up to 50 years.
They have a bizzare structure on top of their heads, called a casque.
This is a hollow horn like crest and the purpose of this appendage is unknown. There are many theories though as to its role or function; something it is serves a protective function; cassowaries tend to run through the forests at great speed with their head down, perhaps the casque acts as a type of helmet if they accidentally hit a tree. Or they may protect from large falling seeds as the cassowaries often hang out under trees waiting to eat falling fruit. The casque may serve as a sexual ornament, to attract a mate. It make be a handy tool for digging for seeds or other foods. Perhaps the most likely role for this unusual appendage is a resonating device, helping in some way to amplify the low frequency sounds made by the birds.