All things Lavender

All things Lavender

I spent a lovely evening down at my local school yesterday.  As part of a community initiative we had a series of workshops given by local parents – it was my turn last night.

I decided to do my workshop on lavender, my most favourite plant and the pride and joy of my garden (and by garden I am referring to the overgrown wilderness that currently exists around my house).

My Lavender Garden
My Lavender Garden

Why do I like lavender so much?  Apart from the beautiful colour, delicate flower and amazing aroma I like it because there are so many things you can DO with it!I admit I only tend to be drawn to plants that have a function or use to me! That is probably why I like my herbs so much (they appeal to the green witch within).

Lavender fulfills the criteria for functional plant in more ways that I can count!  Culinary, cosmetic, medicinal and ornamental… it has it all.  I thought I would share some of the recipes and uses I have come across for lavender and look into a little bit of the science behind the plant.

A look at the plant


Lavender (Lavandula) is a genus comprising almost 40 different species of plant.  It belongs to the mint family, Lamiaceae. The name Lavender comes from the Latin word lavare meaning to wash, a reference to the fondness of the Romans for use of the herb in their baths.  The plant appears often in historical reference, being used in ancient Egypt as part of the embalming process.

The lavender plant is a shrub like plant that is native to the Mediterranean and many parts of Africa and Asia.  The size of the plant varies between species but is typically between 30 to 90 cm.  The common colour of the flowers are the classic “lavender” colour but the range can vary from white to pink to blues to purples. The plant is grown commercially to harvest it’s flowers.  It is the small hairs or spikes on the plant, located between the petals and the stem that produce the oil that give the lavender its lovely scent.  This oil is distilled to produce lavender essential oil.

Lavender essential oil is used in perfumes, cosmetics, clinical applications and aromatherapy.  Different plants are favoured for different scents or different active components.  The most common essential oil is extracted from Common or English lavender (Lavandula angustifolia)  but other species such as lavender stoechas  (Lavandula stoechas), spike lavender (Lavandula latifolia) and lavandin (Lavandula x intermedia)are also used.

Although each different lavender essential oil shares a common chemical composition they differ in the dominant chemicals found in each and thereby differ in their clinical applications.


Clinical applications of Lavender


Anti stress, anxiety reduction, sleep aid


photo credit: Lotus Carroll via photopin cc

Lavender has been used for years as a calming agent and a means to reduce stress and anxiety and enhance restfull sleep.  As well as using essential oils for these remedies, the dried flowers, tincture and teas may also be used.

Studies have shown that lavender does have a mild sedative effect and both men and women exposed to lavender essential oils at night time showed an increase in deep or slow wave sleep (SWS) resulting in more enegry the following morning.  They also showed an increase in light sleep (stage 2) and a decrease in Rapid Eye Movement (REM) sleep.

Lavender aromatherapy treatment has also been shown to result in a measurable decrease in stress levels, and is associated with a decrease in anxiety and stress related headaches.

Antibacterial, antifungal and anti inflammatory


Lavender oil was commonly used in hospitals in recent history because of its associated antibacterial properties.  It was also used in the treatment of cuts, wounds and burns.  There are plenty of studies confirming the antibacterial properties of lavender, particularly lavender essential oils.

Lavender oils have also shown a significant effect on decreasing the growth of a number of fungi associated with common skin and nail infections.  It has also possible applications in the treatment of sinusitis.  The antifungal and antibacterial properties of lavender have made it useful in the treatment of skin conditions such as eczema and acne.

Studies confirming the anti inflammatory nature of lavender reinforce its associate with healing allergies,  rhinitis, rheumatoid arthritis, asthma, burns and general swellings.

Side effects or areas of caution


Some people have reported an adverse effect when using products containing lavender, most notably skin reaction and irritation when lavender essential oil is rubbed directly into the skin.
Exposure to lavender in strong concentrations has also been linked in some people to side-effects including headaches, nausea and irritability.
A study published in 2007 suggested a strong link between prepubertal gynecomastia (benign male breast development) and the use of products containing lavender and tea tree oils.
It is usually recommended that pregnant and breast feeding women avoid the use of lavender oil due to a lack of evidence supporting it’s safety at these stages.


Cosmetic applications of Lavender


Lavender is used in a variety of cosmetics such as soaps, bath products, cleansers, toners, hair products, moisturisers and creams.  It is added to these products for a variety of reasons… for its scent, antiseptic and antibiotic properties, to relax and soothe and to ease swelling and inflammatory pain.


How to harvest and dry Lavender


The ideal time to harvest your lavender is when the flowers have their true colour and are just beginning to open.  Cut at least 10 to 15 cm below the flower.  Gather the cut lavender together in small bunches and secure with an elastic band or equivalent.  Hang the bunches upside down in a dry, well aired space (away from direct sunlight) for two to three weeks, until the flowers are completely dry.
Once the flowers are dry they may be used in a variety of ways.  If you want to remove the dried flowers from the stem hold thestem over a large bowl and gently rub the flowers with your fingers and the flowers should fall off easily.  This is a great activity to do while watching tv or chatting as it is time consuming to harvest the flowers from a large bunch of dired lavender (but a very pleasant task).


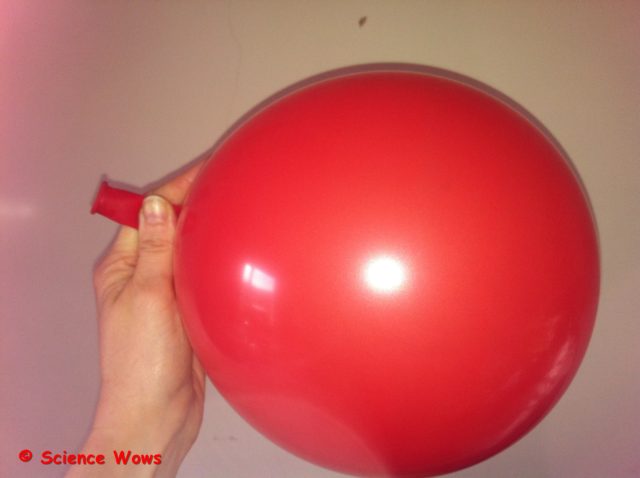
Make your own Lavender bath bombs


The original recipe is from James Wong’s book “Grow your own Drugs” . I have made some minor modifications;
  • Lavender bath bomb
    Lavender bath bomb

    1 – 2 teaspoons dried lavender flowers

  • 1 tablespoon citric acid
  • 3 tablespoons bicarbonate of soda (bread soda)
  • 5 drops lavender essential oil
  • 2 teaspoons sunflower oil (or other vegetable oil)

Combine all the ingredients together in a dry bowl.  Add more or less sunflower oil as required, you want to get a consistency of damp sand.  Rub the inside of a cookie cutter with some sunflower oil and place it on some grease proof paper.  Pack the bath bomb mixture into the cookie cutter, pressing down firmly to ensure it is tightly packed.  Leave in a dry place overnight to allow the sunflower oil to evaporate off and the bath bomb to dry hard. Gentle push the dried bath bomb out of the cookie cutter, wrap in cling film or tinfoil
and store in a dry place.

When you are ready to use your bath bomb just pop it into your bath and watch it fizz away releasing the little lavender flowers and the lovely scent of lavender.  The fizzing is due to the reaction between the citric acid (acid) and the bread soda (base/alkaline) once water is added, producing bubbles of carbon dioxide gas.

Make your own Lavender oil


To make your own lavender oil fill a clean, dry, seal able container with dried lavender flowers and then cover with sunflower oil (or another vegetable oil).  Seal the container and place in a dry place for at least two weeks, shaking once or twice a day.  The length of tine you leave it determines the strength of the smell of lavender in the resulting oil.After two weeks strain the oil through muslin or a fine sieve into a clean dry container or bottle and seal.  This oil can be applied directly to the skin or added to bath water.


Some Culinary uses of Lavender


Apart from the medicinal, cosmetic and ornamental applications of lavender, it is also great as a flavour in our foods.  The flowers are often added to sugar to give it that delicate lavender taste.  The preference in our house when it comes to combining lavender and sugar is to make lavender syrup….

Lavender syrup


  • 250 ml water
  • 3 tablespoons of dried lavender flowers (or fresh flowers)
  • 350 to 400 g sugar

Place the lavender and water into a saucepan and place on a medium, heat to a simmer and leave for five minutes.  Add the sugar and stir continuously until all the sugar has dissolved.  Remove from the heat and allow to cool then transfer to a suitable container, cover and refrigerate for two to three days.

Strain through a fine sieve or muslin into a sterilized container, seal and store in the fridge for up to three weeks.

It never lasts more than a few days in our house though as the kids just love it poured over a warm fresh batch of drop scones.

Lavender syrup and drop scones, the perfect combination

On the subject of refreshments I thought I would share two recipes… one for the children and one for the adults.Lavender syrup can be used much like honey or maple syrup, as well as on pancakes it is great over ice cream or used to sweeten drinks and cocktails.

Children first, while hit by complete lavender fever we decided the ideal drink for the kids would be an adaptation of my mother in laws wonderful lemonade recipe…

Lavender Lemonade


  • 1 pint of water
  • 8 oz of sugar ( approx. 200g )
  • zest from three lemons
  • 3 tablespoons of dried lavender flowers

Add water, lemon zest and lavender to small pot and place over medium heat; allow to simmer for five minutes then add the sugar and still until dissolved.

Remove from the heat and add …

  • the juice of three lemons

Allow the mixture to cool to room temperature and then strain through a sieve.  Serve chilled and dilute to taste (about one part lemonade to two parts water).

The lavender gave the lemonade a lovely subtle flavour and turned it pink

Lavender cocktail


There are a number of cocktails that work well with lavender, vodka, martini and gin seem to be the alcohol base among the most common.  I decided to seek expert advice and so I asked fellow Galwegian and Sunday Times Food Columist Mona Wise (@WiseMona) for her suggestion.  Mona recommended adapting a French 75, substituting the sugar or syrup for lavender syrup.  As this cocktail is made with Gin and Prosecco I did not need any persuading to try it out.
photo credit: Dinner Series via photopin cc

Here is a recipe …

  • 2 parts gin
  • 1 part lavender syrup
  • 1 part fresh lemon juice
  • Prosecco (or sparkling tonic if preferred)
Combine the gin, lavender syrup and lemon juice in a cocktail shaker filled with ice, shake well and then strain.  Add to glass and then top up with prosecco.

Garnish with a sprig of lavender.

I am really looking forward to experimenting with this recipe again this weekend, I have a group of close friends coming over tomorrow night and I think this will make an impressive aperitif!

Lavender Tea


For those looking for a non-alcoholic lavender drink I can highly recommend lavender tea.  I usually use one teaspoon of dried lavender to one cup of boiled water and allow to sit for five minutes.  I can vouch for its effect for inducing a really good nights sleep.

There is a great blog about Lavender Tea and how to grow lavender from seeds over at Greenside Up.  They also sell a beautiful “Time for Tea” seed collection;

I have never grown lavender from seed before but I think that will change now – I am keen to try out all the seeds in the collection. It is on my “Lavender List” for this year.  I also want to make lavender soap and some other lavender cosmetics, as well as try my hand at making lavender wands and lavender icecream but I think that will be a blog for another day!


Cautionary Note:

I do not use any chemicals on, or near my Lavender; the suggested uses and recipes given within this blog are recommended for chemical-free lavender, it is a good idea to either use your own home grown lavender that you know if “free-from” or buy  from an organic and/or reputable source.

I was going to include the attractiveness of lavender to certain insects, particularly bees.  I think that would make a whole blog within itself so I have left that for another day.  However, as pointed out to me by @unusual_plants, we need to be very aware of any products we use with our home grown lavender, in the interest of our little buzzing buddies.  This includes checking the content of the compost you may choose to plant your lavender in as they may still contain such bee threatening compounds as neonicotinoids!

If you enjoyed this blog, tried some of the suggestions or have any questions please leave me a message in the comments below!

Mystery Creature – Elephant nose fish

Week 17th – 23rd June, 2013

A good few correct answers this week… This week’s Mystery Creature goes by the name of Elephant Fish, Elephantnose Fish or, most commonly, Peters’ Elephantnose Fish (Gnatonemus petersii).

photo credit: Joachim S. Müller via photopin cc

Peters’ elephantnose fish is common in certain parts of Africa, found in muddy, slow moving rivers and pools with heavy vegetation.  it are nocturnal, preferring to hide away during the day.  It grows to about 20 -25 cm in length and is grey/black to brown in colour.  The most striking feature of these little fish is their trunk like “nose”, which is not actually a nose at all but an extension of their mouth, or more specifically their chin.

These fish have quite poor vision but can navigate and seek out food very well using active electroreception; they generate small electric fields by flexing muscles in their tails and then detect any interference in the path of these fields.  Its “trunk” like mouth extension is covered in more than 500 electroreceptors (which are also found on much of the body) which can detect the feedback signals.  The fish moves forward with its “trunk” pointing downwards, passes it back and forth, just like a metal detector.  Active electroreception can be likened to echolocation in other animals such as whales and bats.  The detail these fish can gleam from their electrical scan of their environments is quite remarkable.  In order to process the information they are constantly receiving their brains are very large, larger than that of a human, relative to their overall body size.

In their native environment they feed on small worms and some aquatic invertebrates.  They have become popular additions to domestic aquariums though, particularly in America, and appear to accept common fish food in such environments.

Father’s Day tribute – and the science behind the bond!

Father’s Day tribute – and the science behind the bond!

It is Father’s Day here in Ireland.  A day to reflect on our own bonds and experiences with that special man in your life that has known you since birth!  My own story is a wonderful one, my Dad and I are very close and my life memories are filled with lots of special moments with him.

My Dad meeting his 6th grandchild for the first time!

I have a lot to thank him for…

…the weekends he gave up to bring me to yet another horse riding competition or event (only really appreciated this one when I had kids of my own, up until that it never occurred to me that he would have anything else to do ;0)  )
…the lovely way he explained to me how special I still was to him when my little sister was born!
…the day he took off from work and brought me to Galway to see what a nice place it was… this was after I got my “Leaving Cert” results and realised my dreams of becoming a vet were gone… he knew me well enough to know not to try to talk me out of my “depression” but to open my eyes to other possibilities in a different way!  Considering I have now lived in Galway for most of the past 24 years, I think he can chalk that one up as a success!
…the way he stayed up all night reading my PhD thesis when I first showed it to him… and I mean ALL of it… he even had the typos and edits ready for me the next day!
…the way he treated every drawing, every card, every poem I gave him as a child as an amazing work of art… in fact it seems he still has them all!
…the way he is still the one I go to for advice!
…the way the sound of his voice will still make me cry if something has just upset me.
…the way I can see our bond live on with his relationship with my children!

So I thought today would be a good day to reflect on what a wonderful man he is… and to take a look at the science behind the bond between a father and his children.

A lot has changed in a father’s role since I was born.  My Dad was certainly not present at my birth, he was at work and came to see me once he got the call that his first daughter was born!  By the time my own children were born things were very different…my husband was not only present at their births but was actively involved in the whole process, he was my “hypnobirthing” partner and helped me stay relatively calm and focused throughout each birth!

My Dad was also not as “hands on” as most men are now… nappy changing, bottle preping and the like were not really part of his repertoire.  However there is no denying the strength of the bond he has with all three of his children.

The science behind the bonding process between mother and child is more commonly known and understood but there is a definite and undeniable bond formed between father and child also, and although less studied there  are many scientific explanations emerging.

It is now known that expectant fathers may also experience hormonal changes coming up to, during and after the birth of their child.  Studies have shown a drop in levels of testosterone and an increase in prolactin and cortisol levels in men during the weeks coming up to the birth.  These hormones are more commonly associated with expectant mothers.  Prolactin levels are also seen to be higher in fathers than in men with no children, and higher in fathers with young children than with older children.

Studies have also shown an increase in oxytocin levels in fathers after the birth of their child.  This is the hormone that is strongly associated with aiding strong bonding between mothers and their babies.  Fathers have shown an increase in active play and interaction with their infants after receiving oxytocin.

Research is still ongoing into the reasons for these hormonal changes and more importantly the role they play in forming and strengthening the male parental bond.  It is possible they play a role in calming fathers, in increasing their sensitivity to the smell and touch of their young children and in encouraging more play and interaction between father and child.  In other words they may help dampen down the aggressive side of the male and bring out his “inner child”!

Regardless of the science and the research behind it, there is sometimes no need to examine and explain the love, care and affection between a father and his children…

….so today I want to say a big HAPPY FATHER’S DAY  to my wonderful Dad and a big thanks for all the love, support and encouragement he has always given me!  I hope you like my unconventional gift Dad x

#FunFriday – exploring Magnets

#FunFriday – exploring Magnets

What is a Magnet?


A magnet is an object that can produce a magnetic force around it called a “magnetic field”.  Magnets attract certain types of metals such as iron, nickel and cobalt.


Let’s learn more!


A magnetic field is not visible to the human eye, however iron filings can be used to show the pattern of a magnetic field. The magnetic field around all magnets is strongest at it‛s ends – these ends are called the Poles. One end is called the North Pole and the other is called the South Pole, just like the Earth.

If you put the poles of two magnets together they will either pull together (attract) or push apart (repel); Different poles attract (North and South), similar poles repel!

photo credit: daynoir via photopin cc


Did you know… small iron rocks on the Earth‛s surface are often natural magnets and these are called Lodestones.

The Earth as a magnet


The Earth is one big magnet – it‛s magnetic field is created by the iron that is in the core of the Earth. The Earth‛s magnetic field is strongest at the North Pole and the South Pole.

photo credit: *~Dawn~* via photopin cc
Did you know… many objects is space are magnetic including the Sun!

photo credit: Najwa Marafie - Free Photographer via photopin cc
photo credit: Najwa Marafie – Free Photographer via photopin cc


Did you know… the Earth‛s magnetic field deflects charged particles that come from the sun (Solar Wind) and this creates the wonderful lights called AURORA that can sometimes be seen in the sky.

Magnetic compasses use the Earth‛s magnetic field to determine North, South East and West.


Electromagnets


An electromagnet is a magnet that is produced when an electric current is passed around a piece of iron.  Unlike true magnets, electromagnets are only magnetic while the electric current is switched on!

Did you know… the first person to notice that electric currents produce magnetism was a Danish scientist called Hans Christian Oersted, in 1820.
Some countries have started to use high speed trains called “MagLev” trains that are operated by powerful electromagnets.
photo credit: Erwyn van der Meer via photopin cc


These wheel less trains float on magnetic tracks and can reach speeds of more than 500 km/h.

Two experiments to try at home:

Make a compass:

You will need… a circle of paper, a needle, a magnet and a bowl of water.
What to do… thread the needle through the circle of paper so that nearly all the needle lies on one side of the paper (see below). Stroke the needle 30 times in one direction with one end of a strong magnet.  Lift the magnet between strokes. Float the circle of paper on top of the water in the bowl (needle side up).  The paper should spin around slowly for a few moments and then stop.  The needle should now be pointing North-South.  You can confirm this with a compass if you wish!
So what is happening? The needle contains little particles of iron that are all jumbled up.  When the needle is stroked with the magnet it makes all the iron particles align in the same direction (North-South); the needle is temporarily magnetised!

Make an electromagnet:

You will need.. 1 metre of thin insulated wire, a large iron nail, blue tac, a 1.5 volt battery, paper clips;
What to do… wind the insulated wire tightly around the nail at least 30 times then ask an adult to strip back the insulation from both ends of the wire, exposing about 2 cm of the wire beneath.  Using the blue tac stick one end of the wire to the + side of the battery and the other end to the – end.  Now see if your electromagnet can pick up some paperclips.  If you disconnect the batter the paperclips should fall!!
photo credit: Steve Wilhelm via photopin cc


So what is happening? When the wire is attached to the battery it creates an electric current that runs through the wire, temporarily magnetising the iron particles in the nail. When the battery is disconnected the nail no longer acts as a magnet!


Hope you have fun with these this weekend!  If you have a question or something to add please drop me a note in the comments below!
House Martins – the next generation!

House Martins – the next generation!

We waited a long time for the return of our friends, the House martins, this year.  We were so pleased last year when two pairs built nests on our house, in fact, they inspired my first blog!  House martins tend to repair and re use their nests each year so we were sure they would return.  By the end of May though they still had not arrived and we began to give up hope.  Finally, just at the end of May we spotted the familiar flight of their small bodies outside the window and the household celebrated!

Last year we had two nests under the eaves on our house.  This year, as well as repairing the old nests, more couples arrived and built adjoining nests and one more on the South facing end of our house… so now we have five nests… more rejoicing (you get the idea – we REALLY like House martins in this family).
The first nest built on our house!

One pair of nests is literally built over a door into our kitchen so we get to enjoy the cheery little guys every time we come in and out.  My nine year old daughter has inherited her father’s obsession with them and took to checking on them every morning as soon as she awoke.  They make a really chatty, cheery sound and always seem to pop their heads out and greet us as we pass, like gossiping neighbours chatting over a garden fence!

The big excitement this week was when we spotted the ejected egg pile below one of the nests.  The first batch of chicks have hatched!  Eight egg halves in total so four chicks which is in keeping with the norm.  The eggs are tiny as you can see below.  Hard to imagine how small the chicks are.  The will be fed by both parents for the next couple of weeks and then will fledge about 22-32 days old.  The young fledglings usually return to the nest for another week or so and will be fed by the parents during this time.
Evidence of four hatchlings!
Look how small the eggs are!

As amazing as it is to realise how small the hatchlings are, it is an equal marvel to wonder how the whole family fits into the nest after the chicks have grown.  It is an amusing and charming site to see so many little heads beeping out of such a small space.

photo credit: orangebrompton via photopin cc

The house martins will usually have a second brood before the end of the Summer.  Occasionally the first year birds from the first brood will assist in feeding the second brood.

I will be posting more photos and facts on these charming “house guests” as the Summer progresses.  Perhaps you have something to share on the subject too?  If so share it in the comments below!

Buff tip – Phalera bucephala

Week 10th – 17th June 2013

How did you do with this week’s Mystery Creature? This charming moth is called a “Buff tip” (Phalera bucephala).

Image Credit: Michael Bell (Nature Learn)

As most moths are nocturnal they need to rely on  good hiding areas or camouflage to survive during the day.  The Buff tip is a true master in the art of camouflage.  Not only does its colour and markings blend in among the branches of the trees upon which it rests but its body shape is also ideal to make it look just like a twig.

These moths are fairly common in Ireland and throughout Europe.  They have a wing span of between 4 and 7 cm.  The Buff -tip over winters in the crysalis state underground, emerging in adult form in early Summer. The female lays large groups of eggs which hatch en-masse.  The black and yellow larvae tend to feed in large groups after hatching, moving towards a more solitary lifestyle as they grow.  They feed on a variety of deciduous trees such as birch, hazel, alder and oak.  In the Autumn they pupate underground and the cycle begins again.

photo credit: Deanster1983 via photopin cc

These images (unless otherwise stated) were kindly provided by Michael of Nature Learn, a Nature Education program for schools and public groups.  Keep watching for another Mystery Creature from Nature Learn in the coming weeks!

#FunFriday – Exploring Clouds

What are Clouds?

photo credit: Theophilos via photopin cc

Clouds are made up of tiny drops of water or ice crystals. They form when warm air picks up water vapour from the land or sea and carries it into the sky turning it into water droplets or ice crystals!

The study of clouds is called Nephology.

Let’s learn more!

There are lots of ways to describe clouds but they are usually named based on their height in the sky, their shape or the weather they can bring!


  • If a cloud name starts with “cirr-” then you know it must form very high in the sky (over 20,000 feet).
  • If a cloud name has “Alto”- in it then it is in the middle section of the sky (between 6,500 and 20,000 feet).
  • Clouds with “Strato-” in the name are found in the lowest part of the sky (below 6,500 feet).
The clouds that are really high in the sky are mainly made up of ice crystals as the air is so cold.
Clouds at ground level are called “fog”.


Did you know…all clouds are white but can appear grey or dark when seen from below? This may be due to the amount of water they contain and shadowing by clouds above them.

Clouds named according to their shape will contain one of these Latin words in their name…
  • Cumulus” – heap
  • Stratus” – layer
  • Cirrus” – curl of hair
Cumulus Clouds
photo credit: Nicolai Grut via photopin cc
Cirrus Clouds
photo credit: Gerry Dincher via photopin cc


Alrostratus Clouds
photo credit: Anita363 via photopin cc

Therefore a cloud named Altostratus would mean a cloud that forms in layers and sits between 6,500 and 20,000 feet above land.

Did you know... other planets contain clouds made up of chemicals other than water? Venus has clouds made up of sulphuric acid, chlorine and flouride. Neptune is covered by bright blue methane clouds!

The latin word “Nimbus” is used to name rain clouds!

Cumulonimbus Clouds
photo credit: izoo3y via photopin cc

Clouds called Cumulonimbus are often referred to as thunder clouds as they usually bring thunder storms!

Cumulonimbus clouds are the tallest of all the clouds.
Cumulonimbus looks a bit like a giant cauliflower in the sky!
Did you know… a sinlge cloud can hold billions of pounds of water?

Clouds are carried along by the wind and can often travel quite fast;

Thunder clouds (Cumulonimbus) usually travel about 64 kilometres per hour (kph). The highest clouds (above 20,000 feet) can reach speeds of  over 160 kph!

An experiment to try at home:


Make a cloud in a bottle!


You will need… an empty 2 Litre plastic bottle, warm water and a match.


What to do… Fill the plastic bottle one third full with warm water.  Put the cap back on and squeeze and then release the bottle.  Nothing happens. Ask an adult to light the match and put it into the bottle.  Replace the cap quickly.  Try squeezing and releasing the bottle again.  What happens this time?


So what is happening? Once the match has been added to the bottle a cloud forms when you squeeze and then release the bottle (if you squeeze again the cloud dissapears and reappears when you release).  To make a cloud you need water vapour, small particles (like the smoke) and a decrease in air pressure.


Do we have the most dependent offspring?

Do we have the most dependent offspring?

Our garden is bursting with life at the moment!  Busy, haggard birds are flitting around, building nest and laying eggs.  Insect populations are slowly emerging and even our hens are getting broody!  For the first year ever we have a number of young rabbits joining in the ecosystem that is our back garden.  The rabbits in particular have attracted the children’s attention.  You can understand why… there must be at least five of them and they are very tiny, very cute and very independent!  That got my children wondering….

…”WHY ARE THEY OUT WITHOUT THEIR MAMMY?”
photo credit: Gidzy via photopin cc
THE RABBIT’S MOVE TO INDEPENDENCE

Rabbits are independent from a very early age.  A female rabbit (called a Doe) will give birth to a litter of four to twelve baby rabbits (called Kits).  The kits are born blind and without any fur.  However within a week their eyes have opened, their fur begins to grow and their ears begin to stand upright. Wild rabbits will begin to wean about two weeks old and within three weeks they have grown enough to leave the nest and live independently.  They may look small and helpless in our back garden but they are old enough to go it alone in the wild.


A doe can reach sexual maturity between three and six months and can live for up to ten years.  The breeding season of rabbits usually last three quarters of the year.  The most amazing aspect of the rabbit though, is that fact that the doe has no oestrus cycle.  She can literally get pregnant a day after giving birth. Her gestation period is only one months long.

If you want to do the maths on all that it means that one doe could give birth to up 80 to 100 kits a year, or as many as 1,000 kits in one lifetime.  With these turnover rates you can see why the kits have to be independent pretty quickly!


WHAT ABOUT BIRDS?

photo credit: Harpersbizarre via photopin cc

The busiest members of the garden seem to be the birds.  Nest building, egg laying and then feeding a brood of hungry and demanding chicks.  For the first part of their lives these chicks are completely dependent on their parents for food and the parents spend the early summer months on a non stop conveyor belt of foraging and feeding.  The chicks learn to out “beg” their siblings rather than how to feed themselves.  Of course this does not last for long, eventually these young birds will learn to fly and forage all by themselves … no mean feat!

Why do birds choose to feed rather than encourage foraging at an earlier stage?  By evolving in this manner birds can choose to build their nests in more isolated, out of reach places, such as high up trees or on cliff edges. The compromise is that such places do not have a ready supply of food so the parents must go and source the food and bring it back.  Although an exhausting process, the chicks are more likely to survive!


WHAT ABOUT THE INSECTS AND THEIR YOUNG?

This one depends on the insect obviously.  Most insects’ parenting work ends with the lay of their eggs.  This they usually do in large quantities, to increase the chances of survival of at least some of their progeny.  Once the young hatch they are on their own!  Often having to work their way through a number of different forms and changes before they even make it to adulthood! Imagine what it must be like to morph from a grub to an adult? Must be like going through your teens without any parental guidance what so ever!

Not all insects leave their young to their own devices of course.  Some bee, wasp and ant species tend to the eggs in colonies of nests or hives.  Once the larvae emerge from the egg they are fend and tended to completely, passing through different developmental stages until they pupate and emerge as adults.


HOW DO HUMAN INFANTS COMPARE?

The  insects and birds mentioned above rely on their young doing most of their development outside the adult body, in eggs and/or larval stage.  They are not mammals (giving birth to live young) like rabbits or humans.  We have seen how quickly the rabbit young develop and gain independence from their mother.  This is not the case with human infants though.  So why the big difference between the dependence of the young in rabbits and humans?

Factors that influence the level of dependence of young on the adult can include

  • size of the fetus
  • size of the mother
  • number of young per birth
  • brain size and growth rate
  • cultural behaviour of the species
  • life span

Rabbit have large litters, short gestation periods, a less developed brain and a shorter life span than humans.  These facts all explain the difference in dependence of young.

If we look at all mammals we find that humans have very dependent young relative to most other species.It is thought that our evolution into bipedal (walks on two legs) creatures has meant that our young must be born with smaller brains and that the brain develops more after birth.  This is for physical reasons: in order to walk upright the size of our pelvis is restricted and therefore the size of the infants we give birth to is restricted.

To examine infant dependence even further we can compare the dependence of human young with those of other primates; Human infants are much more underdeveloped at birth than their primate relatives!  In fact human development is thought to take 30% to 50% longer than that of other primates.  Why is this the case?  Perhaps it goes back to the point that life span may play a role in infant dependence?  This point alone does not account for the big difference observed between humans and other primates.  Other suggestion that might contribute are the nutritional demands on the mother during gestation and the amount of growth and development the brain will undergo after birth.

Scientists are now also looking at the contribution of maternal nurture and the cultural development of the society of the species.  Humans have evolved a highly developed social and cultural environment.  We have developed complex communication methods (e.g. language and social ques) and cultural interactions.  In order to fit into such a complex system, perhaps the human infant must learn by observation and inclusion… neither of which it can do in the womb.  Maybe we are born with such underdeveloped brains because most of our development and learning can only be done in the culture within which we will live!

What do you think?…..


Hornworm caterpillar

Week 3rd to 9th June 2013

This week’s Mystery creature certainly got a lot of discussion; not surprised as it was a tricky one; a lot of species look very similar!

To put you all out of your misery … it was a HORNWORM CATERPILLAR! (more specifically the TOBACCO HORNWORM).

photo credit: CameliaTWU via photopin cc

…and the adult moth is the SPOTTED HAWK MOTH  (Manduca sexta), also known as the SPHINX MOTH.

The adult moth (image source: wiki commons)

This species is very common in America (and probably only present in Ireland as imports).  Horworm caterpillars can grow up to three inches in length.  The tobacco hornworm is often confused with the tomato hornworm (Manduca quinquemaculata) as both look very similar and can each feed on similar plants.  The tobacco hornworm has white stripes along it’s body and a red “horn” while the tomato hornworm has V-shaped markings and a black “horn”.

Horworm eggs are typically laid on the underside of leaves.  When the caterpillar emerge they will eat through a large amount of leaves for a month or so before pupating in the soil, building a small hole a few inches below the surface.  The adult moths, commonly known as shinx, hawk or “hummingbird” moths emerge from the ground and feed on nectar.  The life cycle can be competed in 30 to 50 days and under the right temperatures, there can be two hatches in one Summer.

Fun Friday – Rockets!

Fun Friday – Rockets!

 What is a rocket?


A rocket can describe any object that is propelled by fast moving liquid or gas!


Most rockets have a nose or cone at the top, a body that houses the fuel and fins at the base.
Rockets are usually powered by a chemical reaction (explosion) within the rocket itself. This chemical reaction requires both fuel and oxygen, both of which must be carried within the rocket.
The fuel and oxygen are called the propellant. There are two types of propellant, liquid propellant and solid propellant.
A solid propellant rocket is easier, simpler and cheaper to make.  However, these rockets are harder to guide and control as once the chemical reaction is started it is hard to stop.
A liquid propellant rocket is more complex and expensive to make but the burning of the liquid fuel is allot easier to control.
 photo credit: Flying Jenny via photopin cc

photo credit: Flying Jenny via photopin cc

A bit of history


The Chinese were the first to invent rockets when they started filling bamboo tubes with gunpowder and lighting them.
Rocket science really began with an English man called Isaac Newton. He formulated three laws to explain the physics of motion. These laws explain how rockets work!

Newton‛s 3rd Law of Motion states that every action has an equal and opposite reaction!


To understand this law think of a balloon full of air.
Demonstrating Newton's Law of Motion
Demonstrating Newton’s 3rd Law of Motion
If the balloon is untied and the air suddenly let out, it will escape the balloon with such force that it will propel the balloon in the opposite direction.
The force of the air leaving the balloon is called the thrust! The thrust that powers the launch of a rocket comes from the force of the gas (generated by the burning fuel) being ejected from the rear of the rocket!

The first liquid propellant rocket was launched in 1926 by an American called Robert Goddard.  He is considered the father of modern rocket science!

Rocket to the Moon


Neil Armstrong... photo credit: NASA's Marshall Space Flight Center via photopin cc
Neil Armstrong…
photo credit: NASA’s Marshall Space Flight Center
via photopin cc

In 1969 Neil Armstrong and Edwin Aldrin became the first men on the moon.

Armstrong and Aldrin traveled to the Moon in a rocket called Saturn V. It was 100 metres tall and weighed more than 3,000 tonnes! It was the largest rocket ever launched!

An Experiment to try at home


Make a stomp rocket!


You will need… an empty 2L plastic bottle, paper, insulation tape, a 1/2 inch PVC pipe, a length of rubber tubing;

What to do… tape one end of the rubber tubing to the neck of the bottle and tape the other end to one end of the PVC pipe. Next make the body of the rocket by wrapping a piece of paper around the PVC pipe and secure it with tape at the overlap. Remove the rocket from the pipe. Cut four triangles of paper and attach to the body of  the rocket near one end; these are the rocket fins. Make a nose (cone shape) for the other end of the rocket and attach it with tape.  You are now ready to launch your rocket. (Best to do this outside!).
Sit your paper rocket over the PVC pipe and place the 2L bottle on the ground on its side. Stomp on the bottle and watch your rocket shoot off!
This is what your stomp rocket should look like

So what is happening?
… when you stomp on the bottle the air inside it shoots out through the tubing and the pipe, forcing the rocket off the end of the pipe! Just blow into the pipe to re-inflate to bottle to start again!

An Experiment to try at home


Make a teabag rocket

I have shared this one with you before, but for those of you who have not seen it I thought it would be a nice addition here…. a double for the Bank Holiday Weekend ;0)


If you try any of the experiments or have any comments or questions, please let me know in the comments below!