Fun Friday – the Halloween Special – fake blood recipe

Halloween is all about dressing up and sometimes you just need a little fake blood to really set an outfit off. We love making our own and with a little science knowledge you can get just the right consistency and colour that you are after.

You will need...
You will need…

You will need…

  • Smooth Peanut Butter
  • Golden Syrup
  • Washing up liquid
  • Red food colouring
  • Green food colouring


What to do…

This is one of these experiments that does not come with an exact protocol, just add the following ingredients until you are happy with the appearance of it, then apply and freak out all your friends!

When you think you have the fake blood just the way you like it do a little test on a white cloth or tissue and adjust further if necessary.


Fakeblood


If you want to experiment a little more try making your own fake blood choosing your ingredients from the following list:

  • Smooth Peanut Butter
  • Golden Syrup
  • Washing up liquid
  • Red food colouring
  • Green food colouring
  • Blue food colouring
  • Chocolate syrup
  • Cornflour
  • Cocoa powder
  • Ribena
  • Chocolate syrup
  • Tomato ketchup
  • Brown Sauce

So what is happening?…

The trick to making good fake blood is to get the colour and consistency right. The food colouring, washing up liquid, cocoa powder, ribena, peanut butter and ketchup will all influence the colour of the blood. You want to get a dark colour, deep red colour so the chocolate and green food colouring will often give the red a darker effect.

It is not just about the right colour though, the consistency of the blood is important too. The cornflour will thicken the blood and make the colour more transparent, as will the peanut butter, syrup and washing up liquid.

The fun is in mixing and changing until you get your ideal fake blood, then apply and freak out your friends and family, all in the name of Halloween fun.

Enjoy!

Fun Friday – Glowing Monster Slime

Fun Friday – Glowing Monster Slime

With a name like “Glowing Monster Slime” you just know this experiment is going to be fun! Just look at the photos if you need any convincing!

You will need
You will need

You will need…

  • two small bowls or cups
  • one large bowl
  • PVA glue (white or clear is you can get it)
  • *Borax Powder
  • Fluorescent paint (you can get non-toxic fluorescent paint in most craft shops)
  • something to stir or mix with

*You can pick up the borax powder in your local chemist (See note below)

What you do… 

To the first cup add half a cup of fluorescent paint and half a cup of PVA glue and mix well.

Mix the glue with the flourescent paint

In the other cup add half a teaspoon of borax powder to one cup of water and mix well until all the powder is dissolved!

Dissolve the borax in the water

Now for the fun bit… pour the glue mixture into the bowl then add the borax solution, mixing all the time.

Mix together the glue mixture ans the borax solution

After a while you can use your hands to mix and mould until you have one big lump of slime and there is little, or no liquid left!

The fun bit
The fun bit

You can store your slime in a ziplock bag or clean jar, it lasts a very long time once you do not let it dry out. You may notice a small layer of liquid separating off the top of the stored slime. This can just be poured off and the slime will become a little more rubbery and less sticky.

When you have finally finished playing just store away

If you have a UV light (black light)** you can make this experiment even more fun by checking out how your slime glows in the dark once the lights go out and the UV light is turned on.

Sooo much fun!
Sooo much fun!

So what is happening?…

Congratulation… you have just experimented with polymers!! In simple terms a polymer is a substance made up of lots of molecules arranged in long chains.  If you imagine that the glue is like cooked spaghetti, it slides and slips around the place quite easily.  When we add the borax to the glue it causes some of the molecules in the glue to stick together making the glue more rubbery and less liquid!  Imagine if you took those strands of spaghetti and tied them together in places, the strands would not be able to slip and slide around nearly as much! The borax and glue mixture is just like your knotted spaghetti!

*Where can I get Borax powder?

In Ireland you need to buy Borax powder in a pharmacy.  The production is a little erratic and the larger volumes are no longer available!  You should be able to get a 100g tub in any pharmacy and it costs between €2 and €3.

**Where can I get a UV light?

This experiment is lots of fun without the UV light but the glow in the dark bit really does take it to a different level. My youngest nearly burst waiting for the night to fall so we could do that part of the experiment. If you are considering buying a UV light you should be able to get one fairly cheaply. I got mine from Maplin. I will be sharing lots more glow in the dark experiments, so if you do get one remember to check back here for some more ideas.

I hope you enjoy this as much as we did and please let us know if you do try it out!

UPDATE 2017: Borax powder is no longer as readily available in Ireland.  here is one alternative, using very simple ingredients… check out this post on how to make silly putty.

Or check out our Ultimate Slime Guide for lots of fantastic slime recipes using contact lens solution or laundry detergent.


Fun Friday – the teabag rocket

We have come over a little healthy of late in the Science Wows household, the adults anyway! #Freefrom this and #freefrom that and of course caffeine is out. Which means herbal teas are in; and the best thing about herbal teas is that you can do this with the teabag…


Seriously, if you were only ever to do one experiment from this blog,  make it this one!!!


Fun Friday – Five Fantastic Facts about DNA and how to extract DNA from a banana

Fun Friday – Five Fantastic Facts about DNA and how to extract DNA from a banana

Dr. Simple was explaining a little about DNA in the last post, so I thought I would share one of the first experiments my children ever asked me to do with them…. they wanted to see DNA, so we extracted it from a banana.

Did you know that we share approximately 50% of our DNA with bananas?


You will need

… a banana, a fork, a bowl, washing up liquid, ice cold surgical spirits (or isopropanol – both available from a pharmacy), salt, a sieve, a glass jar.


What to do…

Remove the banana skin and mash the banana in the bowl, using the fork. Add two teaspoons of washing up liquid and stir slowly.

Add a teaspoon of salt and one to two tablespoons of water and stir carefully.

You want to avoid making bubbles.

Leave for five minutes then strain carefully through the sieve into the jar.

Tilt the glass jar and carefully pour the surgical spirits down the side of the jar, at least as thick as the banana layer.  This will form a separate layer on top of the banana mixture.

Do not mix.

After five to ten minutes you will see a long, stringy substance appear in the top layer. This is the banana’s DNA.

You can use a tooth pick to lift and examine the DNA.


So what is happening?

The salt and washing up liquid break open the banana cells, releasing the DNA.

The DNA will not dissolve in the surgical spirits (or any alcohol) so it floats in this layer.


Here are a five fantastic facts about DNA…

5 Facts about DNA
5 Facts about DNA

The experiment described above is just a quick and simple method that I have used before but if you want something more scientific and a lot more fun… check out Cell Explorers! They do amazing school visits, for junior infants right up to secondary level students,  which I am sure would be of interest to teacher or parents making suggestions in their own schools. Run by Dr. Muriel Grenon and her wonderful team of students and graduates these activities are really top class!  Contact them by email at cellexplorers@nuigalway.ie


Fun Friday – 2 of our favourite sea experiments for kids

Fun Friday – 2 of our favourite sea experiments for kids

These two experiments are inspired by Dr. Simples latest post about “Why the sea is salty“.

First up to show the effect of adding salt to water…

1. THE FLOATING EGG EXPERIMENT


Take the floating egg experiment one step further!


Take this one step further….

We mentioned in the video that you can take this experiment a step further.

Float the egg in the salty water as before.

Add a few drops of food colouring to a jug of unsalted water.

Carefully pour this coloured water down the side of the glass so that it sits on top of the salty water.

The egg will sit between the two layers… can you see it in this picture?

2. OCEAN IN A BOTTLE EXPERIMENT


This is a really simple experiment but always keeps both young and old entertained!

All you need for this experiment is…

  • an empty clear plastic bottle (a 1 or 2L soft drink bottle will work fine)
  • water
  • cooking oil (any kind)
  • Blue food colouring
  • A funnel


What you do…

  1. Using the funnel fill the plastic bottle about one third full with water
  2. Add a few drops of food colouring to colour the water blue
  3. Using the funnel again fill the bottle with the oil (you will notice that the water and oil will quickly settle into two separate layers)
  4. Close the lid tightly on the bottle and turn the bottle on its side
  5. The water layer will be on the bottom of the bottle
  6. If you rock the bottle from side to side you can create a wave like motion of the water, looking just like a little ocean in a bottle; see what kind of waves you can make!


Ocean in a bottle
Ocean in a bottle


How does it work…

This is a good experiment to explain density. The oil is less dense than the water so it will sit on top of the water, creating two separate layers. The layer of oil keeps the water contained within the bottom half of the water and makes the movement of the water look like waves where the two liquids meet.

I have discussed density in more detail in this previous post as well as sharing lots more density experiments.

If you get bored of your ocean in a bottle, why not stand it upright again and add some Alka Seltzer tablets to instantly turn it into a lava lamp!


Enjoy!


Fun Friday – 4 fantastic light experiments for kids

Fun Friday – 4 fantastic light experiments for kids

Yesterday Dr. Simple answered the question… Why is the sky blue?

Sometimes it is nice to get the “proof behind the science” so I thought I would share our four favourite light experiments so your children can find out how it works for themselves!

4LightExp

First up, an experiment to demonstrate what Dr. Simple was talking about yesterday…

Make a blue sky in a jar

Make a blue sky in a jar

You will need…

A clean glass jar, water, milk, a spoon, a torch and a dark room.

What to do…

Fill the jar two-thirds full with water and add half a tea spoon of milk.

Mix well.

Turn on the torch, make sure the room is dark, then shine the torch at the jar of liquid, holding the torch to one side of the jar and look at the colour of the liquid from the front.

The milky liquid will appear light blue in colour (move the torch closer to, or farther from the jar if necessary).

What is happening?…

Tiny particles in the milk act just like the tiny particles in the atmosphere, they scatter light shining upon them. When the light comes from the side of the jar the light of shorter wavelength, like blue light, is scattered the most so this is the colour we observe.


Now with a little alteration you can make…

Sunset in a jar
Sunset in a jar

A sunset in a jar

What to do…

This is the same experiment as the previous one, only this time shine the torch at the back of the jar while you observe the colour from the front. Now the milky water should appear red.

What is happening?…

When we shine the torch from the back of the jar the light is scattered differently. This time most of the blue light has been scattered away from our line of sight so the dominant colour to reach our eye is red light, hence the solution appears red.


Remember how Dr. Simple said that even though sunlight might appear white it is actually made up of all the colours of the rainbow? Here is an experiment to prove that…

Make a rainbow
Make a rainbow

Make your own Rainbow

You will need…

A plastic container, a piece of white card, a mirror and a sunny day!

What to do…

Fill the plastic container about two- thirds full with water and place it on the ground outside, in direct sunlight.

Place a mirror into the water and prop it up at an angle so the sun shines on it.

Hold the white card away from the mirror and move it from side to side or back and forth until you capture the rainbow on the card!

So what is happening?…

Water bends (refracts) light that passes through it.  Each colour bends a slightly different amount so the colours separate. The separated colours are bounced off the mirror and the image is caught on the piece of white card.

If you want a simpler version of this experiment take an old CD out into the sunshine and tilt the side without the label to the Sun. You will see a rainbow of colour appear on the CD at the point where the Sun shines.


Bend light
Bend light

Make a fountain of light

You will need…

An empty plastic bottle (one or two litre), a pin or needle, a torch, a sink or basin and a dark room.

What to do…

Place the empty bottle beside the sink and, using the pin, make a small hole in the side of the bottle, about half way up.

Place your finger over the hole and fill the bottle with water.

Turn on the torch and shine the torch on the bottle, behind the hole. Make sure the side with the hole is positioned towards the sink.

Remove your finger and let the water pour into the sink. See how the stream of water lights up.

So what is happening?…

Light bends when in water so when we shine the light from behind the stream of water the light is reflected off the side and bends with it… effective the light is trapped within it.


Fun Friday – Exploring Density

What is Density?

Density is the mass of an object per unit volume.  A bit of a mouthful but this is how I explained it to my own children today….

…imagine you have a pebble and a marshmallow of the same size and shape… which one do you think is heavier?

My three year old got this straight away… “the pebble of course Mum” (with a “silly question” look that I am use to at this stage).

The Fun Friday Science Team!

So if they are the same size (volume) then why does one weigh so much more than the other?  If you remember that everything is made up of molecules… the heavier object simply has more molecules packed more tightly together (a greater mass); the molecules in the lighter object (in this case the marshmallow) are much more loosely packed together (a smaller mass)!

The pebble is said to have a greater density than the marshmallow.

A bit of History:

A Greek scientist called Archimedes (250 BC) is credited with discovering the concept of density.  The story goes that Archimedes was given the task of determining if the newly minted King’s gold coins were genuine (or if they had been mixed with silver).  Archimedes was pondering this idea while lowering himself into the bath.  When he noticed how his body displaced a volume of water he realised he had cracked it!  If he compared a coin of pure gold with the newly minted ones he could check if they displaced the same amount of water i.e. that their densities were the same.  Turns out they were not and the King was beings duped!

They say that Archimedes was so excited when he realised the solution that he jumped out of the bath and ran all the way home naked shouting “Eureka, Eureka”…. (“I found it, I found it” in Greek).

Here are some experiments on density that you can try at home…

The children and I spent the afternoon trying out these cool experiments that are easy to do at home.  Hope you get to try some too!

1. Make a density rainbow

You will need:

A clear glass, golden syrup or honey, maple syrup, milk, washing up liquid, water, food colouring, cooking oil or baby oil, a clear alcohol (we used isopropanol but you could use methylated spirits or vodka – with adult supervision!), funnels, a dropper or a spoon.

What to do:

Place some water in a glass and add a few drops of food colouring and mix. Place some alcohol in another glass and add a few drops of a different food colouring. Mix.

Carefully add each layer in the following order….

  1. golden syrup
  2. maple syrup
  3. milk
  4. washing up liquid
  5. coloured water
  6. baby oil (or cooking oil)
  7. coloured alcohol
Try to add each layer carefully down the side of the glass, using a spoon, a dropper or a funnel (as below).  Make sure each liquid makes a complete layer that fully covers the layer underneath.  If the layers mix a little, allow to settle before adding the next layer.
Add each layer carefully down the side of the glass
Two junior scientists admiring their work!
We think it looks lovely!


What is happening:

We added the most dense material first (the golden syrup) and then the next dense and so on.  So each layer is a little lighter or less dense than the previous one and therefore floats on it.

You can of course add other things are leave some of these layers out!

2. Lava lamp in a glass

You will need: a clear glass, sunflower/vegetable oil, water, food colouring, some effervescent tablets such as AlkaSeltzer.

What to do: Place water in the glass to about one third full.  Add a few drops of food colouring to the water and mix. Gently pour the oil down the side of the glass filling the glass to almost the top.  If the oil and water mix a little don’t worry, just wait a while until the two layers separate out with the oil sitting on top of the water. Break the tablet into pieces and add one or two pieces to the glass…. I will let Caer explain it to you (with a little prompting from her brother)!

What is happening:

When the AlkaSeltzer tablet reaches the water layer it starts to dissolve and fizz, releasing a gas called carbon dioxide.  This gas forms in small bubbles surrounded by water, they start to rise to the top of the glass because the gas is lighter (less dense) than the water and oil.  The bubbles pass all the way through the oil layer to the top of the glass where the bubble eventually bursts, releasing the carbon dioxide gas.  Once the gas is gone the bubble is just water, which is heavier (more dense) than the oil so it starts to drop down again.  The process continues until all the carbon dioxide has escaped to the top.  Adding more AlkaSeltzer starts it all off again!

3. Fireworks in a glass

You will need: A glass, water, food colouring and sunflower (or vegetable) oil

What to do: Fill the glass with water to about two thirds full.  Carefully pour a layer of oil on top of the water to fill the glass.  Add drops of food colouring to the top of the oil layer and watch as they slowly drop down and enter the water layer.  They streak through it like some mini fireworks!

Add the drops of food colouring to the top of the oil…
…and wait for the fireworks display to begin!

What is happening:

Food colouring and oil do not mix so the drops will fall until they meet the water layer.  Food colouring dissolves in water, the colour diffuses out into the water as the drops fall to the bottom of the glass, giving a lovely fireworks type display!

Hope you enjoyed this week’s Fun Friday as much as we did.  If you have any comments, questions or suggestions please leave a comment below, I always love the chat and feedback!  

Have a great weekend!

Fun Friday – the Tornado

Fun Friday – the Tornado

(Apologies I am posting the Fun Friday blog a day late due to broadband difficulties yesterday )

We all thought we had been visited by a small tornado here in Galway yesterday, a photo of a waterspout just off Salthill was the talk of the town.  Turns out it was just a hoax, but for any junior scientists that may be disappointed I thought I would share a great experiment with you explaining how to make your very own tornado in a bottle!  There are plenty of fun and interesting tornado facts too.

What is a Tornado?

photo credit: Niccolò Ubalducci Photographer via photopin cc


A tornado is a rapid swirling column of air that stretches from a cloud (usually a thunder cloud) to the earth below.

A tornado that forms over water is often referred to as a waterspout.

If the column of air does not touch the earth it is referred to as a funnel cloud.

How do Tornadoes form?

The formation of a tornado requires a combination of a number of specific weather features but usually tornadoes form when an area of warm, wet air meets and area of cool, dry air and alter the atmospheric conditions.  When this causes the warm wet air to rise and cool rapidly thunder clouds are formed.  Under the correct conditions of wind strength and speed the rising air starts to tilt and rotate and the tornado begins to form.

How fast is a tornado?

Most tornadoes have a wind speed of less that 160 km and hour (100 miles an hour), however, some extreme tornadoes can reach much greater speeds, up to 300 km an hour!

Did you know… the fastest recorded tornado was the Tri-State Tornado (Illinois, Missouri and Indiana) of 1925 had a forward speed of 117 km per hour (73 miles and hour)?

How are Tornadoes measure?

Tornadoes are detected using weather spotting and doppler radar.  Tornado warnings may be issues for certain areas by observing the formation of developing weather patterns while radar can be used for more accurate forecasting once thunderclouds have developed.

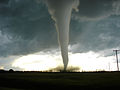
Image credit: Wiki Commons; a category F5 tornado in Manitoba, Canada, 2007.

It is not easy to determine Tornado strength and wind speed for two main reasons..

  1. as the exact location of a tornado is hard to predict it is very hard to have the required equipment in the right place at the right time;
  2. the force and strength of a tornado can destroy the equipment used for such analysis.

One of the devises used to measure wind speed within a tornado is called an anemometer. Doppler radar can also be used for this purpose.  When these measurements are successful, wind speed will be expressed against the Beaufort wind scale, ranging from 0 -12 in wind speed.

In 1971 Dr. Tetsuya Fijita developed a scale to rank Tornadoes, this scale ranges from 0 to 5 and is expressed as F0, F1, F2, F3, F4 and F5.  This ranking is retrospective, estimating wind speed and strength by examining the damage resulting from the Tornado.  This scale has been further refined in the US leading to the Enhanced Fijita Scale.

Do we get tornadoes in Ireland?

There are certain places around the world that are “tornado hot spots” such as many central states in the US, South Africa, Canada and Bangladesh.  However tornadoes can form almost anywhere and there are genuine cases of tornadoes in Ireland.  If we do get visited by a tornado it is usually small and brief.

Did you know…the earliest recorded tornadoes in Europe occurred in Rosdalla, near Kilbeggan, Co. Westmeath, on April 30th 1054?  

The only continent where tornadoes have not been recorded is the Antartic.

Did you know that the UK has the largest number of tornadoes per land mass?  Usually these tornadoes are small.

An experiment to try at home

Make a tornado in a bottle

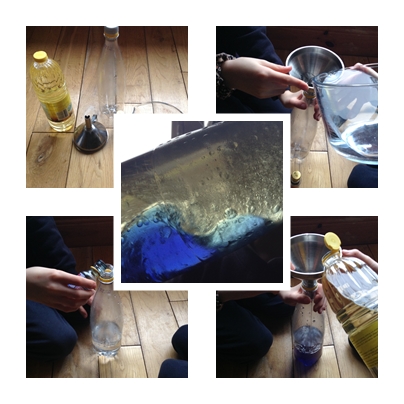
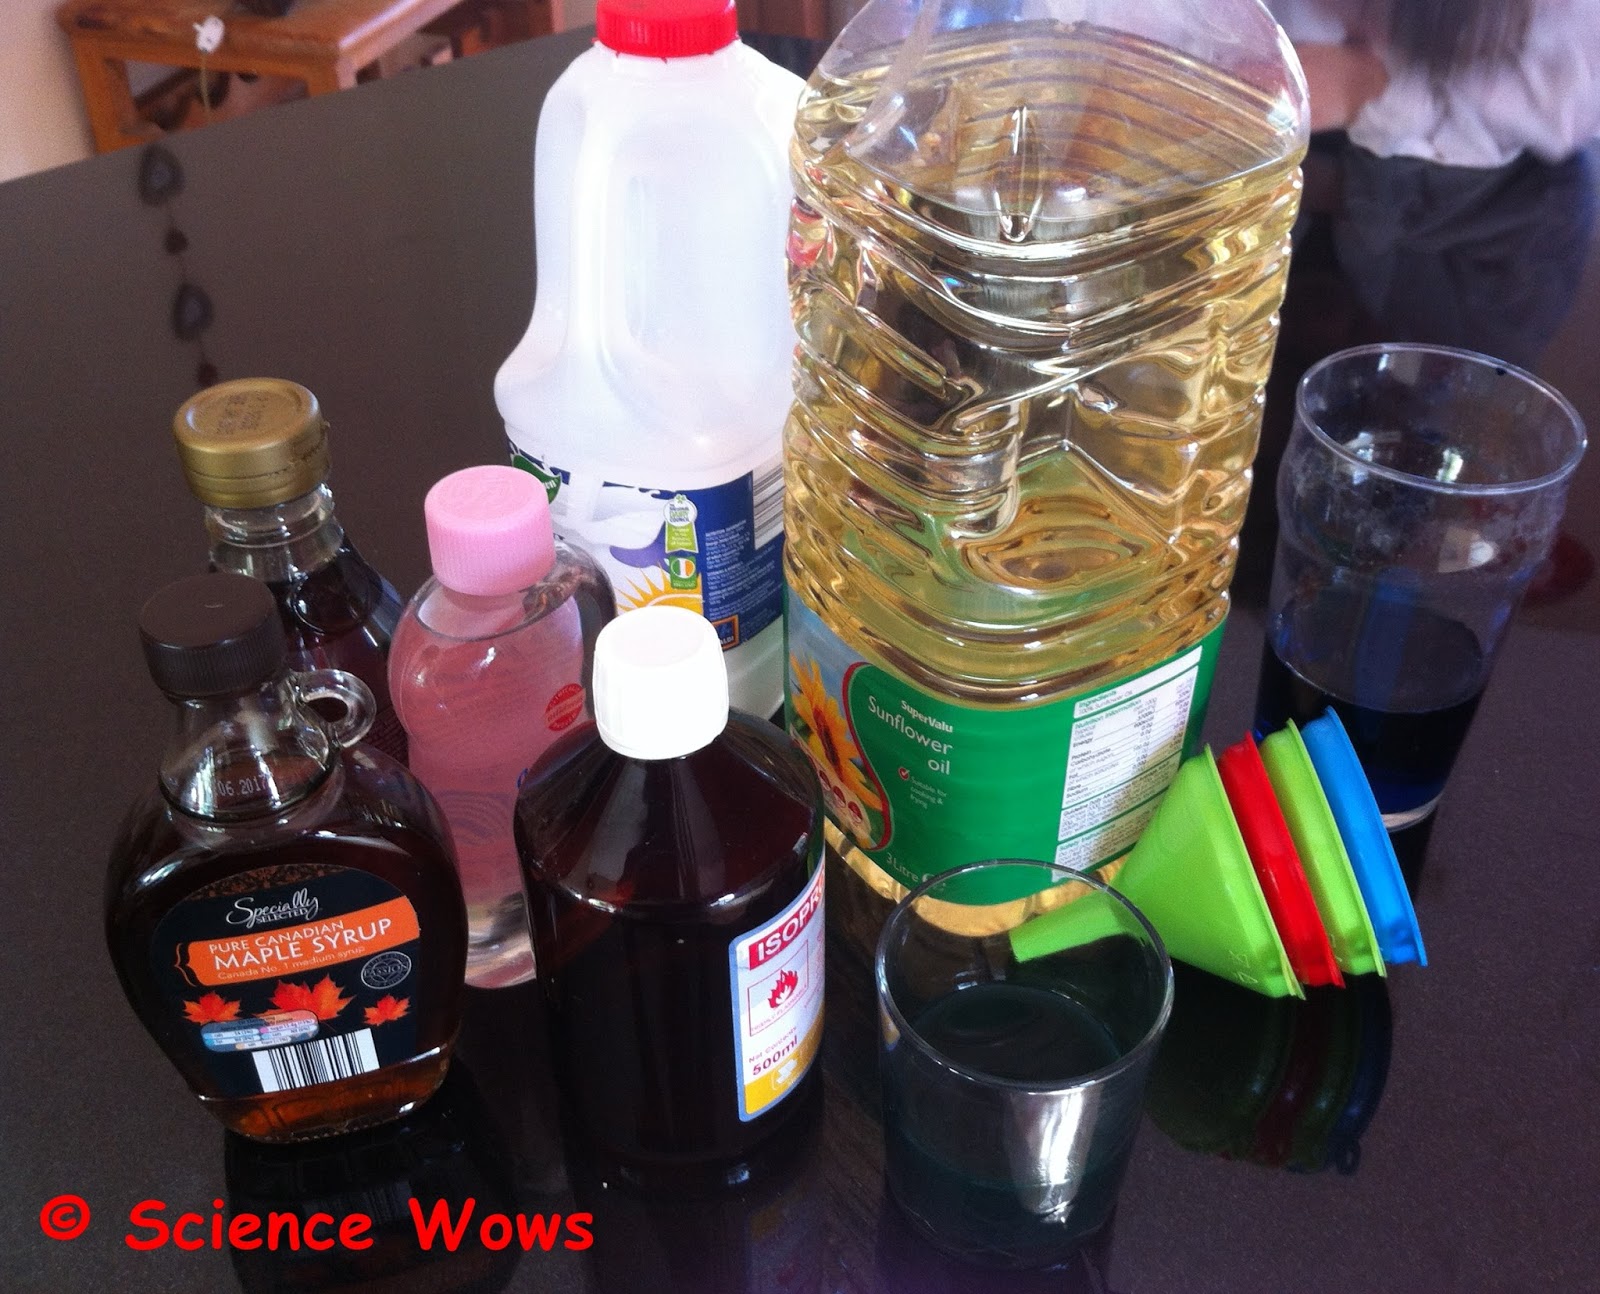
You will need… two empty 2 Litre plastic bottles, an O-ring, strong duct tape, food colouring, glitter (optional). Alternatively use a tornado tube to replace the O-ring and duct tape.

What to do… Fill one 2 Litre bottle 2/3 full with water, add a few drops of food colouring and about a teaspoon of glitter, if using.  Place the O-ring on top of the bottle and tape into place with the duct tape, ensuring that you do not cover the whole.

Place the second (empty) bottle upside-down on top of the first one and tape securely into place.

If using the Tonrado tube you just twist the tube onto the first bottle 2/3 full with water and then upturn the second bottle and twist it securely into place into the other end of the tornado tube!

Once you are confident that the bottle is taped well enough to prevent any leakage you can turn the bottles upside-down so the one containing the coloured water is on top.  Turn the upper bottle in a circular motion about five times and then hold the bottles steady and see what happens.  You should a mini tornado forming in the bottle as the water drains.  if this does not work for you first time don’t worry, it make take a few attempts to get the knack of turning the bottle correctly.

So what is happening?… When we turn the bottle we get the water moving in a vertical, circular motion, just like the air in a tornado.  Once we stop turning the bottle and hold it steady the momentum created causes the water to keep turning and form into a “twister” inside the bottle.  The food colouring and glitter or only present to make the tornado more visible.

Alternatives:

You can change this around a little by adding different things to the water in the bottle and compare how the tornado looks;  Some suggestions include adding grains of pepper, small pieces of coloured paper or a squeeze of washing up liquid.  You can also try the experiment by adding some coloured oil to the water.

Challenge your friends and family:

You can change this into a fun challenge for your friends and family and help them learn about air pressure while too.  Give your friend the bottles all set up and ask them how long they think it will take them to get the water from the top bottle to the lower bottle, without squeezing the bottle.  Let them have a go and time it.  You can then ask if anyone else thinks they can beat that time and give them a go.  Everyone should get about the same time.

Now it is your turn, upturn the bottle and start the tornado and time how long the bottle takes to empty now!  They should be impressed to find out you have beaten their time!

So what is happening?
The hole in the O-ring allows air to pass into the bottle, producing a funnel of air within the column of twisting water.  The movement of air from one bottle to the other equalizes air pressure and allows the water escape into the lower bottle much more quickly.

Fun Friday – Static Electricity

Fun Friday – Static Electricity

What is Static Electricity?

Static electricity is a charge that builds up when two things are rubbed together. Matching charges of static electricity push each other away (repel) while opposite charges attract each other.

Let’s Learn More!

Everything is made up of atoms.  An atom is the smallest piece you can break an object down to while still maintaining it’s properties.

photo credit: ProLithic 3D via photopin cc

Atoms are made up of protons, neutrons and electrons.  Protons have a positive (+) charge, neutrons have no charge (neutral) and electrons have a negative () charge.

At the centre of each atom is a nucleus, this is where the protons and neutrons are found.

The electrons are found to the edge of the atom, they are constantly moving in a circular motion around the nucleus.

When two objects are rubbed together electrons pass from one to the other, making one more positively charged and the other more negatively charged.  This charge is called static electricity.

How does lightning work?

photo credit: Brujo+ via photopin cc


Lightning is caused by a build up of static electricity in clouds.  As the charge in the cloud grows, the base of the cloud builds up a strong negative charge.  This negative charge creates a build up of positive charge in the ground.

If the attraction between the cloud and the ground (or between two clouds) becomes strong enough, a spark of lightning will jump between the two.  This lightning is a giant spark of moving electrons travelling between the cloud and the ground.


Did you know… that the heat of a lightning bolt is hotter than the surface of the sun?

Some things give up or take on electrons more easily than others.

Objects can be ranked according to how easily they give up or take on electrons and this ranking is called the triboelectric series.  Things listed at the top of the triboelectric series give up electrons more easily than those ranked below.

Experiment to try at home

photo credit: Kevin Baird via photopin cc

1. Hair raising fun!

You will need… a balloon and a good head of hair!

What to do… blow up the balloon and tie it tight.  Rub the balloon all around your hair (this is called charging the balloon); Now move the balloon slowly away from your head and watch your hair stand on end!

So what is happening?… When the balloon is rubbed on your hair electrons are passed from your hair to the balloon.  This gives the balloon a negative charge and your hair a positive charge.  As opposites attract, your hair is attracted to the balloon and sticks to it while you pull it away.

2. Attract a can!

You will need… a balloon, a good head of hair and an empty aluminium can!

What to do… charge the balloon on your hair as before.  Lay the empty aluminium can on it’s side on a table.  Then bring the charged balloon close to the can, but do not let it touch it.  Slowly draw the balloon away from the can and watch the can follow.

So what is happening?… The aluminium can becomes attracted to the negatively charged balloon as the area around it becomes positively charged.

3. Bending water!

You will need… a balloon, a good head of hair and a running tap!

What to do… Turn on a tap to a small, steady stream of water and leave it running.  Charge the balloon on your hair as before.  Bring the charged balloon slowly towards the stream of water and you should see the stream of water slowly bend towards the balloon! (If the experiment does not work for you just reduce the flow of water).

So what is happening?… Just as with the aluminium can, the stream of water becomes attracted to the negatively charged balloon as the area around it becomes positively charged.

I hope you have some hair raising fun with these experiments :0)  If you have any questions or queries, or would like me to cover a particular subject in the Fun Friday blog, please just leave me a comment below!

I am going to take a little blogging break for a couple of weeks but will return in August for plenty more fun, facts and experiments to share.

#FunFriday – exploring Magnets

#FunFriday – exploring Magnets

What is a Magnet?


A magnet is an object that can produce a magnetic force around it called a “magnetic field”.  Magnets attract certain types of metals such as iron, nickel and cobalt.


Let’s learn more!


A magnetic field is not visible to the human eye, however iron filings can be used to show the pattern of a magnetic field. The magnetic field around all magnets is strongest at it‛s ends – these ends are called the Poles. One end is called the North Pole and the other is called the South Pole, just like the Earth.

If you put the poles of two magnets together they will either pull together (attract) or push apart (repel); Different poles attract (North and South), similar poles repel!

photo credit: daynoir via photopin cc


Did you know… small iron rocks on the Earth‛s surface are often natural magnets and these are called Lodestones.

The Earth as a magnet


The Earth is one big magnet – it‛s magnetic field is created by the iron that is in the core of the Earth. The Earth‛s magnetic field is strongest at the North Pole and the South Pole.

photo credit: *~Dawn~* via photopin cc
Did you know… many objects is space are magnetic including the Sun!

photo credit: Najwa Marafie - Free Photographer via photopin cc
photo credit: Najwa Marafie – Free Photographer via photopin cc


Did you know… the Earth‛s magnetic field deflects charged particles that come from the sun (Solar Wind) and this creates the wonderful lights called AURORA that can sometimes be seen in the sky.

Magnetic compasses use the Earth‛s magnetic field to determine North, South East and West.


Electromagnets


An electromagnet is a magnet that is produced when an electric current is passed around a piece of iron.  Unlike true magnets, electromagnets are only magnetic while the electric current is switched on!

Did you know… the first person to notice that electric currents produce magnetism was a Danish scientist called Hans Christian Oersted, in 1820.
Some countries have started to use high speed trains called “MagLev” trains that are operated by powerful electromagnets.
photo credit: Erwyn van der Meer via photopin cc


These wheel less trains float on magnetic tracks and can reach speeds of more than 500 km/h.

Two experiments to try at home:

Make a compass:

You will need… a circle of paper, a needle, a magnet and a bowl of water.
What to do… thread the needle through the circle of paper so that nearly all the needle lies on one side of the paper (see below). Stroke the needle 30 times in one direction with one end of a strong magnet.  Lift the magnet between strokes. Float the circle of paper on top of the water in the bowl (needle side up).  The paper should spin around slowly for a few moments and then stop.  The needle should now be pointing North-South.  You can confirm this with a compass if you wish!
So what is happening? The needle contains little particles of iron that are all jumbled up.  When the needle is stroked with the magnet it makes all the iron particles align in the same direction (North-South); the needle is temporarily magnetised!

Make an electromagnet:

You will need.. 1 metre of thin insulated wire, a large iron nail, blue tac, a 1.5 volt battery, paper clips;
What to do… wind the insulated wire tightly around the nail at least 30 times then ask an adult to strip back the insulation from both ends of the wire, exposing about 2 cm of the wire beneath.  Using the blue tac stick one end of the wire to the + side of the battery and the other end to the – end.  Now see if your electromagnet can pick up some paperclips.  If you disconnect the batter the paperclips should fall!!
photo credit: Steve Wilhelm via photopin cc


So what is happening? When the wire is attached to the battery it creates an electric current that runs through the wire, temporarily magnetising the iron particles in the nail. When the battery is disconnected the nail no longer acts as a magnet!


Hope you have fun with these this weekend!  If you have a question or something to add please drop me a note in the comments below!