Fun Friday – the teabag rocket

We have come over a little healthy of late in the Science Wows household, the adults anyway! #Freefrom this and #freefrom that and of course caffeine is out. Which means herbal teas are in; and the best thing about herbal teas is that you can do this with the teabag…


Seriously, if you were only ever to do one experiment from this blog,  make it this one!!!


Fun Friday – Five Fantastic Facts about DNA and how to extract DNA from a banana

Fun Friday – Five Fantastic Facts about DNA and how to extract DNA from a banana

Dr. Simple was explaining a little about DNA in the last post, so I thought I would share one of the first experiments my children ever asked me to do with them…. they wanted to see DNA, so we extracted it from a banana.

Did you know that we share approximately 50% of our DNA with bananas?


You will need

… a banana, a fork, a bowl, washing up liquid, ice cold surgical spirits (or isopropanol – both available from a pharmacy), salt, a sieve, a glass jar.


What to do…

Remove the banana skin and mash the banana in the bowl, using the fork. Add two teaspoons of washing up liquid and stir slowly.

Add a teaspoon of salt and one to two tablespoons of water and stir carefully.

You want to avoid making bubbles.

Leave for five minutes then strain carefully through the sieve into the jar.

Tilt the glass jar and carefully pour the surgical spirits down the side of the jar, at least as thick as the banana layer.  This will form a separate layer on top of the banana mixture.

Do not mix.

After five to ten minutes you will see a long, stringy substance appear in the top layer. This is the banana’s DNA.

You can use a tooth pick to lift and examine the DNA.


So what is happening?

The salt and washing up liquid break open the banana cells, releasing the DNA.

The DNA will not dissolve in the surgical spirits (or any alcohol) so it floats in this layer.


Here are a five fantastic facts about DNA…

5 Facts about DNA
5 Facts about DNA

The experiment described above is just a quick and simple method that I have used before but if you want something more scientific and a lot more fun… check out Cell Explorers! They do amazing school visits, for junior infants right up to secondary level students,  which I am sure would be of interest to teacher or parents making suggestions in their own schools. Run by Dr. Muriel Grenon and her wonderful team of students and graduates these activities are really top class!  Contact them by email at cellexplorers@nuigalway.ie


Fun Friday – Magnets Part 2… learning about the compass and another great game

Fun Friday – Magnets Part 2… learning about the compass and another great game

We can’t get enough of magnets in this house it seems! Last week we shared one of our favourite games and this week it is all about how the compass works, how to make one and another great game to try!


Who invented the first compass


The ancient Greeks knew about lodestone, an iron rich rock that was naturally magnetic. The Chinese are credited with discovering that loadstone would always point towards North if suspended to allow it turn freely. A Chinese Scientist called Shen Kua described the first magnetic needle compass in 1088 AD; his experiments with suspended strips of magnetised iron showed how the strip always points North and how this could be used in navigation.

The arrival of the compass modernised navigation and travel, especially by sea. Before the compass, sailors relied on navigation by the stars but this was tricky on a cloudy night!

Did you know… sailors were forbidden to eat onion or garlic as their breath was thought to interfere with the compass needle?


How to make your own compass


Make your own compass

You will need… a circle of paper, a needle, a magnet and a bowl of water.

……….
What to do… thread the needle through the circle of paper so that nearly all the needle lies on one side of the paper (see below). Stroke the needle 30 times in one direction with one end of a strong magnet.  Lift the magnet between strokes. Float the circle of paper on top of the water in the bowl (needle side up).  The paper should spin around slowly for a few moments and then stop.  The needle should now be pointing North-South.  You can confirm this with a compass if you wish!
……..
So what is happening? The needle contains little particles of iron that are all jumbled up.  When the needle is stroked with the magnet it makes all the iron particles align in the same direction (North-South); the needle is temporarily magnetised!


A really fun game to keep the children entertained


You will need
You will need…


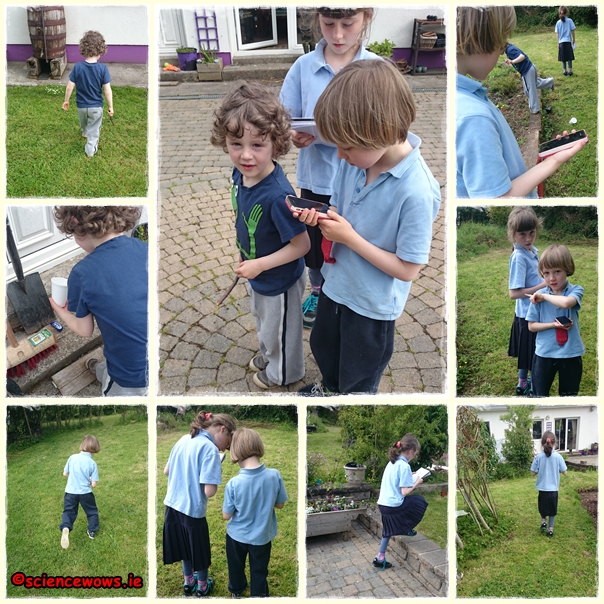
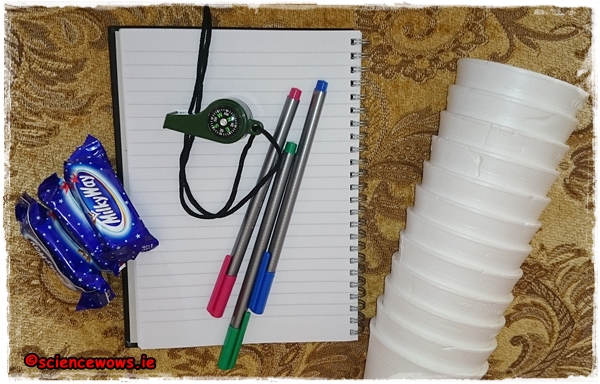
You will need…. some non see through cups or bowls, some treats or treasure to find, a compass, a notepad and a pen.

Setting it up… this is an easy game but it does require a little setting up before you let the children loose! Place the cups (upturned) all around the garden, hiding a treat underneath a few of them. One treat per child.

Decide on a starting point. Map out a route for each child starting at that point and walking X steps North/South/East or West.

Map a different route for each child to a different cup containing the treasure, here is an example…

take 3 steps North

take 3 steps East

take 11 steps North

take 14 steps West

take 5 steps South

take 10 steps East

take 11 steps West


You can make is as long and winding as you like. Remember to get an idea of each child’s step length before you start! Once you have prepared a route for each child you can call them out and let the fun begin.

Each child starts at the same point and needs to follow the instructions given to them, using the compass for direction! Once the instructions run out the child lifts the nearest cup to (hopefully) reveal their prize.

All ready at the starting point!

This game is great for teaching children direction, learning how to follow instructions, read a compass and how to work as a team, if you change the rules to teams instead of individuals.


The beauty of this game is that you can make it as simple or as complicated as you like, adjusting each set of instructions to a child’s age so children of different ages can get involved.

Lots of fun for all ages

My children are ten, eight and four and they really loved this, we have plans to make it bigger and better next time!

Whatever way you play it I hope you enjoy!


Fun Friday – Our favourite Sound Experiments and facts for kids

Fun Friday – Our favourite Sound Experiments and facts for kids

This week’s Fun Friday post is a round up of all our favourite sound experiments and facts. Hear it, make it, feel it and even see it… guaranteed for a weekend full of fun!

 Here are three of our favourite sound experiments…


1. Make Sound…

Make a spooky sound cup


We love this simple experiment to make a spooky sound cup… see what kind of sounds you can make with it.

Just click on this link to find out what to do…


2. Feel Sound…

All you need is a balloon and a radio

All you need for this one is a balloon and a radio or other music player.

Blow up a balloon and tie it. Turn on the radio to a song with low base music. Hold the balloon between your two hands and hold it very
near the speaker of the radio.

What can you feel?

Change to a different radio station and see if the vibrations change.


3. See Sound…

For that extra "WOW"...
For that extra “WOW”…


This one never ceases to get a WOW from everyone, and for a change Dr. How is on the other side of the camera to show how it works … click on this link to check it out.


And here are five fun facts about sound…


photo credit: superUbO via photopin cc
  • Sound waves travel in water at a speed of nearly one mile a second, which is more than four times faster than sound travels through air!
  • Thunder is the sound made by lightning! Sound travels in air at a speed of about one mile in five seconds. If you count the seconds between seeing the lightning and hearing the thunder you can work out the distance from the source of the thunder! For example, if you count ten seconds between the lightning and the thunder then you can tell the storm is about two miles away!
  • An echo is made when sound waves you make bounce off a solid object and travel back to your ear.
  • Some mammals use echoes to help to navigate and to find food – this is called echolocation!
  • Bats use echolocation to fly and hunt at night; they send out high pitched squeaks and clicks almost constantly. These sounds are called untrasonic, they are too high for humans to hear. A bat can detect an object as small as a human hair using echolocation!


We love playing with sound in this house… hope you have some fun with it too

Fun Friday – how to make an ocean in a bottle

Fun Friday – how to make an ocean in a bottle

It is a simple and easy Fun Friday experiment today – how to make an ocean in a bottle


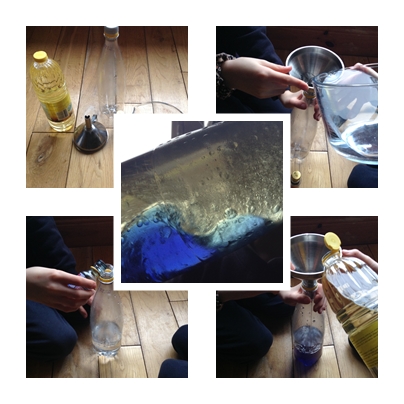
All you need for this experiment is…

  • an empty clear plastic bottle (a 1 or 2L soft drink bottle will work fine)
  • water
  • cooking oil (any kind)
  • Blue food colouring
  • A funnel


What you do…

  1. Using the funnel fill the plastic bottle about one third full with water
  2. Add a few drops of food colouring to colour the water blue
  3. Using the funnel again fill the bottle with the oil (you will notice that the water and oil will quickly settle into two separate layers)
  4. Close the lid tightly on the bottle and turn the bottle on its side
  5. The water layer will be on the bottom of the bottle
  6. If you rock the bottle from side to side you can create a wave like motion of the water, looking just like a little ocean in a bottle; see what kind of waves you can make!


Ocean in a bottle
Ocean in a bottle


How does it work…

This is a good experiment to explain density. The oil is less dense than the water so it will sit on top of the water, creating two separate layers. The layer of oil keeps the water contained within the bottom half of the water and makes the movement of the water look like waves where the two liquids meet.

I have discussed density in more detail in this previous post as well as sharing lots more density experiments.

If you get bored of your ocean in a bottle, why not stand it upright again and add some Alka Seltzer tablets to instantly turn it into a lava lamp!


Enjoy!


Fun Friday – the Tornado

Fun Friday – the Tornado

(Apologies I am posting the Fun Friday blog a day late due to broadband difficulties yesterday )

We all thought we had been visited by a small tornado here in Galway yesterday, a photo of a waterspout just off Salthill was the talk of the town.  Turns out it was just a hoax, but for any junior scientists that may be disappointed I thought I would share a great experiment with you explaining how to make your very own tornado in a bottle!  There are plenty of fun and interesting tornado facts too.

What is a Tornado?

photo credit: Niccolò Ubalducci Photographer via photopin cc


A tornado is a rapid swirling column of air that stretches from a cloud (usually a thunder cloud) to the earth below.

A tornado that forms over water is often referred to as a waterspout.

If the column of air does not touch the earth it is referred to as a funnel cloud.

How do Tornadoes form?

The formation of a tornado requires a combination of a number of specific weather features but usually tornadoes form when an area of warm, wet air meets and area of cool, dry air and alter the atmospheric conditions.  When this causes the warm wet air to rise and cool rapidly thunder clouds are formed.  Under the correct conditions of wind strength and speed the rising air starts to tilt and rotate and the tornado begins to form.

How fast is a tornado?

Most tornadoes have a wind speed of less that 160 km and hour (100 miles an hour), however, some extreme tornadoes can reach much greater speeds, up to 300 km an hour!

Did you know… the fastest recorded tornado was the Tri-State Tornado (Illinois, Missouri and Indiana) of 1925 had a forward speed of 117 km per hour (73 miles and hour)?

How are Tornadoes measure?

Tornadoes are detected using weather spotting and doppler radar.  Tornado warnings may be issues for certain areas by observing the formation of developing weather patterns while radar can be used for more accurate forecasting once thunderclouds have developed.

Image credit: Wiki Commons; a category F5 tornado in Manitoba, Canada, 2007.

It is not easy to determine Tornado strength and wind speed for two main reasons..

  1. as the exact location of a tornado is hard to predict it is very hard to have the required equipment in the right place at the right time;
  2. the force and strength of a tornado can destroy the equipment used for such analysis.

One of the devises used to measure wind speed within a tornado is called an anemometer. Doppler radar can also be used for this purpose.  When these measurements are successful, wind speed will be expressed against the Beaufort wind scale, ranging from 0 -12 in wind speed.

In 1971 Dr. Tetsuya Fijita developed a scale to rank Tornadoes, this scale ranges from 0 to 5 and is expressed as F0, F1, F2, F3, F4 and F5.  This ranking is retrospective, estimating wind speed and strength by examining the damage resulting from the Tornado.  This scale has been further refined in the US leading to the Enhanced Fijita Scale.

Do we get tornadoes in Ireland?

There are certain places around the world that are “tornado hot spots” such as many central states in the US, South Africa, Canada and Bangladesh.  However tornadoes can form almost anywhere and there are genuine cases of tornadoes in Ireland.  If we do get visited by a tornado it is usually small and brief.

Did you know…the earliest recorded tornadoes in Europe occurred in Rosdalla, near Kilbeggan, Co. Westmeath, on April 30th 1054?  

The only continent where tornadoes have not been recorded is the Antartic.

Did you know that the UK has the largest number of tornadoes per land mass?  Usually these tornadoes are small.

An experiment to try at home

Make a tornado in a bottle

You will need… two empty 2 Litre plastic bottles, an O-ring, strong duct tape, food colouring, glitter (optional). Alternatively use a tornado tube to replace the O-ring and duct tape.

What to do… Fill one 2 Litre bottle 2/3 full with water, add a few drops of food colouring and about a teaspoon of glitter, if using.  Place the O-ring on top of the bottle and tape into place with the duct tape, ensuring that you do not cover the whole.

Place the second (empty) bottle upside-down on top of the first one and tape securely into place.

If using the Tonrado tube you just twist the tube onto the first bottle 2/3 full with water and then upturn the second bottle and twist it securely into place into the other end of the tornado tube!

Once you are confident that the bottle is taped well enough to prevent any leakage you can turn the bottles upside-down so the one containing the coloured water is on top.  Turn the upper bottle in a circular motion about five times and then hold the bottles steady and see what happens.  You should a mini tornado forming in the bottle as the water drains.  if this does not work for you first time don’t worry, it make take a few attempts to get the knack of turning the bottle correctly.

So what is happening?… When we turn the bottle we get the water moving in a vertical, circular motion, just like the air in a tornado.  Once we stop turning the bottle and hold it steady the momentum created causes the water to keep turning and form into a “twister” inside the bottle.  The food colouring and glitter or only present to make the tornado more visible.

Alternatives:

You can change this around a little by adding different things to the water in the bottle and compare how the tornado looks;  Some suggestions include adding grains of pepper, small pieces of coloured paper or a squeeze of washing up liquid.  You can also try the experiment by adding some coloured oil to the water.

Challenge your friends and family:

You can change this into a fun challenge for your friends and family and help them learn about air pressure while too.  Give your friend the bottles all set up and ask them how long they think it will take them to get the water from the top bottle to the lower bottle, without squeezing the bottle.  Let them have a go and time it.  You can then ask if anyone else thinks they can beat that time and give them a go.  Everyone should get about the same time.

Now it is your turn, upturn the bottle and start the tornado and time how long the bottle takes to empty now!  They should be impressed to find out you have beaten their time!

So what is happening?
The hole in the O-ring allows air to pass into the bottle, producing a funnel of air within the column of twisting water.  The movement of air from one bottle to the other equalizes air pressure and allows the water escape into the lower bottle much more quickly.

Fun Friday – Rockets!

Fun Friday – Rockets!

 What is a rocket?


A rocket can describe any object that is propelled by fast moving liquid or gas!


Most rockets have a nose or cone at the top, a body that houses the fuel and fins at the base.
Rockets are usually powered by a chemical reaction (explosion) within the rocket itself. This chemical reaction requires both fuel and oxygen, both of which must be carried within the rocket.
The fuel and oxygen are called the propellant. There are two types of propellant, liquid propellant and solid propellant.
A solid propellant rocket is easier, simpler and cheaper to make.  However, these rockets are harder to guide and control as once the chemical reaction is started it is hard to stop.
A liquid propellant rocket is more complex and expensive to make but the burning of the liquid fuel is allot easier to control.
 photo credit: Flying Jenny via photopin cc

photo credit: Flying Jenny via photopin cc

A bit of history


The Chinese were the first to invent rockets when they started filling bamboo tubes with gunpowder and lighting them.
Rocket science really began with an English man called Isaac Newton. He formulated three laws to explain the physics of motion. These laws explain how rockets work!

Newton‛s 3rd Law of Motion states that every action has an equal and opposite reaction!


To understand this law think of a balloon full of air.
Demonstrating Newton's Law of Motion
Demonstrating Newton’s 3rd Law of Motion
If the balloon is untied and the air suddenly let out, it will escape the balloon with such force that it will propel the balloon in the opposite direction.
The force of the air leaving the balloon is called the thrust! The thrust that powers the launch of a rocket comes from the force of the gas (generated by the burning fuel) being ejected from the rear of the rocket!

The first liquid propellant rocket was launched in 1926 by an American called Robert Goddard.  He is considered the father of modern rocket science!

Rocket to the Moon


Neil Armstrong... photo credit: NASA's Marshall Space Flight Center via photopin cc
Neil Armstrong…
photo credit: NASA’s Marshall Space Flight Center
via photopin cc

In 1969 Neil Armstrong and Edwin Aldrin became the first men on the moon.

Armstrong and Aldrin traveled to the Moon in a rocket called Saturn V. It was 100 metres tall and weighed more than 3,000 tonnes! It was the largest rocket ever launched!

An Experiment to try at home


Make a stomp rocket!


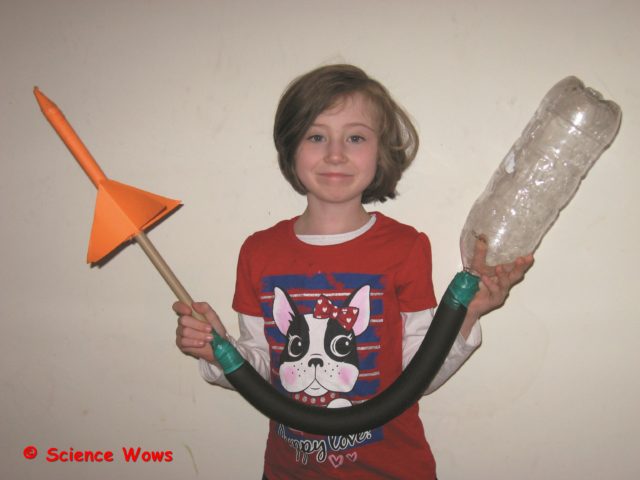
You will need… an empty 2L plastic bottle, paper, insulation tape, a 1/2 inch PVC pipe, a length of rubber tubing;

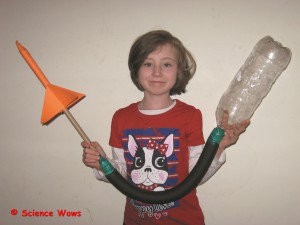
What to do… tape one end of the rubber tubing to the neck of the bottle and tape the other end to one end of the PVC pipe. Next make the body of the rocket by wrapping a piece of paper around the PVC pipe and secure it with tape at the overlap. Remove the rocket from the pipe. Cut four triangles of paper and attach to the body of  the rocket near one end; these are the rocket fins. Make a nose (cone shape) for the other end of the rocket and attach it with tape.  You are now ready to launch your rocket. (Best to do this outside!).
Sit your paper rocket over the PVC pipe and place the 2L bottle on the ground on its side. Stomp on the bottle and watch your rocket shoot off!
This is what your stomp rocket should look like

So what is happening?
… when you stomp on the bottle the air inside it shoots out through the tubing and the pipe, forcing the rocket off the end of the pipe! Just blow into the pipe to re-inflate to bottle to start again!

An Experiment to try at home


Make a teabag rocket

I have shared this one with you before, but for those of you who have not seen it I thought it would be a nice addition here…. a double for the Bank Holiday Weekend ;0)


If you try any of the experiments or have any comments or questions, please let me know in the comments below!


#FunFriday – learning about pressure!

I am pleased to be part of a Science and Nature theme at www.mykidstime.ie this week.  If you check out the links you can find some fun and fact filled articles on Sound, Light and Pressure along with some suggested experiments on each topic.

For today’s #FunFriday post I have shared one of the experiments on Pressure….hope you like it!


Have a great weekend and remember to drop me a comment if you try it or have any suggestions or questions!  I always love to hear from you!

Fun Friday – the coke and mentos experiment…with a bit of a twist!!

Fun Friday – the coke and mentos experiment…with a bit of a twist!!

It’s Friday so that can only mean one thing… another fun experiment to try, think you are going to like this one!

Nearly everyone seems to have heard of the classic “Coke & Mentos” experiment so we started with that…


You will need:


A 2 Litre bottle of coke (Diet coke is best as it doesn’t leave a sticky mess)
A packed of mentos mints
Basically you want to place the bottle of coke on the ground and add as many mentos to it at once as possible and then stand way back!!


How do you add the mentos?


  • Well you could pop one or two in quickly and it will work fairly well.
  • You could roll a piece of paper into a tube, sit it in the neck of the bottle and, gently pinch the base while you      fill it with mentos (up to ten is about right) and then let then all slip into the bottle when you release the pinch at the base!
  • There are devices specifically designed for delivering mentos into coke…. I bought this one from my local book  shop…
  • With this you insert the pin, load up with mentos, screw the devise onto the top of your bottle of coke and then pull the pin to release the mints into the coke.  There is even a little ring of plastic that drops down and covers the pin holes so all the coke goes upwards only.
  • You can make your own devise, like we did here (thanks Hubby)… does pretty much the same thing.
  • This is the one the I use for kids parties and events and it goes down a treat.  I don’t bother plugging the holes at the side so the coke fountains out the side as well as the top and it all adds to the effect!

This is what happens when you add the mentos to the coke

Fun, isn’t it, but I thought we could shake it up a little (pardon the pun) … so I added two seven year olds home from school with a temperature and needing a bit of a distraction…

The “R & D” Department

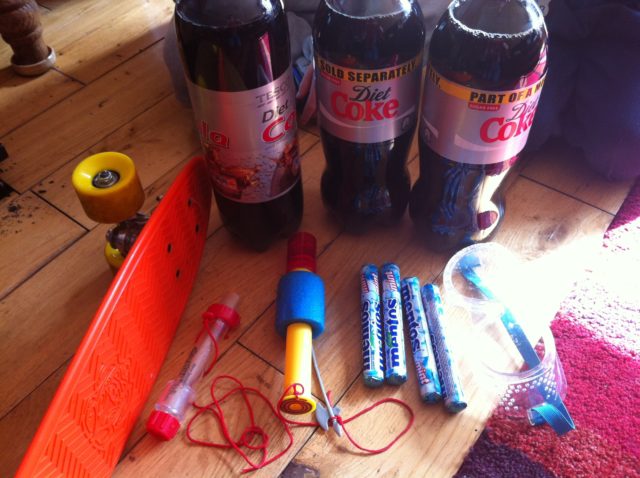
Then I gave them these… and asked them to come up with something fun!

The Props

And this is what they came up with…..(That’s two teddies tied to the front of the skate board!!)…


What do you think?  Not bad for two boys who had a temps of 38.5 an hour before….Oh the wonders of Calpol!

If you really want to scale things up you might get some inspiration from these guys (I love this video ;0)  )…
Coke and mentos powered car“.

So, do you want the bit of science behind the fun?...

Firstly, this is not thought to be a chemical reaction between the coke and the mentos.  It is most likely a physical reaction known as nucleation;  The coke is full of carbon dioxide gas, to give it it’s fizz;  the mentos are full of tiny little craters on the surface of the sweet, the carbon dioxide gas is able to form bubbles in these “craters” producings thousands of tiny bubbles all at once; these bubbles of gas are under a lot of pressure within the bottle of coke and so come shooting out the mouth of the bottle.  If anyone knows anything about Newton and his laws they will know that every reaction has an equal and opposite reaction (Newton’s third law of motion)… so the coke comes shooting out of the bottle in one direction and the force of this propels the skate board forward in the opposite direction.  PRETTY COOL!

Now it’s your turn to go off and try it out, if you come up with any of your own ideas and experiments I’d love to hear about it!

….HAVE FUN!

Fun Friday – the bouncy egg experiment!

Fun Friday – the bouncy egg experiment!

With all the excitement of the Easter bunny we forgot about our last egg- experiment…”the bouncy egg” so I thought it might be a fun one to start off this new blog spot… “Fun Friday”, where I will share a new experiment for you to try!

So firstly, this is how we set up the experiment….


We left the eggs in the vinegar for two days and then removed them and gently washed them in a bowl of water … unfortunately,  when I was washing the egg from the plain vinegar experiment, I burst it… Ooops!

No harm done as we substituted the other just to show you how the “bouncy” bit worked!


The result…(we had a very cautious scientist in the video but you can get quite a bounce out of the egg!)


What has happened to the shell?

The vinegar is an acid (acetic acid); it reacts with the calcium in the egg shell (calcium carbonate) and breaks it down, producing a gas as it does so.  You may have observed the gas as bubbles being formed, during the experiment.  Effectively the vinegar (acid) eats away at the egg shell until it is all gone.


The fluorescent bit

Then for a bit more fun I turned on a UV light!  Ok, I know, most of you don’t have one of these lying around at home but as I’m a Mad Scientist I do ;0) …and I was curious to know what would happen if we left it sit in fluorescent vinegar.

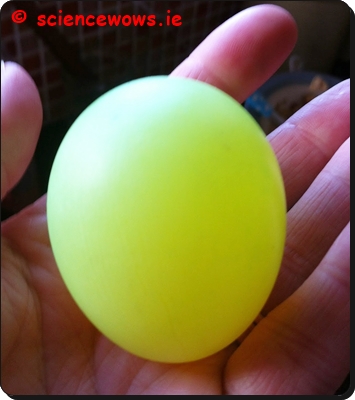
The results were Fab!! A fluorescent egg… check it out!  (I hope you can hear me in the video, sound is a bit low!)


So there you go, it worked better than I expected… the egg is completely fluorescent…. and bouncy, just for that extra bit of fun!


What is fluorescence?

In case you are wondering “WHAT IS FLUORESCENCE?”….let me explain… it is the emission of light from an object after it has absorbed light (or electromagnetic energy)…. usually the light absorbed has a short wavelength (in this case the UV light) and the light emitted has a longer wavelength.

When I shone the UV light onto the egg it “glowed”, even in daylight it  looks bright – just like a fluorescent pen!

The flourescent egg in daylight!
The fluorescent egg in daylight!