Fun Friday – the coke and mentos experiment…with a bit of a twist!!

Fun Friday – the coke and mentos experiment…with a bit of a twist!!

It’s Friday so that can only mean one thing… another fun experiment to try, think you are going to like this one!

Nearly everyone seems to have heard of the classic “Coke & Mentos” experiment so we started with that…


You will need:


A 2 Litre bottle of coke (Diet coke is best as it doesn’t leave a sticky mess)
A packed of mentos mints
Basically you want to place the bottle of coke on the ground and add as many mentos to it at once as possible and then stand way back!!


How do you add the mentos?


  • Well you could pop one or two in quickly and it will work fairly well.
  • You could roll a piece of paper into a tube, sit it in the neck of the bottle and, gently pinch the base while you      fill it with mentos (up to ten is about right) and then let then all slip into the bottle when you release the pinch at the base!
  • There are devices specifically designed for delivering mentos into coke…. I bought this one from my local book  shop…
  • With this you insert the pin, load up with mentos, screw the devise onto the top of your bottle of coke and then pull the pin to release the mints into the coke.  There is even a little ring of plastic that drops down and covers the pin holes so all the coke goes upwards only.
  • You can make your own devise, like we did here (thanks Hubby)… does pretty much the same thing.
  • This is the one the I use for kids parties and events and it goes down a treat.  I don’t bother plugging the holes at the side so the coke fountains out the side as well as the top and it all adds to the effect!

This is what happens when you add the mentos to the coke

Fun, isn’t it, but I thought we could shake it up a little (pardon the pun) … so I added two seven year olds home from school with a temperature and needing a bit of a distraction…

The “R & D” Department

Then I gave them these… and asked them to come up with something fun!

The Props

And this is what they came up with…..(That’s two teddies tied to the front of the skate board!!)…


What do you think?  Not bad for two boys who had a temps of 38.5 an hour before….Oh the wonders of Calpol!

If you really want to scale things up you might get some inspiration from these guys (I love this video ;0)  )…
Coke and mentos powered car“.

So, do you want the bit of science behind the fun?...

Firstly, this is not thought to be a chemical reaction between the coke and the mentos.  It is most likely a physical reaction known as nucleation;  The coke is full of carbon dioxide gas, to give it it’s fizz;  the mentos are full of tiny little craters on the surface of the sweet, the carbon dioxide gas is able to form bubbles in these “craters” producings thousands of tiny bubbles all at once; these bubbles of gas are under a lot of pressure within the bottle of coke and so come shooting out the mouth of the bottle.  If anyone knows anything about Newton and his laws they will know that every reaction has an equal and opposite reaction (Newton’s third law of motion)… so the coke comes shooting out of the bottle in one direction and the force of this propels the skate board forward in the opposite direction.  PRETTY COOL!

Now it’s your turn to go off and try it out, if you come up with any of your own ideas and experiments I’d love to hear about it!

….HAVE FUN!

Fun Friday – the bouncy egg experiment!

Fun Friday – the bouncy egg experiment!

With all the excitement of the Easter bunny we forgot about our last egg- experiment…”the bouncy egg” so I thought it might be a fun one to start off this new blog spot… “Fun Friday”, where I will share a new experiment for you to try!

So firstly, this is how we set up the experiment….


We left the eggs in the vinegar for two days and then removed them and gently washed them in a bowl of water … unfortunately,  when I was washing the egg from the plain vinegar experiment, I burst it… Ooops!

No harm done as we substituted the other just to show you how the “bouncy” bit worked!


The result…(we had a very cautious scientist in the video but you can get quite a bounce out of the egg!)


What has happened to the shell?

The vinegar is an acid (acetic acid); it reacts with the calcium in the egg shell (calcium carbonate) and breaks it down, producing a gas as it does so.  You may have observed the gas as bubbles being formed, during the experiment.  Effectively the vinegar (acid) eats away at the egg shell until it is all gone.


The fluorescent bit

Then for a bit more fun I turned on a UV light!  Ok, I know, most of you don’t have one of these lying around at home but as I’m a Mad Scientist I do ;0) …and I was curious to know what would happen if we left it sit in fluorescent vinegar.

The results were Fab!! A fluorescent egg… check it out!  (I hope you can hear me in the video, sound is a bit low!)


So there you go, it worked better than I expected… the egg is completely fluorescent…. and bouncy, just for that extra bit of fun!


What is fluorescence?

In case you are wondering “WHAT IS FLUORESCENCE?”….let me explain… it is the emission of light from an object after it has absorbed light (or electromagnetic energy)…. usually the light absorbed has a short wavelength (in this case the UV light) and the light emitted has a longer wavelength.

When I shone the UV light onto the egg it “glowed”, even in daylight it  looks bright – just like a fluorescent pen!

The flourescent egg in daylight!
The fluorescent egg in daylight!
"a can of worms"

"a can of worms"

My daughter asked me the other day if you cut an earthworm in two will it grow back again?  And will you have two worms?  Suddenly the whole family is in on the act with talk of geckos tails and why we can’t grow back a limb.  So to dispel a few myths and legends I thought I’d take a look for this weeks blog!

photo credit: schizoform via photopin cc


CAN YOU CUT A WORM IN HALF AND GET TWO WORMS?

The short answer is NO, so please don’t go trying!  It is true that the anatomy of the earthworm is very different to our own and if part of a worm is cut off, one part may survive.  The part that can survive is the “head” end. First let’s look at some of the unusual features of the inside of an earthworm.

ANATOMY OF AN EARTHWORM

Image credit: the weather report

The earthworm’s body is made up of segments called annuli.  These segments are stuck together just like a series of rings all lined up; each segment contains little bristle like hairs called setae and these allow the earthworm to move.  Earthworms are invertebrates meaning they don’t have any internal “boney” skeleton.

The earthworm does not have one heart as we do… it has FIVE!  These hearts help pump the blood through the worm’s body.  The worm needs oxygen just as we do but it has no lungs to fill with air, instead it has time pores on it’s skin which absorb oxygen from outside it’s body.  In order for this to happen the worm needs to keep it’s body moist, which is why they often feel a bit slimy.  Too much moisture though and the worms can drown; when it rains earthworms will move closer to the surface to prevent them from drowning!

Earthworms have a “head” and a “tail” but no eyes, ears or nose, so they can’t see, hear or smell as we can.  However their skin is covered with sensors for light and movement so thy can react to too much light (sunshine) or movement (rain falling or soil being disturbed by digging predator).

SO WHAT HAPPENS IF WE CUT AN EARTHWORM IN TWO?

Firstly, cutting up earthworms or any other creature is a very cruel thing so please don’t do it!  However if an earthworm’s body was to be cut into two parts its survival would depend on a number of factors:

  • Where in the body is the earthworm cut?  The earthworm would have a better chance of surviving if it’s body is cut closer to it’s tail end.  This end does not contain the vital organs.  Research by Dr. Thomas H. Morgan (1901) found that the head end of the earthworm may survive if the head end contained at least 16 segments.  It is possible that some of the tail end will even be regenerated. Some repair and regeneration is also possible at the head end, but usually only within a small number of segments.
  • Chance of infection:  the earthworm can pick up a bacterial infection just as we can.  If the earthworm can seal the cut or regenerate the segment before infection sets in it has a better chance of surviving.
  • The speed at which the earthworm heals:  regenerating part of the body would require an awful lot of energy for the earthworm, the quicker it can heal the quicker it can get back to eating and refuel its body.  If the earthworm does not have enough energy to complete the process it will die.

THE ROLE OF EARTHWORMS IN OUR GARDENS

The earthworm is often called “nature’s plough” as it digs through the soil , turning and rotating as it goes.  Earthworms are herbivores, they feed on leaves, root and other decaying plant matter. The earthworm deposits this matter through out the soil through its faeces.  An earthworm can eat up to one-third of its own body weight in a day!

The burrowing of earthworms helps the soil in two ways, it allows air and water into the soil through the channels it forms and it moves different layers and types of soil around, distributing nutrients and making the earth more fertile. Although earth worms often stay close to the surface of the soil they can burrow down as deep as two metres.

EXPERIMENT: Make your own wormery

A wormery (or worm farm) allows us observe the work that worms do within our soil.

  • Fill a large see-through container with alternative layers of soil and sand.
  • Put a layer of leaves and vegetation on the top.
  • Add enough water to keep the soil damp.
  • Collect some worms and add them to your wormery.
  • Cover the outside of your bowl with a large piece of card or paper to block out the light.
  • Put your wormery in a safe place and check on it every day – remember to keep adding some water to keep the soil moist.
  • You sould notice very quickly that the different layers of soil and sand are getting mixed together, the work of the industrious worms.
  • Remember to keep adding leaves and vegetation to the top layer and do let your worms safely back out into the garden once you have finished the experiment!

References:
Morgan, T. H., 1901. Regeneration. MacMillan, New York.
Chris Maynard, 2001. Backyard Science. Dorling Kindersley, US.

Further reading:

Earthworm facts and photos

"Mammy I hatched an egg!"

"Mammy I hatched an egg!"

As a mother of three young children I have had many charming moments that I feel I will remember forever…. first steps, first words, how they pronounced a certain word, the list is endless.  Memories to cherish for a lifetime…. and then I forget!! Startling but true!  More moments forgotten than remembered.  However, certain things will stay with me forever…. like when my daughter was five and we got chickens for the first time; she was beginning to learn the joy of finding and collecting the eggs each day.  One day she came to the back door with her bounty only to trip at the step and drop an egg.  The poor thing burst into tears with the dramatic exclamation…

……………………………….”MAMMY, I HATCHED AN EGG!

Image credit: Graham Ettridge

I will never forget that one!  It was hard to keep a straight face as I tried to console my sobbing child.  With all the egg activities and treats of the Easter it has certainly got us talking and thinking about eggs in this house, have you ever wondered about these marvels of nature?

WHAT IS AN EGG MADE OF?

Firstly, what exactly is an egg made of and what purpose does each component have?

Image source: http://www.exploratorium.edu

The shell:  the egg shell is made of calcium carbonate (95%), just like the enamel of our teeth (see previous post).  The other 5% of the egg shell is made up of calcium phosphate, magnesium carbonate and proteins. Although the shell gives the egg it’s strength you might be surprised to learn that it actually contains up to 7,000 tiny holes (pores);  these pores allow air and moisture pass through the shell.

The bloom/cuticle:  this is a protein coating outside the egg shell that acts as a natural barrier to bacteria and dust while reducing moisture loss.

The membrane:  there are two layers of membrane just inside the shell called the outer and inner membrane.  These membranes are like layers of skin and contain a protein called keratin, which is found in our own nails and hair!

The yoke: the yellow of the egg contained within a membrane called the vitelline membrane.  The yolk is the part of the egg that feeds the developing embryo – it has a very high protein content and is also rich in vitamins and minerals.  The yolk contains all of the egg’s fat and cholesterol.  The yolk is the primary food store for the developing chick.

The Albumen: this is the white of the egg; it has a high protein and water content. The albumen cushions the developing chick and keeps it moist while still in the egg.

The air cell: this is a pocket of air at the wide end of the egg, created between the outer and inner membrane.  The air cell gets bigger as the egg ages.

The chalazea:  these are spiral ropes of egg white that keep the yolk in place.

WHAT ANIMALS LAY EGGS?

Animals that lay eggs are called oviparous and they include birds, fish, amphibians, many reptiles, many arachnids and insects, some molluscs and two mammals – the echidna and the platypus.  Mammals that lay eggs are referred to as momtremes.

A BIT OF EGG EVOLUTION

The reptile is credited as inventing the egg shell, allowing their young to develop outside the mother’s body.  All true dinosaurs are reptiles and they all laid eggs.  The development of the egg shell has been a fundamental step in evolution as it allowed the embryo develop in self contained egg, without the requirement for water.  This removed animals’ dependence on water for breeding.

HOW IS AN EGG MADE?

In the hen it takes about 24 to 26 hours to produce an egg.  An egg is made from the inside out, starting with the yolk which is released from the hens ovary and moves through various parts of the body where another element of the egg is added until finally the finished egg reaches the vent and the egg is laid.  Within 30 minutes of laying an egg, the process will start for the hen all over again.

SO WHAT GOES ON INSIDE THE EGG?

The embryo has started to develop in the egg while it is still being made within the body of the hen.  Once the egg is laid the development of the embryo will only continue if conditions are correct.  If the temperature and humidity levels are right (temp approx 22oC, relative humidity 50% ) the development of the embryo will continue after the egg is laid.  This process continues for approximately 21 days.  If the egg is being hatched under a broody hen then the hen must turn the eggs regularly.

THE HATCHING PROCESS

Image credit: http://www.waldeneffect.org

Finally, when the time is right, its time to crack out and see the world.  The young of many egg-laying species are equipped with an egg tooth – a tooth like projection on the end of a beak (birds) or protruding from a jaw (reptiles) that helps the young animal tear through the membrane and break through the hard shell.  The egg tooth will eventually be reabsorbed or fall off.

Chicks and many other animals will hatch from the larger, rounded side of the egg.  That is because this is the end where the air cell is usually located.  Once the chick becomes too larger to receive enough oxygen from inside the egg it will use it’s egg tooth to pierce through the inner membrane into the air cell space.  This provides them with an extra supply of oxygen, just enough to sustain them as they continue the hatching process and crack and break though the egg shell.

We have been lucky enough to hatch a few broods of chicks over the years and it is always so exciting to meet the little ones for the first time.

This is chips – one of our brood!

So the only other question to be addressed is “which came first – the chicken or the egg?” but I think that’s a blog in itself, perhaps for another day!

AN EXPERIMENT TO TRY – HOW STRONG IS AN EGGSHELL?

You would be amazed how strong an egg shell is, although you might want to try this one over a sink!
Hold a raw egg between your thumb and first finger, holding at the two ends and then apply pressure – as hard as you can!  You might be surprised to notice that the egg doesn’t break!

If you repeat this but apply the pressure to the sides of the egg, things might not go so well and you might find yourself covered in egg!

So why is this?  Although an egg shell can be very fragile, it’s shape can provide it with great strength.  This is because the egg is dome shaped at the top and the bottom, just like a bridge structure;  this structure means that when you apply pressure the force is distributed evenly over the shell, not just on one point, hence the egg does not crack!

Further reading:
Anatomy of an egg
Eggshell
Poultry reproduction and incubation


"What’s for dinner?"

"What’s for dinner?"

I had planned a different blog for today but something funny happened yesterday evening and it has lead me down a different path!  My children commented on the nice smells from the kitchen and asked me what was for dinner…. “Carbonara” I replied.  The two oldest started to chat and whisper to themselves and I was bracing myself for some kind of “I don’t eat that” protest, but instead they just asked the question again…..”What did you say we are having Mum?”.  This time they heard my answer more clearly and the two of them cracked up laughing.  I couldn’t understand what was so funny until the laughter subsided and they told me…..

……………………………”WE THOUGHT YOU SAID CARBON DIOXIDE!”

This lead to a super nerdy science discussion over dinner about all things carbon dioxide like.  The little three year old was very proud of himself telling the others how he made carbon dioxide is his science video with mammy.  I have posted this one before but here is a link if you want to see the little Einstein in action!

I was surprised at how much the children knew and how interested they were about carbon dioxide. It is a simple but essential molecule that is an integral part of life on earth.

WHAT IS CARBON DIOXIDE?

Carbon Dioxide is a colourless gas.  It is made up of one carbon molecule bound to two oxygen atoms and is written as CO2.

Image source: explainscience.tumblr.com

WHERE DO WE FIND IT?

Although CO2 makes up less than .04 % of the gases in air it is crucial for the existance of life on earth as we know it.  Most of us know that we need oxygen to breath but plants need CO2 for their survival.  Green plants take CO2 in from the air and, using energy from the sun, break the molecule down into carbon (C) and two oxygen molecules (O2).     The carbon is kept by the plant and converted into starch and sugar.  This process is called Photosynthesis. The O2 is then released into the air by the plant.

Image source: nskamericas.com

So how does CO2 get replenished back into the air again?  This happens through a process called respiration!  Animals (including us humans) breath in O2 into our lungs and pass it to every cell in our bodies, through our bloodstream.  Our cells need this O2 to grow and to make the energy that powers the body.  During the body’s energy making process some of the carbon (from our food) is combined with the O2 forming CO2.  This is a waste product in our bodies so it is carried  back to the lungs to be released  into the air in our breath.

THE CARBON CYCLE

You can start to see a cycle emerging in all this; plants take in CO2 and convert it to food (sugar and starch) and O2.  The O2 gets released into the atmosphere.  Animals eat the plants and break down the sugar and starch, combining the C part released with O2 forming CO2 again!  This is called the carbon cycle.

Other things contribute to the carbon cycle:  Carbon is present in our bodies, in fact it is present in all animals, and plants, even rocks and dirt.  When bodies and plants die and rot this carbon ends up in the earth.  Over time some of this carbon get converted into fossil fuel such as coal, peat or oil.

When we burn these fossil fuels the carbon gets combines with oxygen releasing CO2 back into the atmosphere.

Image source: eschooltoday.com

Another step in this cycle is what the plants do at night! In the absence of sunlight plants switch to respiration, which means that, just like us, plants take in O2 and release CO2.

SUBLIMATION

CO2 exists as a gas at standard atmospheric temperature and pressure.   It will freeze into a solid state at temperatures below -78oC.  Solid CO2 is often called “dry ice”.  Dry ice can be used to create a fog or smoke effect and is a great ingredient in many fun science experiments. One of my favourites is making a big bubble using dry ice – I found this demo showing how (click the image below to link to the experiment).  If you ever do get some dry ice make sure you work with an adult supervising as it is VERY COLD!

An interesting fact about CO2 is that it does not exist in a liquid state at standard atmospheric pressure.    This means that under normal conditions dry ice will turn straight into a gas as it thaws (i.e. it does not go from solid to liquid to gas as most  substances do).  This process (solid straight to gas) is called sublimation.

GLOBAL WARMING

Some of the gases within our atmosphere are known as greenhouse gases as they absorb some of the sun’s heat that is reflected off the earth and stop it escaping into space.  CO2 is one of the greenhouse gases naturally present in our atmosphere.

These greenhouse gases maintain the earth’s temperature and this process is called the greenhouse effect.  If the level of a greenhouse gas changes significantly then we experience global climate change.  Global warming is the term used to describe an overall increase in global temperature due to an increase in greenhouse gases in our atmosphere.  Increased levels of CO2  are thought to be the main contribution to current global warming; These increases are primarily due to the large number of fossil fuels burned by humans and a vast and steady decline of trees globally.  Recent reports show a 30 percent increase in atmospheric CO2 levels since the dawn of the industrial revolution. While there is still much debate about the extend of global warming it would appear that consequences such as melting ice caps, rising water levels, global temperature increases, droughts and floods must, at least in part, be attributed to human actions!

Science has turned it’s attention to natural and renewable energies that provide some solutions to preventing and potentially reversing many of the current issues observed with global warming.

 Woody Harrelson 

AN EXPERIMENT TO TRY

Did you know that some types of fire extinguishers contain CO2?  You can make a “mini” fire extinguisher using just vinegar and breadsoda….. but I thought I would let the experts show you!

Further reference:

The carbon cycle
Living in the greenhouse

What’s your favourite colour?

What’s your favourite colour?

With three children in my house I get asked a lot of questions.  “Whys?” “What ifs?” “How comes?” are all part of the household daily dialogue.  Apparently, the average three year old asks at least 50 questions a day, although I reckon our resident three year old easily doubles this number!  I have noticed, of all the many questions my youngest asks, the most frequent one is….

……………………”MAMMY, WHAT’S YOUR FAVOURITE COLOUR?”

Your favourite colour seems to be one of the most defining aspect of your character when you are three years old!  Apart from your food preferences, I think it is the first main expression of personal preference.  The answer to this question can change at any given moment, but my three year old has been consistent with his favourite colour of yellow and I have to admit it really fits with his personality – but why do different things appear different colours?  I thought this week I could share a bit about the science of colour!

To understand the science behind colour we need to consider a bit about the science of light.  Light, either from the sun or a light bulb, may appear white to us, but it is actually made up of seven different coloursmixed together; these colours are red, orange, yellow, green, blue, indigo and violet.

Light is a type of energy called electromagnetic (EM) energy.  EM energy actually travels in waves, even though we see light as straight lines.  Light is the only type of EM energy that humans can see.  The wavelength of light determines it’s colour.  Light with the longest wavelength is red.  Light with the shortest wavelength is violet.

SO HOW DOES LIGHT RELATE TO COLOUR?

When we look at a red flower, what are we really seeing?  When light shines on an object, some of that light gets bounced back (reflected) off the object. The rest of the light gets absorbed by the object.  We see the object as the colour that it reflects.  So, when we are looking at a red flower we are looking at a flower that has absorbed all the light that is shining on it EXCEPT red light.  It is reflecting red light so that is the colour it appears to the human eye.  When an object appears white it is reflecting all the light shining on it and when an object appears black it is absorbing all the light and not reflecting any of it.


photo credit: -Reji via photopin cc

Scientist and artists sometimes look at colour in two very different ways; a scientist, observing light, will say that when you combine all the colours you end up with white (as discussed above).  An artist may see it all very differently, when we mix paints, for example, if we mix all the colours together we will end up with black!MIXING COLOURS

Image credit: www.gelighting.com

AN EXPERIMENT TO TRY:

You can try this yourself at home: use torches to create the coloured light…fix two different coloured pieces of cellophane (say red and green) over the end of two torches (one colour on each torch).  Shine the torches on a white wall or piece of paper.  When you overlap the red and green colours you should get yellow!  Now repeat with paint – mix red and green paint and what do you get?  Not yellow this time but brown!

HOW ARE RAINBOWS MADE?

When light travels through water it slows down and the light bends.  Different wavelengths of light bend to different degrees so the light gets split up into its component colours.  This is how rainbows are made…
when sunlight travels through drops of rain each colour of light bends to a different angle and the white light is separated out into it’s seven colours.

Photo credit: Eric Rolph

Did you ever notice that usually when you see a rainbow there is a second, more faint rainbow around the first one?  This second rainbow forms because some of the light is reflected off the back of the raindrop and bent a second time!  These secondary rainbows appear more dark as the light has been bent twice and the colours appear in reverse.  Check it out next time you see a rainbow!

HOW DO ANIMALS SEE COLOUR?

Some animals, such as cats and dogs, rely more on what they can hear or smell, than on the colours they see.  Their colour vision  would not be as good as humans.  Like Humans, many primates and marsupials have good colour vision that they may use to allow them to recognise prey or food.  Good colour vision is common among fruit eating animals as it allows them determine ripe from un-ripe fruit.
Many species of birds and fish have better colour vision than humans.  If you consider how elaborately colourful these animals often are then it is not too surprising to accept that they must be able to see these lovely displays of colour among their own species. Pigeons, for example are thought to be among the best animals at detecting colour and can see millions of different hues.
Reptiles and amphibians are thought to have colour vision equal to, or better than, that of humans.
Many insects can see light (colour) that is not visible to humans.  Bees, for example, can see Ultra Violet (UV) light.  This allows them to see UV patterns on flowers, leading them to the source of nectar.
Finally, a myth buster…do bulls really “seeing red”? Infact, no they don’t – they are colour blind.  The only reason that they charge the red cape is because it is fluttering in front of them!


Image credit www.valencia-property.com

Further Reading:

About Rainbows
Colour vision: One of nature’s wonders
Colour vision 
Reptile vision.

Pancakes- everything you didn’t realise you needed to know

Pancakes- everything you didn’t realise you needed to know

Ok, this week’s blog inspiration is slightly different to the norm.  Usually the idea comes from a question that a child has posed – this time there is a slight deviation, but only slight…. this weeks question came from an adult, but only in the chronological sense – as in fact he is classified as the biggest kid in our house- it was posed by my husband.  I was making pancakes the other morning (as I do every weekend on the request of my son) when my husband pondered aloud…”I wonder what the reason behind each ingredient is… and who made the first pancakes”.  As I was wondering what next to blog about the two ideas seemed to merge into one, and so was born the question…..

…..”WHAT IS THE SCIENCE BEHIND A GOOD PANCAKE, AND WHO’S IDEA WAS IT?”…..

Made in the name of science

A BIT OF HISTORY…

So, before I delve into the science behind the PERFECT PANCAKE, I thought I’d look at a little bit of history first.  The pancake as we know it seems to be accredited to the ancient Greeks, who in the 6th century started combining ground wheat with olive oil, honey and milk – and so the first pancake was born. If we expand on our concept of what a pancake really is we could look back further still to the process of making flat bread from ground grains and nuts mixed with milk or water, dating back to the neolithic period.

WHAT DO WE FIND IN A MODERN PANCAKE?

If we start within Europe a modern pancake can be classified as the round flat variety similar to the french crepe which contains some form of flour, and a liquid such as milk or water.  These flat pancakes usually also contain eggs and butter, and sugar in the sweetened variety.  Then we also have the thicker, fluffier pancakes that contain a raising agent, the name and variation of these include drop scones, Scottish pancakes and of course the well know buttermilk pancakes that are most common in America.

In our house the three most common pancakes made are the buttermilk pancakes, drop scones and the sweet flat crepe like ones.

WHAT GOES INTO A PANCAKE…

If we take a closer look at the primary ingredients we begin to see the complexity and science that really goes into making these delights:

FLOUR… this ingredient can be considered the backbone of the pancake as it provides structure
SUGAR….as well as adding the nice sweet taste and contributing to the colour of the pancake, sugar also keeps the pancake from getting to thick and stodgy
EGGS…. the proteins in the eggs add to the structure of the pancake and to the overall flavour
BUTTER/FAT… as with the sugar, the fats keep the pancake tender and prevent them becoming overly stodgy
MILK/WATER… the liquid portion of the pancake adds to the structure and is necessary for certain chemical reactions to occur
RAISING AGENT…  as the name suggests, these agents help raise the pancake, making them light and fluffy

You can of course find many varieties with their own local changes and substitutes, potatoes are commonly used as the starch ingredient instead of flour.

First lets take a look at the thin flat pancake or crepe… in this case we will assume they contain flour, milk and sugar.  From the above list we can now predict that the flour is the body of the pancake, it provides the structure, but how does it do this?  There are two proteins found in flour called glutenin and gliadin.  When moisture is added to flour (in this case the milk) these two proteins link together to form gluten.  Gluten is a “sticky” protein, this stickiness allows it to form a network and it is this that adds structure to the batter.  Finally we come to the sugar which caramelizes with the heat adding sweetness to the mix and contributing to the colour of the pancake as it cooks.  The sugar also prevents the pancakes becoming too thick and stodgy by reducing the amount of gluten produced.

Image credit: jbeancuisine.com

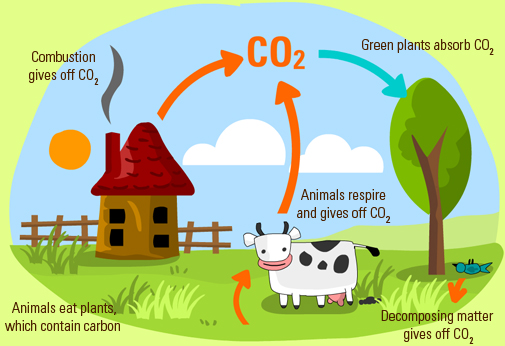
So now we move on to the thicker pancakes; the main difference with these is that they contain a raising agent!  Yeast is a biological raising agent used in some baking, it produces carbon dioxide gas while digesting sugar and this gas forms tiny bubbles within the yeast.  When heat is added during baking these bubbles expand making the bread/cake “rise”.

The main drawback with baking with yeast is that it requires time and who really wants to wait too long for their breakfast?  That is why, when using raising agents in pancake mixtures, we substitute the yeast for bread soda and/or yeast; but who can really tell what the difference is between these two?

Bread soda verse baking powder

Bread soda (also known as baking soda) is pure sodium bicarbonate. Baking powder contains bread soda but it also contains a powdered acid (usually cream of tartar – potassium bitartrate).  Bread soda is an alkali/base and will therefore react with an acid (such as the buttermilk used in pancake batter) producing salt, water and carbon dioxide gas…

BREAD SODA + ACID —–> SALT + H20 + CO2

This carbon dioxide gas gets trapped in thousands of tiny bubbles within the gluten making the pancake batter rise on cooking into light and fluffy wonders!  (The same process as with the yeast but a lot quicker).

The baking powder has the added advantage of having the acid already present, so once a liquid is added the dry acid and alkali can react in the same manner as above.

So now that we are starting to understand the science of it all how do we use this knowledge to make the best pancakes.  before we jump into this one we first have to consider the science of flavour and odour!

THE SCIENCE OF FLAVOUR

The Maillard reaction describes a chemical reaction requiring certain amino acids and sugars and the addition of heat to produce the molecules responsible for the odours and flavour of food.  Now there is a science worth studying!

MAILLARD REACTION:  Amino Acids + sugar + heat —-> flavour and odour

So what does this have to do with our pancakes?  Well Maillard reactions work best in alkali conditions so bread soda is a definite plus is making golden tasty treats.  HOWEVER, add too much bread soda and the pancake will brown too quickly and will have an acrid burnt flavour, not to mention the unpleasant taste produced from the left over breadsoda.  It is trickier than we think and yes, of course, someone has already done the science bit for us to work out the ideal amount of bread soda required.

WE ARE HUNGRY – SPEED IT UP

You will be glad to hear that speed is recommended when preping pancakes;  Although it is good to allow the batter sit for a few minutes to allow the gluten to “relax” (build up a sufficient network) it has been shown that if left too long the bubbles will have burst and the pancakes will be flat and dense once cooked.

SCIENCE IN MY KITCHEN

I decided I had to try some of this pancake science out for myself so turned to my original buttermilk pancake mix from the wonderful NIGELLA LAWSON.  This recipe actually uses both baking soda and baking powder (I omitted the banana).  I decided to test out two theories…

1.  Does the amount of bread soda determine the colour and flavour of the pancake?
2.  Does the length of time the batter is left standing really make that much of a difference?

To keep it simple, I decided to keep everything else (including the amount of baking powder) constant.
So I donned my apron in favour of my labcoat and I set to work.  I prepared the basic batter mix excluding the addition of bread soda.  To digress for a moment, I also followed another golden pancake rule – not to over-mix the batter (a few small lumps of flour allows it better absorb the liquid and produce gluten).

My “slighlty lumpy” pancake batter

I dived my basic batter mix between four bowls and then added different amounts of bread soda to each (the first bowl had no bread soda, the second had half the recommended amount, the third had the recommended amount and the fourth had double what was recommended!).  Then I let the batter sit for five minutes before cooking the pancakes.

Here are my results…  the pancake on the top left had no bread soda, top right had 1/2 the recommended amount, bottom left had the ideal amount and bottom right had twice the recommended amount.  You can see how the pancake gets darker with the addition of more bread soda, with the last one being just a bit too dark.  The taste test revealed that the one on the bottom left had the best taste (and texture) and that the one with the most bread soda had that unpleasant taste of bread soda!

To investigate my second question I left the same pancake batters sit for two hours before cooking them.  As you can see the pancakes cooked after two hours were indeed a lot less light and fluffy and were a bit soggy inside!

The batter for these was left sit for five minutes
The batter for these was left two hours

WHY ARE PANCAKES ROUND?

Pancakes are round for two main reasons: gravity and surface tension.  Assuming that the pancake pan is flat then once the batter is added gravity will pull on all parts of the batter uniformly in all directions, pulling it out into a round shape.  Surface tension pulls evenly on the edges keeping them restrained into the round shape.

THE SCIENCE OF FLIPPING A PANCAKE…

Would you believe that someone has actually looked into the exact science of pancake flipping?  How cool is that ….

According to University Professor of Mathematics Frank Smith, the simple mathematical formula for the perfect flip is: L = 4 H /P- D / 2
(L = hand distance from inner edge of the pancake / H = height of flip / D = diameter of pancake)

If that sounds a bit too complicated check this out …

Dr. Tungate, a senior physics lecturer at Birmingham University, found that “a pancake should be flipped into the air at a speed of 10 miles-an-hour, which means that it takes less than .5 of a second to reach the top of its trajectory.”

AND THEN THERE IS THE SCIENCE OF WHAT YOU ACTUALLY PUT ON YOUR PANCAKES…

… but I think that is a whole other blog! So whatever toppings you choose I hope you enjoy your pancakes today!!

All that science made me hungry!

And if you still want more….HERE IS AN EXPERIMENT YOU CAN TRY….

Inflating balloons… This experiment shows two fun ways of inflating balloons, kids will love it, it’s easy to do and it teaches some kitchen science… like the difference between using yeast and bread soda as raising agents in baking!

Further reading:
Pancakes served with a side of science.
Celebrate your pancakes with a side of science.
Baking powder verses baking soda.
The history of pancakes.